There are a variety of tables stored in the project database (.SQLite file) which act as look-up libraries for your data, your maps, legends, filtering processes, etc. Some of these define data types, such as lithology material names or stratigraphy formation names; these tie directly to the downhole well data that you enter, and only one of each of these "types" tables can be created.
Other reference tables, however, are more general and you can create and maintain many versions of these for different maps, models, logs, etc. For example, you could create separate, customized, color-contour tables for all of the I-Data (geochemistry) tracks in your project database, or separate point-map scaling tables for a detailed production datasheet in the Utilities.
See Creating a New Project for the options that are available for bringing in tables from another RockWorks database when you create a new borehole project.
! In earlier versions of RockWorks, these tables were stored in separate text files with a .TAB file name extension. Now that they are stored in the project database, there are tools for importing (and exporting) the .TAB versions.
Summary of Miscellaneous Project Tables
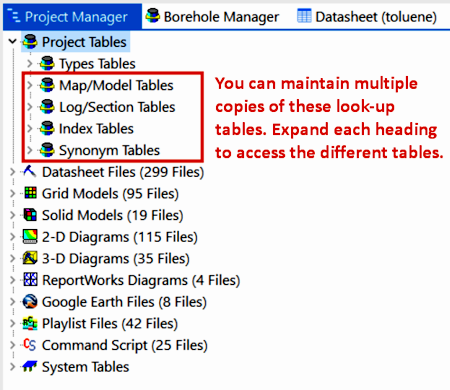
- Expand the Project Tables heading in the Project Manager.
- Expand the sub-heading for the kind of table you're working with.
- Map/Model Tables: Contour lines, color-contours, point-map scaling, gridding settings, polygon tables
- Log/Section Tables: Profile locations, cross-section locations, fence panel locations, log bargraph scaling
- Index Tables: Customized legends for colors, symbols, patterns, line types
- Synonym Tables: A substitution table for the Datasheet | Edit | Columns | Translate program.
- Expand the table's heading.
- Double-click on the name of the table you wish to open. It will be displayed in the table editor.
(See the list of the tables, below, for links to topics describing their layout.)
Follow these steps if you want to create a new table - if none already exists or if you need to create an additional one.
- Access the table grouping as described in the above topic.
- Right-click on the heading of the type of table you wish to create. For example, to create a new Polygon Table, right-click on the Polygon Table heading in the Project Manager. (You can maintain multiple copies of all of these tables.)

- Select the Add a Table option in the pop-up menu.
- Enter a name for the new table and click OK. The table names can be up to 50 characters including spaces.
A new, blank table will be displayed in the editor.
- Enter/import the data for the table.
Data is saved as you enter it. See the list of the tables, below, for links to topics describing their layout.
- Follow the steps for Opening an Existing Table, above.
- When the table is displayed, select File | Save As from the table editor menu.
- Enter the name for the new table and click OK. This new table will now be displayed in the Project Manager.
- Edit the data as you wish.
- Follow the steps for Creating a New Table, above, if you want to create an entirely new table; follow the steps for Opening an Existing Table if you wish to append the external data to an existing table.
- When the blank or existing table is displayed, select the File | Import option from the table editor menu.
- Set the Import Source to Import from a Project.
- Project to Import From: This will default to the current project folder. The tables in the current database will be listed here. If you need to open a different folder to access the external file, click the small open-folder button to the right, and browse for that project folder name.
- Click on the name of the table to be imported.
- Append to current table: Check this box if you wish to append the contents to the current listing.
- Click the Import button.
RockWorks will read the contents of the selected table and populate the table with its contents.
RockWorks14 (and earlier versions of RockWorks) stored these tables in ASCII files, typically with a ".TAB" file name extension. Follow these steps to import an ASCII ".TXT" or ".TAB" file into the database.
! These files can be either space- or tab-delimited; RockWorks will be able to determine automatically the column delimiter.
- Follow the steps for Creating a New Table, above, if you want to create an entirely new table; follow the steps for Opening an Existing Table if you wish to append the external data to an existing table.
- When the blank or existing table is displayed, select the File | Import option from the table editor menu.
- Project to Import From: This will default to the current project folder. If you need to open a different folder to access the external file, click the small open-folder button to the right, and browse for that folder name.
- Set the Import Source to Import from a File.
- RockWorks will list all of the files with the extension ".TAB" or ".TXT" in the Tables list to the right.
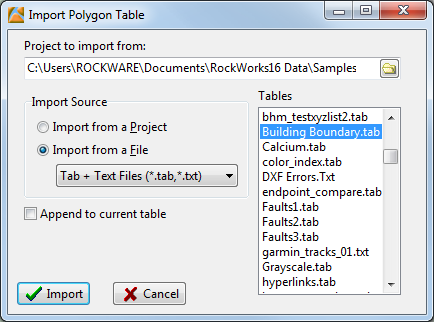
- Click on the name of the file to be imported.
- Append to current table: Check this box if you wish to append the contents to the current listing.
- Click the Import button.
RockWorks will read the contents of the external text file and populate the table with its contents.
- Follow the steps for Opening an Existing Table, above.
- Select the File | Export option from the table editor menu.
- Browse to the folder where the TAB file is to be created.
- Enter a name for the TAB file, and click the Save button.
Click on a link below to read more information about the contents and use of these tables
 Back to Tables summary

RockWare home page