Project Folder | Create New Project
Each project you work on in RockWorks must have its own folder, called a Project Folder, on your computer. The Project Folder is where the project database (.SQLite)* of the same name is created, for storage of borehole data or (if you're working in the Datasheet) of miscellaneous project files. Graphic files, grid and solid models, and other accessory files for that project should also be saved in the Project Folder.
Conceptually, a project should contain data for a specific geographic location. See RockWorks Projects - Overview for more information.
Step-by-Step Summary
What's Next
Follow these steps to create a new project folder:
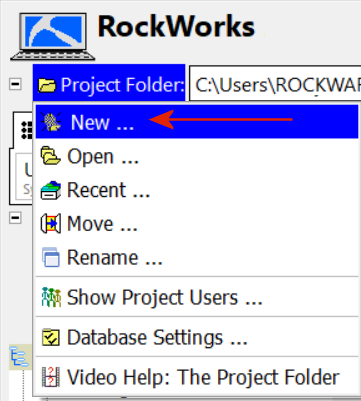
- Click on the Project Folder menu button in the upper-left corner of the RockWorks program window.
- Select the New option from the Project Folder menu.
RockWorks will display a Create New Project Wizard window.
- Set up the project. Start with the Folder tab and click the Next button (at the bottom) to advance through the new-project screens. Click on a link below for more information about these important new-project settings.
- Folder tab: Set up the project folder options.
- Database Settings tab: Set up the advanced database settings. (Optional)
- Template tab: Choose the existing project to use as a template for this one. (Optional)
- Coordinates tab: Set up the project coordinate projection and units. If unknown, you can choose a local coordinate system.
- Click the Finish button at the bottom of the Create New Project window to proceed using the established settings.
The program will:
- Create a new .SQLite file (SQLite database) in the selected folder, assigning the .SQLite file the same name as the project folder.*
- Initialize the database using factory default "data dictionaries", or those from a previous project, as requested. These data dictionaries are stored in the "System" folder inside the project folder. They define the layout of the project database.
- Initialize the project database with blank (factory-default) tables, or with existing data from a previous project, as requested.
- Initialize the program's menus with factory defaults or with settings from a previous project, as requested. (It stores these configurations in a "menus.ini" file in the "System" sub-folder.)
- Set up the project for the specified coordinate projection and units.
- Open the new project.
* RockWorks20 defaults to a local SQLite database (.SQLite). You can choose a local Microsoft Access (.MDB) if you prefer. The Advanced level of RockWorks also offers the ability to use Microsoft’s SQL Server as the data server. MS SQL databases are not typically stored in the project folder, but in the defined server location. The sequence of steps listed here will differ for SQL Server and other non-local databases.
 Back to RockWorks Projects - Overview

RockWare home page