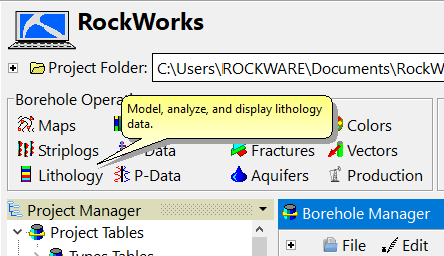
RockWorks | Setup | Preferences
The Preferences menu option (available in the Setup button at the top of the main program window) is used to establish some general operational settings for the program. These are global settings that will not change as you work in different projects. Click on a topic below to jump to its description.
On Startup
User Interface
Borehole Orientations
Datasheet
Decimal Places
Diagram Scaling
Help System
Image Format
New Projects
PLSS Land Grid
Project Manager
RockPlot
Updates
Warnings
Miscellaneous
On Startup - Use these settings to determine program behavior on startup. (Changes will take effect the next time that RockWorks is launched.)
- Prompt for Project Folder: Insert a check here if you would like to be prompted on program startup for the name of the project to be loaded. By default this is not checked, and when the program is launched it will simply load the last-used project or, if you're new to the program, the tutorial "Samples" folder.
! Note that you can change the current Project Folder at any time while you are working with the program. See Creating a New Project Folder or Opening an Existing Project Folder for information.
- Start in "Root" folder: Choose this option for the program to display a typical browse window, showing the folders in the default \My Documents\RockWorks Data folder.
- Display List of Recent Projects: Choose this option if you prefer to see a list of recently-accessed project folders.
User Interface - Use these settings to adjust the program display.
- Pull-Down Menu Item Captions
- Choose Short for the pull-down menus to display short versions of the program names, such as "3D Striplogs".
- Choose Long for the menus to display longer versions of the program names, such as "Multiple 3D Striplogs".
- Show Hints: Check this box if you want RockWorks to display program option hints, which look like this:
- Delay: This defines the delay in milliseconds between pointing to a menu item and display of the hint. If you want to keep the hints but don't want them to be displayed as you casually move your mouse around the program screen, increase the delay.
- Duration: Use this setting to define how long, in milliseconds, the hint will be displayed.
Borehole Orientations - Use these settings to fine-tune how the program converts depths to XYZ coordinates and handles "noisy" surveys.
- Smooth Azimuths: Check this box to smooth the bearings using a moving average.
- Depth Filter Size: Type in the distance, in your project units, within which the moving average filter is to be applied.
- Use Inclination Cutoff: Check this box if you want to restrict the smoothing to a specific inclination range.
- Maximum Angle from Vertical: Type in the maximum angle tolerance from vertical within which the smoothing is to take place.
-
The effects of these tools are most dramatic when the items that are being plotted are offset from the log axis as shown by the diagram below.

- Adjust Near Vertical Azimuths: Insert a check in this box to reduce noisy azimuth (bearing) data which can be a problem with automated collection tools.
- Maximum angle from vertical: Into this prompt type in the maximum angle tolerance from vertical for survey points to be modified. For example, if you are only concerned with survey points that are vertical downward plus or minus 5 degrees, you would enter: 5
- Replacement Azimuth
- Automatic: Choose this option to have the program replace the bearings for portions of the well within the maximum angle with the last azimuth.
- Manual: Choose this option to type in the replacement azimuth.
- Borehole Deviation - Computational Resolution:
First, some background: For non-vertical holes, RockWorks interpolates XYZ points at regular intervals down the hole based on the downhole azimuth/inclination data in order to create a 3-dimensional polyline. This calculation is performed once unless the downhole survey data is changed or if the user selects one of the Borehole Manager | Edit | Calculate XYZ Values options. This 3D polyline is then used to determine the xyz coordinates for all of your downhole data by performing a weighted average of the closest polyline point above and the closest polyline point below the depth in question.
In previous versions, the spacing between the points within the 3D polyline was hardwired. Now you can adjust this resolution using these settings.
- Automatic: Choose this option to have the polyline resolution based the Z (elevation) range of the project and a user-defined divisor.
- Project Elevation Range Divisor: Type in the value of the divisor used to determine the spacing interval for the deviation polyline. The program will divide the project elevation range (specified through the Dimensions tab) by the divisor to determine the spacing interval.
- Manual: Choose this option to have the polyline resolution based on a distance value.
- Type into this prompt the number of points per borehole for the deviation polyline.
Datasheet
- Font: Click on this item to select the font to be used in the RockWorks datasheet. You can also specify font color and size. This will not take effect until the next time you start up the program.
- Load Last Datasheet on Startup: Insert a check here if the program is to load into the Datasheet, automatically on startup, the last datasheet file with which you were working. This is a handy time-saver if you're working with the same file over an extended period of time. This option is enabled by default.
! If a file has been loaded into the datasheet editor and you then change to a different project folder and close the program, the program will not attempt to automatically load the file into the datasheet when the program is restarted.
- Include Column Titles when Optimizing Column Widths: The Datasheet editor's View | Optimize menu option is used to adjust the widths of all of the datasheet columns automatically for optimal viewing.
- If this option is not checked, the widths will be based on the data only.
- If this option is checked, the widths will be based on the data and the column headings.
- Lateral Cell Margins (pixels): This setting adds the specified pixel margins on either side of the datasheet cells when optimizing column widths.
Decimal Places - Use these settings to define the number of decimal places for coordinates and other real numbers in the program.
- Coordinates Expressed in Feet: Select the number of decimal places for program coordinates representing feet.
- Coordinates Expressed in Meters: Select the number of decimal places for program coordinates representing meters.
- Coordinates Expressed in Decimal Degrees: Select the number of decimal places for program coordinates representing decimal degrees. Refer to the examples in the screen for recommendations.
- All Other Real Numbers: Select the number of decimal places for display of other real numbers in the database.
Diagram Scaling - Use this option to define how the program will scale the items within graphic diagrams.
- Based on Project Dimensions: This is the default setting. This tells the program to dimension diagram items (such as log widths, text sizes, etc.) as a percent of the XYZ range of the project. You can see the XYZ extents for the project in the Project Dimensions pane's Statistics window.
Example: Let's say your project's XYZ extents are 1000 feet. If your log stratigraphy columns are set to a size of "2" (representing percent), then they'll be displayed at an actual diagram width of 20 feet. When displayed in RockPlot2D you could use the Measure | Distance tool to actually measure the item's actual diagram width.
The benefit of this method is that the relative sizes of these diagram items should work well for projects of many different sizes.
- Based on Custom Size: Choose this item if you want to manually establish a reference size.
- Custom Size: Enter the size upon which graphic items are to be scaled. For example, if you set the size to "500", and your log stratigraphy columns were set to a size of "2", then they'll be displayed at an actual diagram width of 10 feet.
Help System - Use these settings to tell RockWorks the location from which it should load the Help messages. Help messages are displayed within the "Instructions" pane in the program windows, and via the Help | Contents menu option.
- The Internet (Default) Strongly Recommended: Choose this option if the Help topics are to be loaded from the RockWare web server. Of course, this requires that you have connection to the internet to be able to read the Help topics.
- Designated Folder On This Machine Or Network Server: Choose this option if the program should read the Help topics from a local folder. This will require approximately 120 MB of disk space.
- Folder: Browse for the name of the folder where the zipped Help topics (installed with the program) are to be unzipped for local access. Be sure to choose a folder where you have read and write permissions. We recommend the "C:\ProgramData\RockWare\RockWorks20x" folder on your local computer. A "WebHelp" subfolder will be created inside the folder you specify.
Image Format - Use this setting to choose the default file type for graphic exports. Choose from one of the displayed raster image formats.
New Projects - If you aren't using the default SQLite database type or the assumed settings, you can use these settings to streamline the process of setting up a new project database (SQL Server, etc.). These options are displayed in the New-Project window under the advanced settings; if you set them up here they'll become defaults when you create your next new project.
! Don't edit these unless you need to customize the process of creating a new database because of a different provider (SQL Server) or specific login requirements.
- Display DB Login Prompt: Insert a check here if your database is set up to require a login and password and if, when creating or opening a project, you wish to be prompted to enter the login information. Leave this unchecked if your SQL Server is configured to pass through your network login (Windows NT Integrated Security) and the database login prompt does not need to be shown.
- Default DB Server: Defines the location of the database server.
- Default Data Provider: RockWorks defaults to SQLite. You can use this prompt to choose a different default database provider (SQL Server, etc.).
PLSS Land Grid - Use these settings to tell the program which library of Range/Township/Section locations you wish to use for converting PLSS descriptions to XY coordinates, or for creating section or lease maps.
- Use RockWare's Land Grid Files: Choose this option if you would like to use the default RockWare LandBase for spotting wells and creating maps. The hardwired location for this collection of files will be shown below this option. Please see the RockWare LandBase topic for details.
- Use Imported Land Grid Files: Choose this option if you have imported commercial land grid data and created a custom library of PLSS information. You should also choose this option if you have created a custom library which is a subset of the large RockWare LandBase. Please refer to the Landgrid Table documentation for details.
- Folder for Imported Land Grid Files: Click here to browse for the name of the folder where you created the custom look-up tables.
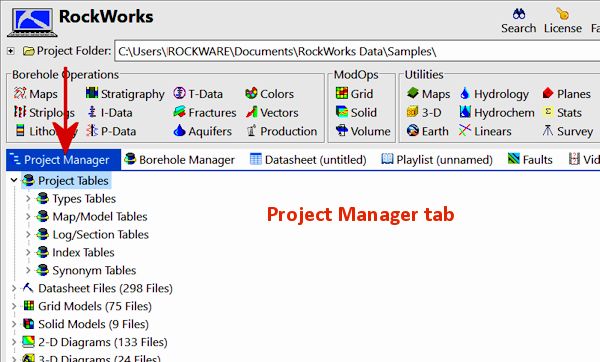
Project Manager: The Project Manager is a dockable/undockable program tab where you can see an organized list of files and tables in the current project folder and database. Click here to set up how the Project Manager pane will be displayed.
- Monitor Project Folder: Check this box if you want RockWorks to automatically refresh the contents of the Project Manager.
! If you are using RockWorks on a Macintosh computer which is running a Windows OS, you may need to turn this off.
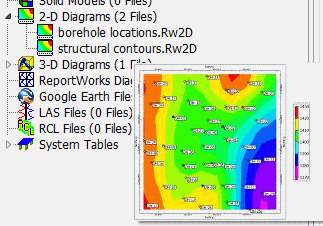
- Create 2D Previews: Insert a check in this box if you wish to save a "preview" of each RockPlot2D (".Rw2D") file that you save in RockPlot2D, for display in the Project Manager pane along the left edge of the program window.
- Size (% of original): Use this setting to define how big the previews should be, as a percent of the size of the original graphic image (default = 25%). Note that the Create 2D Previews option must be checked if you want to see previews in the Project Manager, as established above.
- Show Project Manager Preview Images: Insert a check here to display graphic file previews as you hover the mouse over the file name. (See also Create 2D Previews, above - that setting must be activated in order for the graphic previews to be available.)
RockPlot
- RockPlot2D
- Enable Anti Aliasing: Use this checkbox to turn on/off anti-aliasing of fonts in RockPlot2D. Anti aliasing smooths the appearance of text on the screen and in raster exports but can make very (000) small text appear fuzzy. With anti aliasing disabled small text may appear pixelated. This also applies to RockPlot2D files displayed within ReportWorks as well as all printing and exporting to raster files.
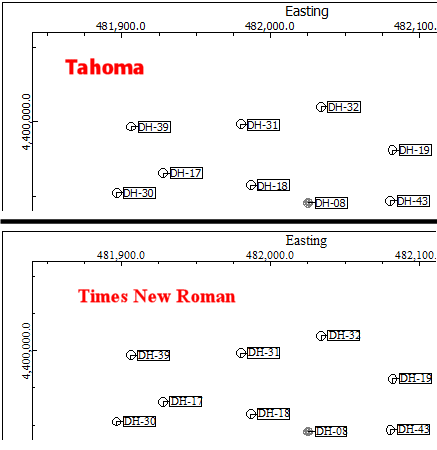
- Default Font: Use this setting to establish the font style that will be used in your 2D graphics. Compare the examples below. Note that once the graphic image has been created and is displayed in RockPlot2D, you can change individual item fonts there, as well. See Editing Text Attributes for more information.
-
- RockPlot3D
- OpenGL Driver: RockPlot3D uses OpenGL to render the 3D scenes. Support of OpenGL is offered on computers in two ways - hardware (your video card supports OpenGL) and software. How do you know if you have a video card that supports OpenGL? The easiest way is to access the RockPlot3D Help menu, click on the About item, and then click on the OpenGL Troubleshooting tab displayed there. The window will display the driver that is installed on your system.
- Use Hardware: If there is a driver installed, its manufacturer and renderer and version will be listed. You should opt for the Use Hardware Acceleration setting if your computer contains a good card with a driver. You will be able to display and manipulate bigger images better
- Use Software: If no driver is installed (typical of many laptops) you may see something like Driver Vendor: Microsoft Corporation, Driver Renderer: GDI Generic. In this situation, RockPlot3D will make use of RAM memory to provide the umph to drive the graphics. You should choose the Use Software Acceleration setting. For this to work effectively, we recommend that you have plenty of RAM and a faster processor.
- Do not show warning when potentially overwriting tables: When a RockPlot3D scene is generated by RockWorks, some accessory database information (such as the Stratigraphy table) is included in the .Rw3D file so that legends and other annotations can be added quickly. If you then annotate two .Rw3D files together, you will be asked whether the original tables are to be overwritten with the appended ones. If these warnings are tiresome, you can turn them off by checking this box.
Updates
- Check RockWare Website for Newer Version on Startup: Insert a check here to have RockWorks check, each time it's started up, whether there's a newer version on the RockWare web site, and display an alert if there is. If desired, you can choose to save the latest installation program to your local computer. Once the download is complete you can then run the installation program to re-install RockWorks.
-
! Note that updates are not available to you if your maintenance has expired.
Both the initial version check, as well as the download, are done on separate threads, so the program should be able to launch even if it's trying to check the RockWare site for update information, and should run while the download is done in the background.
- Check RockWare Website for Maintenance Renewal on Startup: Check this box if you want RockWorks to check the RockWare server on startup to see if you have extended the maintenance on your license, and update the license status accordingly.
-
Note that you can also force the maintenance update in the Licensing window.
- Proxy Settings: If you use a proxy server to access the internet you can, if needed, specify manual settings for the proxy.
-
- Resolve all host names locally: Use no proxy, therefore all host names are resolved locally either with the machine's 'Hosts' file or the domain's DNS server.
- Use System Settings: By default RockWorks will use your system defaults.
- Use Manual Settings: RockWorks checks for updates and downloads the new installation (and any other Help menu downloads you may choose) using the http protocol on port 80. If you have to enter a user name and/or password for downloads via http, you can try using these Manual Settings to bypass the Proxy.
- Proxy address: Enter the address for your proxy server. Since Rockworks is only looking at http protocol, the proxy server address can be entered as "http=http://my_http_proxy" or more simply by the server name "my_http_proxy".
- Proxy ignore list: If allowed, enter www.rockware.com to have the proxy server ignore this address and allow access to the RockWare website. You may need to set this up on the system level. For more information on the proxy settings (address and ignore list) see the Microsoft document Enabling Internet Functionality.
- Proxy UserName: Enter your user name here.
- Proxy Password: Enter your username's password in this prompt.
-
! If your proxy server is blocking access to the RockWare website for update information and downloads, and the manual settings are not permitted by your organization or they aren't working properly, you should deactivate the "check RockWare website for newer version on startup" option. You can always refer to our user forum for postings on the availability of new builds of the program, and download them manually from our website.
Warnings
- Warn User If…
- No Points Located within Project Area...
- When Creating Grids and Solids: If checked, the program will warn you if there are no data points being sent to the gridding or solid modeling routines, typically if your project dimensions are outside your data, or if you’ve turned on data filters that are removing everything.
- When Modeling a Stratigraphic Horizon: If checked the program will notify you if there are no points for a particular stratigraphic top or base. Usually this should be left on, but can be turned off if you have a formation defined in the Stratigraphy Types table for which you have not yet entered any data, and don’t want to be repeatedly warned about missing data.
- Grid is Missing when creating stratigraphic models: If checked the program will notify you if a grid model is missing as it builds your stratigraphy model. As above, this should probably be left on, but can be turned off if you have a formation defined in the Stratigraphy Types table for which you have not yet entered any data, and don’t want to be repeatedly warned about missing surface models.
- File not saved: When this setting is activated, the program will display a "Do-you-want-to-save?" reminder when you close a RockPlot2D or RockPlot3D graphics window and the image has not been saved (the image window reads "Untitled" in the title bar), or if editing changes have not been saved. We recommend that you leave this setting on.
- Borehole has zero depth: Turning off this warning (which is turned on by default) will deactivate the warning message that is normally displayed whenever a borehole with TD=0 is encountered (e.g. drawing a cross-section). Once disabled, the program will still attempt to plot the borehole, meaning that just the borehole title will be displayed (assuming that you've elected to plot the borehole title). This can be helpful for users who still want to display the titles for planned boreholes or for boreholes which don't yet have any downhole data. Turning off the Borehole Has Zero Depth warning (unchecking the setting) also eliminates the interrupting messages when processing large, low-quality datasets in which that are many un-populated boreholes.
- Available Memory Drops Below a User-Defined Level: Check this box to tell the program to display a warning if available memory drops below a specified percent of total memory.
- Memory Warnng Level (% of Available Memory): Enter the memory level at which the warning should be triggered.
Misc.
- Automatically Resample Grids: Check this option to allow RockWorks to temporarily resample without prompting the user when two data types do not have the same resolution. By “temporarily”, we mean that the initial grid will not be modified. Instead, the temporary, resampled grid will be created in order to complete the current operation. Click the question mark to read more about the theory behind this option.
- User Prefix to use when Naming Files: Use this option to define, for the current user, a unique text prefix that is to be added to the user's menu settings file, so that their settings remain separate from those of other users.
-
Why would you do this?
Background: RockWorks stores the current suite of menu settings - gridding method, contour line color, and such - in a file named "project.ini" in the project folder's "System" sub-folder. If you have several people working in a project at the same time, then they will all be writing to this settings file concurrently. This can create maddening situations whereby User-A's settings keep changing, as User-B modifies the same menus.
The solution: Enter a user prefix here. In this way, User-A's menu settings will be stored in a file named "User-A-prefix_Menus.ini" where "User-A-prefix" is the User Prefix value entered here. You will also be prompted, on program startup, which set of settings you wish to use.
- Number of Processors: The very first time RockWorks is started up on a particular computer, it looks to see how many processors you have on your computer - the number is displayed here. This way it can take advantage of multiple processors (if you have them) to multi-thread certain modeling procedures. You can select a different number if you don't want RockWorks to have access to all available processors.
- Log File: This setting permits RockWorks to create a workflow log file and specifies how long to save that file for. The location where the log file is saved is noted for convenience.
- Data Plotting: This check box allows users to decide whether or not to plot borehole data above the borehole Collar Elevation or below the borehole Total Depth in sections, profiles, or 3D diagrams.
- RockWorks Tables for information about the program's reference "libraries" of patterns, symbols, colors, and more. In earlier versions, they were accessed from the Preferences window. They are now accessed via the Project Manager.

RockWare home page