Borehole Operations | StripLogs | All Logs to PDF
Use this program to create a 2-dimensional strip log of all boreholes or enabled holes only, and output the logs directly to a single, multi-page PDF file.
Feature Level: RockWorks Basic and higher
Menu Options
Step-by-Step Summary
- Rules & Filters
Use the tabs at the top of the window to apply spatial filters, stratigraphic rules, or time/date filters to data being displayed in your logs. (More info)
- 2D Log Design
Click on this tab at the top of the window to set up how you want the logs to look.
- Visible Items: Use the check-boxes in the first pane to select which log items are to be displayed. See Visible Item Summary for information about the different log items.
- Options: Click on any of the Visible Items names to see the item's settings in the Options pane to the right. See the Visible Item Summary for links to the Options settings.
- Layout Preview: For each item you've activated, you'll see a preview cartoon in the upper pane. Click and drag any item to the left or right to rearrange the log columns. See Using the 2D Log Designer.
-
- Output
Click on this tab to define the PDF output.
- PDF Output: Click to the right to type in the name to assign to the output PDF file.
- Display in Viewer: Check this box to display the PDF file in your default PDF viewer upon completion.
- Options
- Include
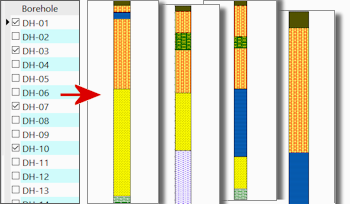
- All Boreholes: Choose this option to output all boreholes in the database, regardless of their enabled/disabled status.
- Enabled Boreholes: Choose this option to output to the PDF file only those holes which are enabled.
- Scaling
- Automatic: Choose this if all logs are to be scaled to the PDF pages using the scale which works for the first borehole being output. RockWorks will fit the log to the PDF page at the optimal scale.
- Manual: Choose this option if all logs are to be scaled to the PDF pages using a specific scale. Enter the scale in in Meters per cm or Feet per Inch (units to match your project units).
- Margin (%): Enter a margin to be applied on the PDF page.
- Resolution: Choose the desired output resolution for the PDF images.
- Patterns:
Click here to define how the log patterns are to be output.
- Dynamic Pattern Scaling (Automatic): This is the default setting. With this, RockWorks will output striplog patterns using the pattern densities stored in the logs themselves.
- Fixed Pattern Scaling (Manual): Choose this option if you don't like the default pattern scaling. It allows you to enter a scalar for both the horizontal and vertical axes. This can be helpful if the patterns overall are simply too coarse or dense.
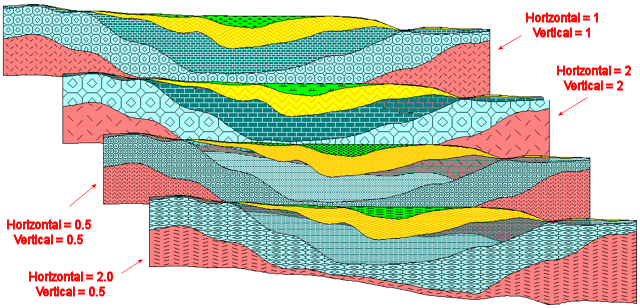
- Horizontal Scalar: Type in the value by which the existing pattern densities will be multiplied. A value > 1 will make the pattern blocks larger (less dense) along the horizontal axis of the diagram.
- Vertical Scalar: Type in the value by which the existing pattern pattern densities will be multiplied along the vertical axis of the diagram. This graphic example shows the effect of the scalars in a cross section diagram.
- Vertical Exaggeration
Click here to pre-define the vertical stretch you would like to apply to all of the logs. By giving the program this information in advance of generating the log, it can help with text and graphic sizing and placement. (More info)
! This will apply to all logs being output.
- View Direction
Click on this tab to set up the view direction for non-vertical holes. You are specifying the direction, from 0 to 360 degrees, toward which the logs are to be viewed. For example, to view the log from the south, toward the north, you would enter 0.0; to view the log toward the east (from the west), you would enter 90. This will be ignored for Unwound logs, below.
- Vertically Clip Log
Insert a check in this box if you want to display a subset of the log data.
Click on the tab to define the elevation range to be displayed.
- Top Elevation: Enter the uppermost elevation to be displayed in all of the logs.
- Base Elevation: Enter the lowermost elevation to be displayed in all of the logs.
! Log clipping parameters are defined using elevations, not depths. (More info.)
! Log clipping parameters will apply to all logs being output.
- Log Profile: Use these options to define how non-vertical boreholes will be displayed.
- Normal Profile
Choose this option for vertical holes, or to display inclined/deviated holes with true projection using the View Direction defined above. (More info.)
- Directional Unwind
Choose this option to plot a profile of a deviated borehole in which the azimuth is constant and normal to the viewer, as if the deviated well were unwound to the East. Note that this is not a "projected" profile (ala' the non-unwound striplogs or the projected profiles). (More info.)
- Plot Vertical
Choose this option to force deviated wells to be plotted vertically within the striplog, using a measured depth scale. (More info.)
- Use True Vertical Depth
Choose this if the log should be plotted vertically and display true vertical depths rather than measured depths. (More info.)
Follow these steps to create a 2-dimensional strip log of all boreholes or enabled holes, output directly to PDF.
- Access the Borehole Manager program tab.
- Enter/import your data into the Borehole Manager database, if necessary.
- If you intend to output specific boreholes to the PDF file, be sure those holes only are enabled (shown with a check-mark).
- Select the Borehole Operations | Striplogs | All Logs to PDF menu option.
- Establish the program settings, as described above.
- Be sure to click on the Striplog Design tab to establish the layout of the log diagrams.
- Click on the Continue button to proceed.
RockWorks will create a 2D, projected view of the data contained in all of the boreholes or the enabled borehole, as selected, reading its data from the borehole database. Only the log items you have activated will be displayed in the log. Each log will be added to the PDF file, using the file name you specified. If requested, the resulting PDF file will be displayed in the default PDF viewer installed on your computer.
 Back to StripLogs Menu Summary

RockWare home page