RockPlot2D | File | Import | Raster Image
- or -
RockWorks | Graphics | Images | Image -> Map
This program is used to display a raster image in a new RockPlot2D window. This procedure supports BMP, JPEG, TIFF, WMF, EMF, PNG, GIF, TGA, PCX, AFI, VST formats.
Menu Options
Step-by-Step Summary
- Image Name & Location
- Project Image
Use this option if you have a Project Image defined under Project Settings and wish to display that image in this map.
- Other Image
Choose this option if you wish to use a different image as background for this map.
- File Name: Click on the small button to browse for the name of the image file to be imported into RockPlot2D. The supported formats are listed above.
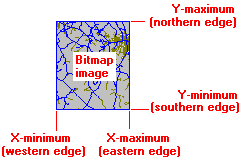
- Image Location Defined By...: You have several options for entering the coordinates at which the bitmap is to be displayed. This is required because bitmaps are not stored with any kind of global coordinate information.
- Project Dimensions: Choose this option if the current project dimensions represent the border coordinates for the image you've selected.
- World File: Choose this option if there is an accompanying World File which defines the image extents.
- Automatic: Choose this option if the program is to search automatically for a World file with the same file name as the Image File, above, and with either world file name extensions: *.bmpw or *.bpw (italicized letters are replaced by the extension characters of the Image File, as in *.pngw or *.pgw, etc.)
- Manually Select: Choose this option to specify the name for the World file.
- World File: Click to browse for the World file to be used for georeferencing the selected image.
- Manually Specified: Click in this radio button if you want to type in the X and Y coordinates for each bitmap corner.
! RockWorks assumes that these coordinates match the coordinate system and units defined in the Dimensions pane.
- X-Minimum: Enter the X (Easting) coordinate represented along the western edge of the image.
- X-Maximum: Enter the X (Easting) coordinate represented along the eastern edge of the image.
- Y-Minimum: Enter the Y (Northing) coordinate represented along the southern edge of the image.
- Y-Maximum: Enter the Y (Northing) coordinate represented along the northern edge of the image.
- Labeled Axes
Check this option to annotate the imported image borders with axis titles and/or coordinate labels.
Click on this tab to establish the map axis settings. See Labeled Axes Options for details.
- Map Overlays
Check this option to include various other layers on your imported image.
Click on this tab to activate the different layers and establish their settings. See Map Overlays for details.
- Other 2D Files
Check this option to include existing RockWorks maps or diagrams as layers with your imported image.
Click on this tab to select the existing maps (.Rw2D files) to be included. See Other 2D Files for more information.
- Peripherals
Check this option to include various peripheral annotations with your image. Options include titles, north arrows, scalebars, and more.
Click on this tab to activate the items and establish their settings. See Peripherals for more information.
- Border
Check this option to include a solid line border around the entire image.
Click on this tab to specify the line style, thickness, and color.
- Output Options
- Save Output File: Check this to assign a name for the map in advance, rather than displaying it as Untitled.
- Automatic: Choose this option to have RockWorks assign the name automatically. It will use the name of the current program plus a numeric suffix, plus the ".Rw2D" file name extension.
- Manual: Choose this option to type in a name of your own for this file.
- Display Output: Check this option to have the resulting map displayed in RockPlot2D once it is created.
Follow these steps to bring a raster image into the RockPlot2D window.
- Be sure that the image file to be displayed resides in the project folder.
- Select the RockWorks | Graphics | Images | Image -> Map menu option.
- OR -
Open a blank RockPlot2D window, and select the File | Import | Raster Image menu option.
- Enter the requested menu options, described above.
- Click the Process button to proceed.
The program will read the input file and the defined coordinates, and will display the image in the RockPlot window.
- Save it or combine it with other maps and diagrams using the RockPlot2D tools.
 Back to Import menu

RockWare home page