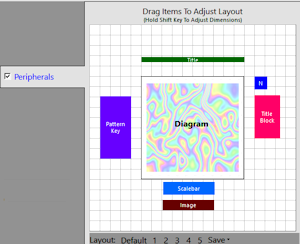
The Peripherals layer is available for most RockWorks maps and diagrams. It is used to add titles, title blocks, legends, and other peripheral items to a map, profile or section diagrams, or other 2D plots.
Each item which is activated will be displayed in the interactive design window. You can adjust the placement of the item relative to the diagram by clicking and dragging in the design pane (which is shown above). You can adjust the size of the item by holding down the Shift key as you click and drag in the design pane. You can also adjust the size and relative placement of a selected item using the Position & Dimension settings to the right of the design pane.
Layout: Click the Save button below the design window to save up to 5 configurations to apply to your diagrams. If you have saved one or more configurations, just click on the number to reload that configuration.
 Peripherals
Check this item to activate one or more peripheral layers for your map or diagram.
Click on this tab to establish the layer settings.
- Title
Check this item to include title text with your diagram.
Click on this tab to enter the title text.
- Primary Title: Enter here the text to be plotted as the main title.
- Secondary Title: Enter the text to be plotted as the secondary title. If none is desired, leave this field blank.
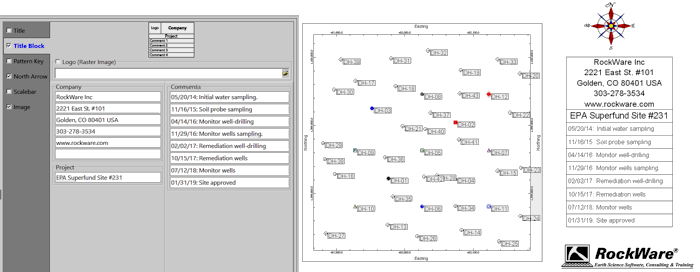
- Title Block
Check this item to include a multi-line, multi-column block of text (and optional image) to the diagram.
Click on this tab to enter the text and image information. (More info)
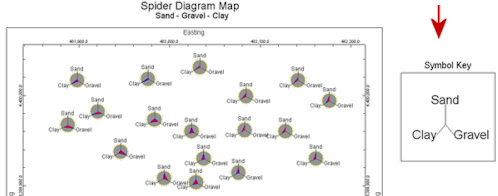
- Symbol Key
Check this item to include a key to the names and position of the components being included in Spider Diagram Maps.
Click on this tab to set up the key. (More info)
- Pattern Key
Check this item to include one or more legends with keys to patterns/colors and names in the diagram.
Click on this tab to select the key types. (More info)
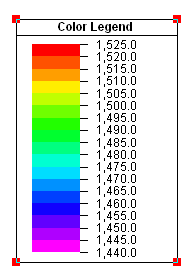
- Color Legend
Check this item to include a legend to colors in a map or diagram with color contours.
Click on this tab to set up the legend. (More info)
- North Arrow
Check this item to plot a north arrow with your map.
Click on this tab to select the design you prefer.
- Scalebar
Check this item to plot a scalebar with your diagram.
Click on this tab to set up the scalebar.
- Override Automatic Width Computation: Leave this unchecked to have RockWorks determine automatically the best width for the legend, given your map units and range.
If you prefer to define a specific width for the scalebar, then check this box and type in the desired width, in your map or diagram horizontal axis units. This will take precedence over the Scalebar Position & Dimensions "W" (Width) setting at the bottom of the window.
- Units Label: Type in the content for the label, such as Meters or Feet.
-

- Image
Check this item to plot a raster image with your diagram or map, such as a company logo.
Click this tab to select the image and establish display settings.
- Image File: Browse for the image to be displayed.
- Aspect (Height/Width) Ratio:
- Preserve: Choose this for the aspect ratio of the image to be preserved (not stretched).
- Stretch to Fill Rectilinear Region: Choose this option to fill the designated space with the image.
- Include Border: Check this box to include a line border around the image. Click the Line Style box to choose the line style, thickness, and color.
- Image Preview: Use this area to preview the image you have selected. Click the Refresh button if it is not displayed.
- Position and Dimensions: Use these settings, to the right of the design pane, to define where the peripheral item is to be plotted in relation to the main map or diagram.
! As you click and drag the item in the Peripherals design pane, the values in these prompts will be updated. Similarly, as you edit the values in these prompts, the item's size and placement will be updated in the design pane.
- X: This setting represents horizontal offset. It determines how far, as a percent of the diagram width, the item is to be offset from the main diagram. The greater the value you enter, the further the peripheral item will be offset from the diagram.
- Y: Determines how far, as a percent of the diagram height, the item is to be offset vertically in relation to the diagram.
- W: Set the width for the item as a percent of the output diagram width.
- H: Set the height for the item as a percent of the output diagram height.

RockWare home page