![]()
How it's Used
How to Insert a Pattern Block into a Log Design
Menu Settings
How to Reposition the Pattern Block
How to Review the Settings
The Header/Footer Pattern tool is used to insert a square or rectangular block into the log's header or footer, filled with the pattern of your choice. This is a fixed design item with no corresponding data file commands. This pattern block does not automatically link to any lithologic keywords.
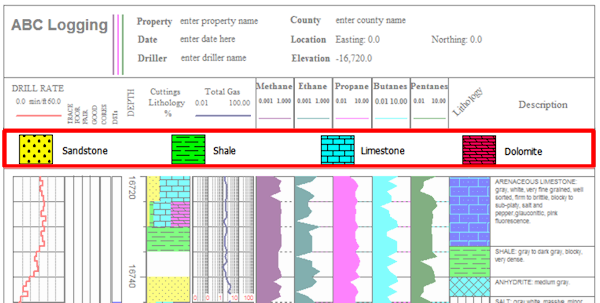
See the Pattern Legend to create a table of pattern blocks with text in the header or footer. See the Lithology Pattern Column, Pattern Percent Column, or Fillbar Column for information about plotting patterns in the body of the log.
! Only the pattern index number is stored in the log design. If you choose a different pattern library as default, these pattern blocks may change in the log design.
Select: To select the pattern to be displayed in the header or footer block, click on the Select button. Or just click on the graphic pattern block in the middle of the window. The program will display the Select Pattern window.
To choose a pattern for the block, simply click on one of the displayed patterns. You may use the scroll bars as necessary to view additional patterns. The pattern you have selected will be displayed in the preview box at the top of the window, and its "index number" will be shown in the upper-left part of the window.
To adjust the density at which the pattern is to be displayed in the header block, click on the up- or down-arrow labeled Density. The pattern preview will be updated to reflect the density changes. The greater the value, the less dense the pattern (fewer repeating cycles of the design).
Select a foreground and background color for the pattern design by clicking on the appropriate color box and making a selection.
Adjust the line thickness for the pattern design by increasing/decreasing the Line Width value.
When you have established the pattern, color, and density to your satisfaction, click on the OK button at the bottom of the Select Pattern window. You will be returned to the Header/Footer Pattern Setup window.
See Viewing and Editing Patterns for more information.
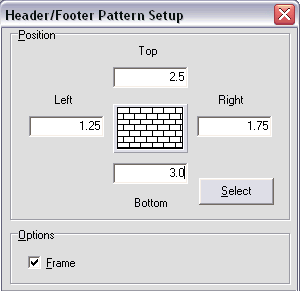
Position: Use these settings to determine the placement of the pattern block.
Left, Right: These coordinates determine the horizontal placement of the left & right edges of the pattern block in the header/footer of the log.
Top, Bottom: These coordinates determine the vertical placement of the top and bottom edges of the pattern block.
You may change the block's position by editing these values, or by simply moving or resizing the item on the design screen itself, as discussed below.The horizontal and vertical coordinates are expressed in decimal inches or centimeters relative to the left and top edges of the design screen, respectively.
Frame: If you want the pattern block to be enclosed in a solid-line box, insert a check in this box.
See: Move or Resize Header/Footer Items for information about dragging, resizing, and aligning items.
If you need to access the pattern block's options window you can:
![]() Back to Header/Footer Item Summary
Back to Header/Footer Item Summary
![]()