![]()
How it's Used
How to Insert a Lithology Pattern Column into a Log Design
Menu Settings
How to Review the Settings
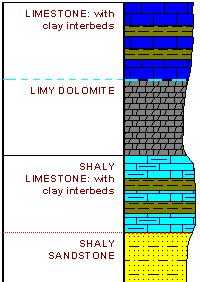
How it's Used: A Lithology Pattern Column is designed to contain graphic patterns that are associated with keyword declarations. The patterns can also be clipped based on hardness or other values in a curve column, resulting in a lithology profile.
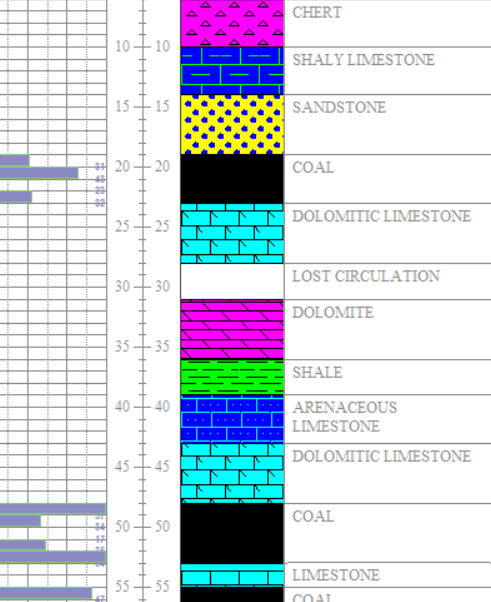
How it works: As the LogPlot program compiles your data file, it will locate keywords listed in a Lithology datasheet, scan the "keyword table" for these keywords and, if found, plot the associated graphic pattern design for that interval in the Lithology Pattern Column that has the same name. The text descriptions themselves can be plotted in the Lithology Description Column on the log.
There can also be an associated data tab for displaying interbedded patterns in this column.See the Interbed datasheet.
! It is not required that each Lithology Pattern Column have an associated Description Column.
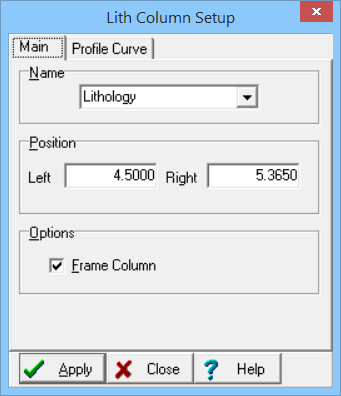
Name: Enter the name for this Lithology Pattern column. Each pattern column item must have a unique name so that you can refer to each one individually in the data file.
Position: These coordinates determine the horizontal placement of the Lithology Pattern column in the body of the log. You may change the column's position by editing these values, or by moving or resizing the column on the design screen itself. The horizontal coordinates are expressed in decimal inches or centimeters relative to the left edge of the design screen.
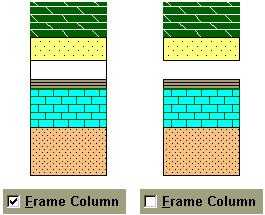
Frame Column: If this setting is activated (with a check-mark) the program will enclose the column in a solid line frame. This will probably only be noticeable in areas where no lithologic patterns are displayed.
Use a Curve to Create a Profile: Insert a check in this box to activate this feature and enable the additional settings.
Curve Name: Type here the name of the Point Data datasheet in the data file, or the name of the column within a multi-column Point Data datasheet, that contains the data to be used to mask the lithology column. For example, if you wish to clip the patterns based on hardness, and you have those values stored in a Point Data column named "Hardness", this is the name you would type into the Curve Name field.
Min Value, Max Value: Here, type in the minimum and maximum curve values to be associated with the edges of the lithology column. For example, if your curve data representing hardness ranges from 40 to 80, you could set the Min Value to 40 and the Max Value to 80. Or, if you wanted to show this curve at less exaggeration, you could set the Min Value to 0 and the Max Value to 80.
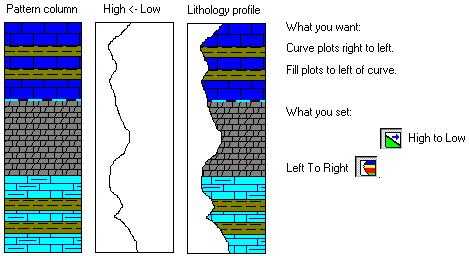
Low to High, High to Low: These buttons determine the direction in which the curve’s values will plot. Click on the left hand button (Low to High) if the low curve values are to correspond to the left edge and the high values to the right edge of the Lithology Pattern column. Click on the right-hand button (High to Low) to if the high curve values are to correspond to the left edge and the low values to the right edge of the pattern column.
Left to Right, Right to Left: These buttons determine the direction in which the opaque fill will plot. Click on the left button (Left to Right) to fill the region on the left side of the curve line with white. Click on the right button (Right to Left) to fill the region on the right side of the curve line with white.
Here are some examples of button combinations:

If you need to access the Setup window you can:
![]() Back to Log Body Item Summary
Back to Log Body Item Summary
![]()