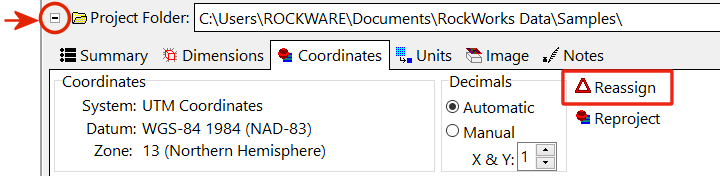
Use the Reassign button in the Project Settings | Coordinates pane to set the project to a different coordinate system but not change any of your existing data.
To access this pane, click on the small button to the left of the project folder name. This toggles between "+" (expanding) and "-" (hiding) the Project Settings tabs.
! This program does not change any of the data itself. It simply changes the labels which are displayed in the Borehole Manager's Location table. It also changes the coordinate system to be used for your output models and graphics, as displayed in the Project Settings | Coordinates pane.
Example: You created your new project with map locations and output coordinates defined as UTM meters, and you have imported the data assuming this is the case. But you export your map to Google Earth and realize the locations are way off. Your client then advises you that the map coordinates are actually in the State Plane system, and represent feet. You can use this program to relabel the coordinate system and units, without changing any of the actual numbers.
Notes:
- See Reprojecting your Project Coordinates if you need to convert the borehole location coordinates - the numbers themselves - or Converting Coordinates if you need reproject coordinates in the RockWorks datasheet.
- IMPORTANT: This conversion process will not update any existing models, maps, sections, or 3D scenes with the new coordinate labels. You'll either need to recreate them from the converted data, or update the labels for existing graphics in RockPlot2D or RockPlot3D.
Menu Options
Step-by-Step Summary
Borehole Data:
- Horizontal Coordinates and Units: These settings define the coordinate system and units (feet or meters) in which your borehole or sample locations (X and Y) are defined. You can choose from the following. (More info)
- Local (Custom): Click in this radio button if your XY (map) coordinates are undefined, or if they are X and Y coordinates in a local grid (e.g. not using global system).
- Units: You need to specify whether the Local coordinates represent Feet or Meters.
- Local Coordinate System Origin: You can geo-reference your local coordinate system by entering the longitude and latitude coordinates in decimal degrees that exist at the local coordinate "origin" of 0,0. If you don't know these global reference coordinates, you can leave the Local Origin set to a Longitude of 0.00000 and a Latitude of 0.00000.
- State Plane Coordinates: Click in this radio button if your map coordinates are based on the US State-Plane system, NAD-83.
- Units: You need to specify whether the State Plane coordinates represent Feet or Meters.
- State Plane Coordinate Zone: The State Plane systems are zone-specific, so you need to define the zone to which the coordinates apply. Click on the Zone button to see a reference map; choose the zone from the scrolling list to the right of the map.
- UTM Coordinates: Click in this radio button if your map coordinates are based on a Universal Transverse Mercator system.
-
- Units: You need to specify whether the UTM coordinates represent Feet or Meters.
- Datum: Click on the large button to view the available projections. The two most common projections for the U.S. are:
- Clark 1866 (NAD-27): Used within most USGS maps. NAD-27 coordinates may be as much as 200 meters from WGS-84 (NAD-83) datum of the exact same coordinate.
- WGS-84 (NAD-83): Used by GPS (Global Positioning System) units and more recent USGS maps.
- Zone: Click on this button to display an interactive map where you can click on the UTM Zone for the data.
- Other: Click in this radio button if you want to choose from an expanded list of projections. (More info)
- Vertical Units: Here, you need to define the units that define elevations (such as at the top of your boreholes), depths (downhole measurements), and casing offsets. Choose either Feet or Meters.
- Open the project whose coordinates you wish to relabel.
- Expand the Project Settings pane if necessary.
- Click on the Coordinates tab, and click on the Reassign button.
- Make your coordinate selection, as described above.
- Click Finish.
- RockWorks will display a window where you can confirm this change; click Yes to continue or No to cancel the label change.
- If you choose Yes, RockWorks will change the coordinate system label under the Project Settings | Coordinates tab and (if applicable) the Units labels in the Dimensions pane. If you are working in the Borehole Manager, the labels will also be changed on the Location table.
 Back to Project Coordinates

RockWare home page