Borehole Manager | File | Import | Excel | Column Based | Location
Borehole Manager | File | Import | Text | Column Based | Location
These Borehole Manager programs are used to read row and column data from a single worksheet in Excel file or from a single text (CSV, tab-delimited) file, and import the rows and columns into the Location table for a single borehole or for multiple boreholes. This import functions similar to the Location import in the Row Based Excel import, just simplified to exclude the import of other data. This import works with XLSX, XLS, CSV, and TXT files, provided that Microsoft Excel is installed on the user's machine.
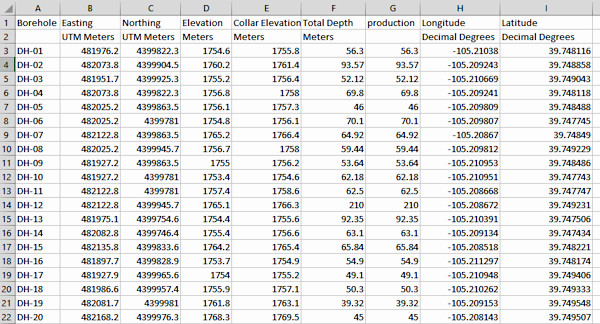
Here is an example of the kind of Excel data that can be brought into RockWorks using this program; this subset lists the borehole ID in the first column, and the 5 required fields: Easting, Northing, Elevation, Collar Elevation, and Total Depth. You can also import any number of additional columns into other coordinate fields or customized fields.
! This import program allows you to import one or many columns from the spreadsheet.
! This program allows you to append new data from Excel to existing location records in RockWorks, to replace all existing location data, or to create new borehole records entirely.
Menu Options
Step-by-Step Summary
- File Selection tab
- Filename: Click on the small open-file button to browse for the name of the Excel file (XLSX or XLS) or CSV (CSV or TXT) that contains the data to be imported.
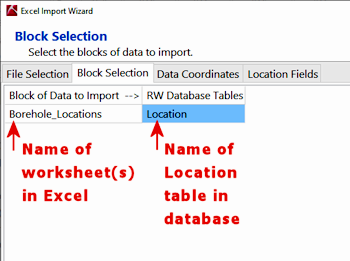
- Block Selection tab
- Block of Data to Import: Listed in this column are the names of the worksheets in the Excel file. You'll need to identify which of the worksheets contains the location data to be imported.
- RW Database Tables: Click on the blank cell in this column, and choose the Location table name from the pop-up list. This process will tell the importer that the fields in the above worksheet are to be imported into the Location table.
-
- Data Coordinates tab
Your borehole database has a defined coordinate system, which you established when you created the new project. Here, you can define the coordinate system in the data being imported, so that RockWorks can convert them to the project coordinate system if necessary.
- Current Project Settings: For your reference the current project coordinate system and units are shown at the top of the window. You cannot edit these here.
- Borehole Data, Horizontal (XY) Coordinates and Units: Here you need to specify the coordinate system and units that the imported data represents. If the imported data is the same as the project, no conversion will occur. If the imported coordinates are different, they will be converted during import to the project system.
If you do not know what the import coordinates represent, you should select the same units as your project coordinates, and they'll be imported with no changes. Later, should you need to relabel or reproject the data, you can do so.
- Lon/Lat: Choose this if the imported data are recorded in decimal longitude and latitude degrees. No additional settings need to be made.
- Local: Choose Feet or Meters for the local units of the imported data. The system origin should equal the project's system origin.
- SPC: Choose this if the imported data are recorded in State Plane coordinates. Select the Zone upon which the State Plane coordinates are referenced and define the units (feet or meters).
- UTM: Choose this if the imported data are recorded in UTM coordinates (WGS 84). Choose the UTM Datum and Zone. Select feet or meters as the coordinate units.
- Other: Choose this if the imported data are recorded in another coordinate system not listed here. (More info)
- Vertical (Z) Units: Use these settings to define the units, Feet or Meters, in which the depths and elevations in the Excel spreadsheet are defined. If the units are different than the project's vertical units, displayed at the top of the window, then RockWorks will convert the units during import.
- Location Fields tab
Because RockWorks allows you to define custom location fields in your borehole database, you can also list these custom fields in your Excel file's Location worksheet. Use this screen to tell the program which Excel fields are to be imported into which database fields.
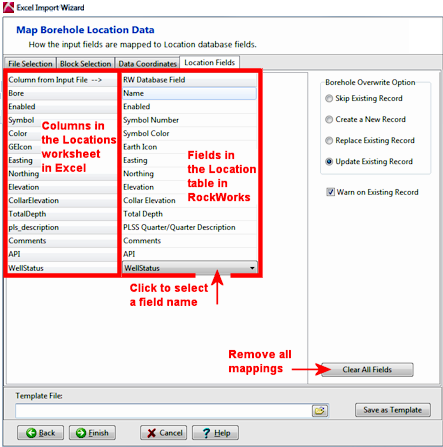
- Column from Input File: Listed in this column are all of the columns in the Location worksheet in the Excel file.
! If the Excel spreadsheet has a lot of columns, you'll need to use the scroll bar to view them all.
- RW Database Field: Listed in this column are the names of the fields in the Location table in the current Borehole Manager database.
- If the import columns to the left are the "expected" location fields and are named according to the format defined in the File Format section, the importer will recognize them and list the appropriate database field automatically.
- If a column is not recognized, no database field will be mapped.
- To remove an RW Database field name ("unmap" it), click on it; you'll see a long pop-up menu. Scroll to the top of the list and select the blank field.
- To select or change a field for the Excel information, click in the cell and select the field name from the pop-up list.
- To create a new field in the database, simply click on the <add new field> item and type in the name for the new Location tab field. During the import process, RockWorks will add this field to the project's data dictionaries.
- Borehole Overwrite Options: Use these settings, on the Location Fields tab, to specify what should happen if the Location worksheet in the Excel file references borehole names which already exist in the current project database.
- Skip Existing Record: If a borehole ID exists in the RockWorks database, the importer will skip all Excel Location records with the same borehole ID.
Example: if there is already a borehole named "BH-01" in the project, the importer will not import any new Location data flagged for a "BH-01" boring, and the original borehole's Location data will remain unchanged.
- Create New Record: If a borehole ID exists in the RockWorks database, the importer will create a new borehole record (with a new name, appending "_1") for all Excel Location records you've mapped for import that have the same borehole ID.
Example: if there is already a borehole named "BH-01" in the project, and you're importing Location data for a borehole named "BH-01," the program will create a new borehole record named "BH-01_1" and import the Excel data into that new record, leaving the original borehole record unchanged.
- Replace Existing Record: If a borehole ID exists in the RockWorks database, the importer will delete all existing location data for that borehole and replace it with the Excel records you've mapped for import with the same borehole ID.
Example: if there is already a borehole named "BH-01" in the project, the importer will delete all location data for that borehole from the database, and then import the Excel location data for BH-01. The original borehole record will be completely replaced.
! You can activate Warn on Existing Record (the check-box below these options) to have the program display a confirmation dialog box for each existing borehole, so that you can choose to replace, update, skip, or create a new record, on a borehole-by-borehole basis.
- Update Existing Record: If a borehole ID exists in the RockWorks database, the importer will not delete that borehole's Location data before import. Instead it will add new fields from Excel to the borehole's location table. Any existing fields that you have mapped for import will be replaced.
Example: There is already a borehole named "BH-01" in the project, with the 5 required Location fields. In this import you map only the borehole name and 3 custom location fields so that the new data are added to the location records.
- Warn on Existing Record: If activated, this option will force the importer to display a warning when it finds boreholes in the Excel file that already exist in the database. The warning window will offer the same overwrite options as discussed above, on a borehole-by-borehole basis.
- Access the RockWorks Borehole Manager program tab.
- If necessary, browse to the project folder in which you want to work.
- Be sure that the spreadsheet you want to import complies with the row and column format described above, with data for each borehole on a single row and formation depth or elevations listed in columns. If you are importing for multiple holes at this time, the borehole name must be listed in one of the columns.
- Select the File | Import | CSV | Column Based | Location menu option to import from CSV.
Select the File | Import | Excel | Column Based | Location menu option to import from XLS or XLSX.
- Click on each of the import wizard's tabs and enter the data as described above.
- Click the Import button to proceed.
- If you have requested any warning for duplicate file names, the program will issue such warning(s) during import; respond as you see fit for each warning.
The program will read the specified XLSX, XLS, CSV, or TXT file. It will extract the data from the requested input data columns and map them to the indicated database fields for the indicated boreholes.
 Back to Importing Data

RockWare home page