Borehole Manager | View | Optional Fields

Use the Optional Fields window to create or modify any customized location fields that can be added to the current project's database and displayed in the "Optional" tab, or in user-created tabs, in the Location table.
Selecting the fields to be displayed in the Borehole Manager
Adding a new field to the database
Adding a new tab to the display
Adding Optional Fields from a template
- Access the Borehole Manager program tab.
- Click on the Location table for any borehole.
- Click on the Optional Fields button, or select the View | Optional Fields menu option.
Note that this button is not available if you are working with RockWorks in Free mode.
The program will display the following window.
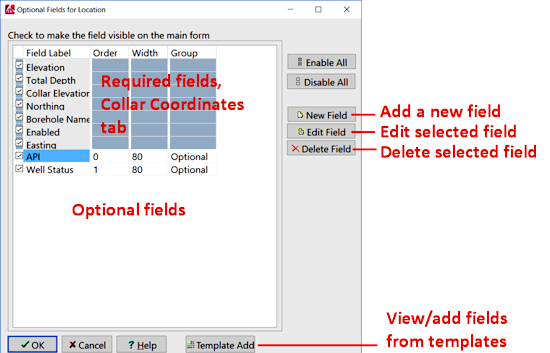
- To select which fields are to be displayed in the Borehole Manager: Insert check-marks in the appropriate boxes. For example, if you are not in the oil and gas industry and never reference API numbers, you could remove this field from display in the Location table's Optional tab.
! You can use the buttons along the right edge of the window to enable all fields or disable all fields.
! Disabling the display of a field does not remove it from the project database; it just prevents it from being displayed in the Borehole Manager.
- To add a new field:
- Click the New Field button along the right edge of the window. The program will display the following window:
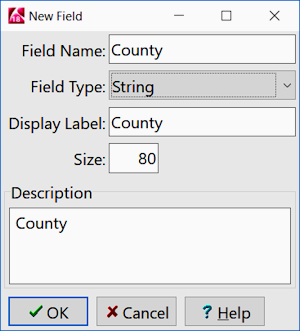
- Enter the requested information:
- Field Name: Enter the name for the field, as it will be stored in the database. The Field Name cannot include any spaces.
- Field Type: Select the type of data to be specified for this field:
- Boolean: Choose this if the field is to be a yes/no (on/off) field. It will be displayed as a check-box on the Location tab.
- Date: You can choose this if the field will contain date information (such as drilling date or completion date).
- Floating Point: You can choose this type if the field will contain real number information (such as secondary elevation).
- Integer: You can choose this type if the field will contain an integer value.
- String: Choose this type if the field will contain general alpha-numeric information.
- Value List: Choose this if you wish to create your own list of items which will be selectable via a drop-down list, such as project, driller, county names, etc.
- Display Label: Enter the label for the field, as it will be displayed in the program window.
- Description: This is used for your information, to identify the field.
- Click OK when the New Field information is entered to your satisfaction, or Cancel to cancel the new-field operation.
- The new field will be shown in the Optional Fields for Location window.
- To add a new display tab:
- Click on the Group name for one of the listed optional fields.
- Type in a new name.
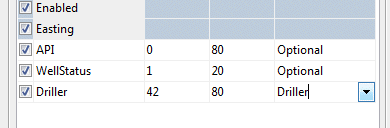
- This will now be available for selection for other fields. Once you click OK in the Optional Fields window to accept your changes, the new group will also be displayed as a new stick-up tab in the Location table.
- To load Optional Fields from a Template:
- Click on the Template Add button at the bottom of the Optional Fields window. Any existing templates will be displayed here.
- Click on any field to see its details to the right.
- Select fields to add by:
- Clicking on any heading to select all of the fields underneath it.
- Clicking on any individual field to select it.
- Holding down the Shift key as you click on field names to select multiple fields.
- When all of the fields you wish to add to your database are selected, click the Add button at the bottom of the window. You'll be returned to the Optional Fields window, with these new fields listed.
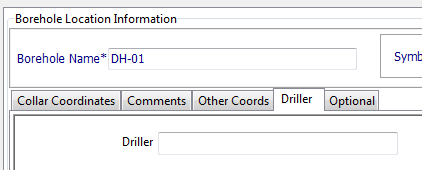
- Click OK when your selections for visible fields and/or new fields are established. You'll be returned to the main Borehole Manager window. The selected fields will be displayed on the Optional tab or custom tab that you have created.
! Added fields will be saved to the RockWorks data dictionary for your current project.
Tip: Use the Map | Optional Fields tool to create a contour map of any of your optional data fields which contain numeric (Floating Point or Integer) data.
 Back to Optional Fields

RockWare home page