RockWorks | Borehole Manager | Striplogs | Pick Stratigraphic Contacts
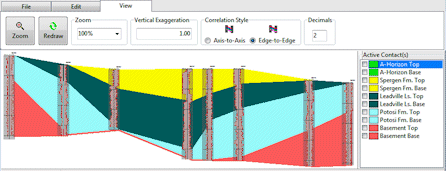
Use this program to interactively select the depths to stratigraphic tops and bases, from geophysical, lithology, or other available data. This is one of the most powerful tools in this program since it lets you visualize existing lithology blocks or geophysical curves in a 2D display, and then point-and-click to pick the stratigraphic contacts. The contact depths are recorded in the project’s Stratigraphy table.
! This tool will assign formation depths assuming vertical boreholes. If your boreholes are deviated, you may need to eventually edit by hand the picked formation depths, based on how the stratigraphic surfaces or log intervals look when displayed in diagrams that can accommodate the borehole’s deviated downhole trace.
You can display an unlimited number of boreholes in the stratigraphy picker display (the equal-spacing option makes it easy to view many at once), though screen real estate may still be a limitation. You can add new formations on the fly within the stratigraphy picker.
See Picking Lithology Intervals for a similar tool for picking non-ordered lithology intervals from logs.
Feature Level: RockWorks Basic and higher
Menu Options
Step-by-Step Summary
Because the stratigraphy picker displays known data in two or more vertical striplogs, these options will look just like those for the 2D Section diagram in the Striplogs menu. Be sure to follow very carefully the steps listed in the Step-by-Step section below.
- Rules & Filters
Use the buttons at the top of the window to apply spatial filters, stratigraphic rules, or time/date filters to data being displayed in your logs. (More info)
- 2D Log Design: Click on this button, at the top of the window, to select the items to display in the individual logs in the cross section.
- Visible Items: Use the check-boxes in the first pane to select which log items are to be displayed. See Visible Item Summary for information about the different log items.
- Options: Click on any of the Visible Items names to see the item's settings in the Options pane to the right. See the Visible Item Summary for links to the Options settings.
- Layout Preview: For each item you've activated, you'll see a preview cartoon in the upper pane. Click and drag any item to the left or right to rearrange the log columns. See Using the 2D Log Designer.
- Section Location: Click on this button at the top of the window, to select which wells are to be displayed in the stratigraphy picker. The most recent section drawn for this project will be displayed. (More info)
- Vertical Exaggeration
Click here to pre-define the vertical stretch you would like to apply to your diagram. By giving the program this information in advance of generating the section, it can help with text and graphic sizing and placement. (More info.)
! Note that you can always change the vertical exaggeration at which the diagram is displayed, in the stratigraphy picker window itself. But, by telling the program up-front how stretched it will be, you'll get better placement of the graphic components.
- Striplog Placement
- Hang from top of Borehole: If unchecked (default) the program will plot the section with the logs displayed at their appropriate structural elevations. If you check this box, the program will instead adjust the log elevations such that the top of the logs (zero depth) align to a horizontal datum. This capability to plot by elevation allows the user to include projected picks above and below existing logs.
-
- Striplog Spacing
- Proportional (default): Using this setting, the logs will be placed in the section proportionally to their distance from each other on the ground.
- Equal Spacing - Automatic: Using this setting, the logs will be placed within the section at equal spacing. The program will automatically determine how to space them in the display. The benefit of this method is that closely-spaced boreholes won't plot on top of each other.
- Equal Spacing - Manual: Using this option, the logs will be placed within the section at equal spacing, using the distance setting you enter. The value you type in will represent actual distance units in your study area.
See also: Contact Picker Options
 Back to StripLogs Menu Summary

RockWare home page