Step 6: Pick the First Formation
The Contact Picker window will be comprised of four main sections:
- Logs: The program extracted the selected data for the selected wells and displayed their logs from left to right across the log screen.
- Formation names: To the right of the logs will be the names of the formations you listed in the Stratigraphy Types Table (back in Step 3).
- Data: Below the logs will be a table that lists (vertically) the borehole names as they appear from left to right in the logs, and (horizontally) the top and base of each formation. This formation data is what will be posted using the stratigraphy picker tool.
- Menus: At the top of the screen are the menu tabs where viewing, editing, and other options can be accessed.
The process of picking the formations is as simple as (1) selecting the formation to be recorded, in the Active Contact(s) pane and (2) clicking on each log where that formation appears present, in the graphic pane. The program will record the depths in the lower table.
Here's a more detailed step-by-step:
- If the logs appear too squashed for good visibility, you can adjust the Vertical Exaggeration (default = 1). You can adjust the size of the window, as well as the panes within the window by dragging on the pane boundaries and dragging.
- Select the first formation you wish to pick by inserting a check in its check-box in the upper-right window.
! You can select more than one unit if you like.
! So, if you'd like to pick the base of the upper formation AND the top of the next formation, insert a check in both boxes.
- To mark the top of this formation you will click the left mouse button at the point on the first log where you think that formation top would lie.
- The program will post that depth in the data table, in that formation’s Top column, for that log. If you make a mistake, see Tips.
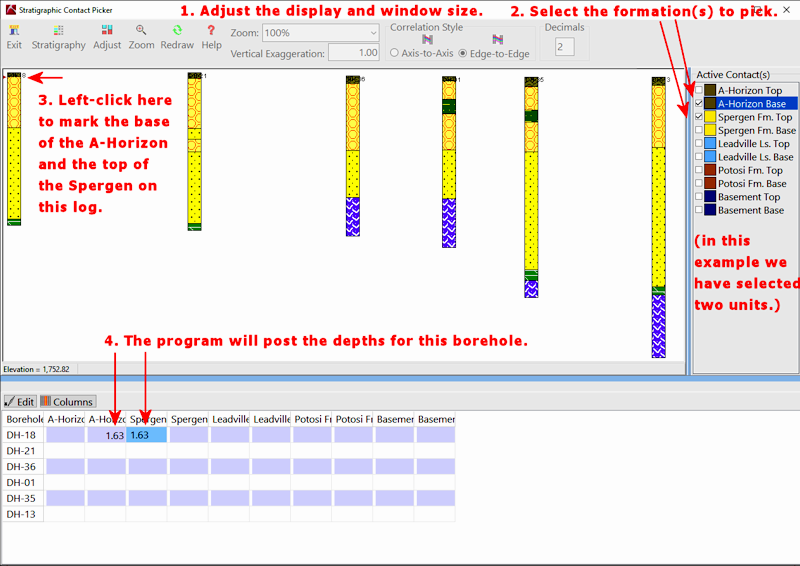
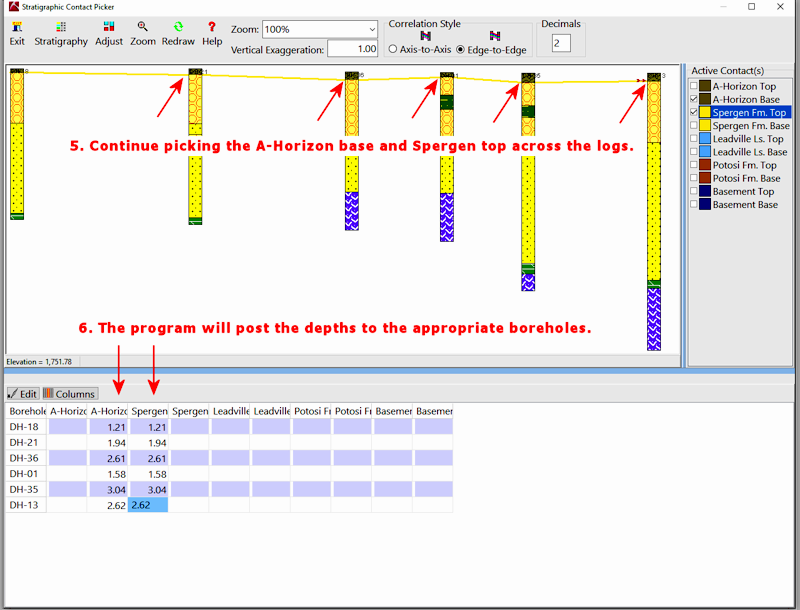
- Continue selecting that formation’s top on the remaining logs. It is not necessary to click on the logs from left to right, but that may help keep you organized. You may skip logs if you don’t think that formation is present there. You will see a line connecting the formation tops you've picked, in the color displayed for the unit. Each pick will also be marked with a small arrow.
- The program will post the depths to the data listing.
Step 7: Pick the next formations.
- Now, select the next formation to be picked by inserting a check in its box, to the upper right.
! You can select more than one unit if you like.
! So, if you'd like to pick the base of the upper formation AND the top of the next formation, insert a check in both boxes.
- Start back at the first log and left-click at the proper depth to select the selected formation(s).
- The program will post the depth(s) in the proper column(s) for that log.
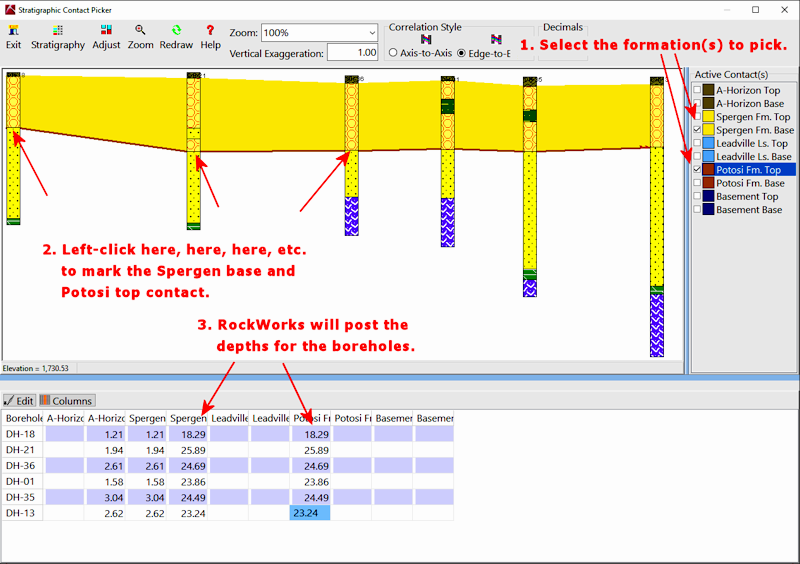
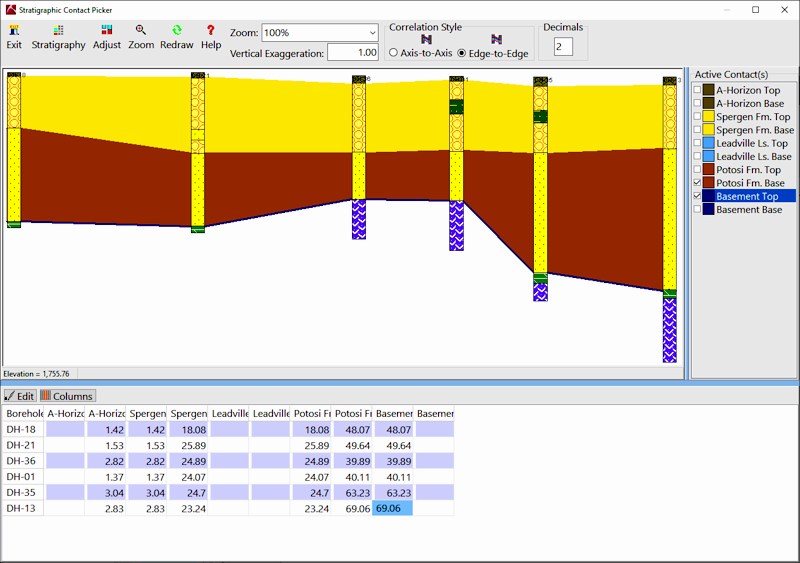
- Continue selecting the selected formation(s) on the remaining logs. Note how the unit's color will be displayed as as a correlation reference.
- Next, clear the check-boxes in the upper-right for the formation(s) just picked, and select the next unit(s) to be picked by inserting checks in the appropriate box(es).
Notes:
- Editing Depths: You can enter directly into data cells if you wish - just click in a cell and type in the depth value. To have the correlations updated, simply click on the Redraw button in the upper View toolbar.
- Adjusting Picks: This data is not posted to the actual database until you end the session, below, so you can pick and re-pick with your mouse as much as you like.
- Missing Formations: You can leave formation bases blank if you wish, and you can skip formations entirely in any/all logs.
- Adding New Formations: If you need to add a formation to the listing, click on the Stratigraphy button. This will bring up the project's Stratigraphy Types Table where you can define a new formation name, pick the color and pattern, etc.
! Be sure to set the Order of the added formation (and adjust the order of any other affected formations) so that they will appear in the contact picker in the proper order.
! You cannot remove formations from within the Stratigraphy Picker window.
- Pick Lines and Symbols: When plotting the pick lines and symbols, the program positions the left edge of the pick line at the left edge of the log rather then centering the line at the left edge of the log. This will hopefully eliminate confusion when the logs are very closely spaced and there's a chance of selecting a pick for the wrong log.
Step 8: End the session
- When you are ready to terminate the formation picking session, click on the Exit button.

- The program will offer you some important choices; choose one:
- Choose Discard Changes to ignore all of the work you did in the formation picker. Any stratigraphic depths listed in the picking window would not be posted to the project database.
- Choose Save Changes without Adjustments to save the depths as listed in the data table, posting them to the project’s Stratigraphy table in the database.
- Choose Adjust Contacts & Save Changes to automatically adjust the depths of the formation tops to equal the depths of the base of the next formation upward, posting the depths to the Stratigraphy table in the project database.
- Click OK.
- The program will close the Contact Picker, discarding or saving or adjusting and saving the data as requested.
Contact picker - what next?
Now that you have the stratigraphic units defined, use the Striplogs menu to create log-based section and 3D diagrams (RockWorks Basic). Use the Stratigraphy menu tools to interpolate surfaces for the formations and generate diagrams - 3D models, profiles, cross-sections, fence diagrams, etc. (RockWorks Standard and Advanced).
You might recall that the Stratigraphy Picker does not take into account any borehole inclination or deviation. If your boreholes are not vertical, creating this type of log+stratigraphy diagram could help you determine stratigraphic depth.
Tips on using the formation picker
- Refreshing the Display: To erase all of the markings on the screen display of all of the logs, click the Refresh button to redraw the logs. This will not erase any depths already posted in the data table.
- Re-doing Picks: To redo a pick on a well, you can simply re-click it. The new depth will be posted in the data table, overwriting the previous one, and updated correlation panels will be displayed. You can refresh all of the log markings as described above, without affecting the data table.
- Starting Over: If you want to start over from scratch, just click the Exit button and choose Discard Changes. You will be returned to the Stratigraphy Picker setup window, with no stratigraphic depths posted.
 Back to Pick Stratigraphy Contacts

RockWare home page