RockWorks | ModOps | Grid | Grid -> Solid
This program is used to insert a 2-dimensional grid file "slice" into an existing real number or Boolean solid model file, replacing the existing node values with the grid's node values. The grid file can be inserted into any horizontal (constant Z) or vertical (constant Y or X) layer in the original solid model.
Note: This program requires that a grid model and a like-dimensioned RockWorks Boolean OR real number solid model already exist.
Menu Options
Step-by-Step Summary
- Input/Output
- Input
- Grid to be inserted into solid: Click to the right to browse for the name of the existing grid file (.RwGrd) that is to be inserted into the solid model.
! Note that the grid file must have the same number of nodes (and the same coordinates) as the solid model slice it is to replace.
- Solid Model: Select the name of the existing solid model (.RwMod) into which the program is to insert the grid. This solid model can contain real numbers or Boolean ("0" or "1") node values.
- Output Solid Model: Enter the name to assign to the new solid model file (.RwMod) the program will create, with the inserted data.
- Slice Orientation: These options determine the orientation of the solid model slice that will be replaced with the input grid file. Choose a Horizontal layer (constant Z value), a Vertical East/West layer (constant Y value), or a Vertical North/South layer (constant X value).
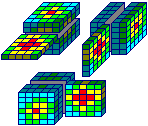
- Horizontal Layer (constant Z value):
-
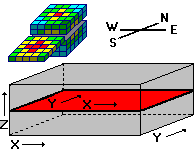
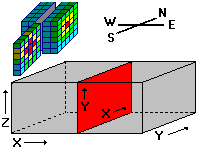
- Vertical East/West Layer (constant Y value):
-
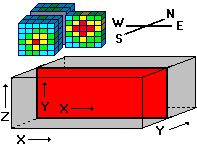
- Vertical North/South Layer (constant X value):
-
- Oblique slices are not available.
- 3D Solid Diagram
Insert a check here to display the output solid model as a 3D diagram.
Click this tab to set up the diagram options.
- Block Diagram
- Isosurface: Click in the Isosurface radio button to display the solid model as if enclosed in a "skin." This view will be smoother than a voxel display. (More info)
- Voxels: Click in the Voxels radio button to represent the solid model in the 3D display as color-coded voxels. You can choose to display either the Full Voxel, or just the Midpoint. Display of the midpoint only can significantly improve display time for huge models.
- Color Scheme: Choose the color scheme for the block model - automatic, table-based, etc. (More info)
- Isomesh: Check this box to plot a series of polylines that represent three-dimensional contours at a user-defined cutoff. Click this tab to establish the settings. (More info)
- Other 3D Solid Diagram Options: Use these checkboxes to append other layers to your 3D scene. (Summary)
- Output Options
- Save Output File: Check this to assign a name for the 3D scene in advance, rather than displaying it as Untitled.
- Automatic: Choose this option to have RockWorks assign the name automatically. It will use the name of the current program plus a numeric suffix, plus the ".Rw3D" file name extension.
- Manual: Choose this option to type in a name of your own for this RockPlot3D file.
- Display Output: Check this option to have the resulting scene displayed in RockPlot3D once it is created.
- Select the ModOps | Grid | Grid -> Solid menu option.
- Enter the requested menu settings, described above.
- Click the Process button to continue.
The program will scan the input solid model file and display the number of layers in the selected slice direction. For example, if you've selected to insert horizontal slice, the program will display the top to bottom layers in the model and their Z (elevation) coordinates. Or, if you have selected to insert a north-south vertical slice, it will display the existing slices and their X coordinates.
- Click on the layer in the existing solid model that is to be replaced by the input grid file, and click OK to continue.
The program will read the input grid file and insert its G values into the requested solid model layer. The model will be saved under the file name you specified.
If you requested a diagram, the model will be displayed in a RockPlot3D tab in the Options window, using the requested display type.
- You can adjust any of the modeling or diagram settings in the menus and then click the Process button again to regenerate the model and display.
 Back to Solid Menu Summary

RockWare home page