! You need to select the name of the FOLDER; the program is not asking you to select the name of any particular file.
! Don't select the "System" folder inside your project folder.
=====================================================
This project appears to be a RockWorks16 project.
"full project path"To upgrade a RockWorks15/16 project to the RockWorks20x format, a new project folder
and database will be created and your RockWorks15/16 project data copied into it.=====================================================
Do you wish to proceed?
=====================================================
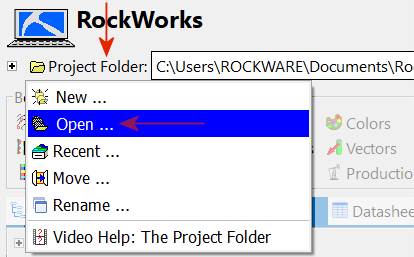
Click Yes to continue with the process of opening and updating a RockWorks16 project folder.
If you select Yes, you'll be presented with a series of screens where you will define the location of the new project folder, the coordinate system and units for the existing project, and the output coordinates for the new project.
- New Project Folder: The default name that will be displayed here is the name of your RockWorks16 project (such as "Airport"), now in the RockWorks Data folder.
-

If this is not acceptable, you can use the
 button to browse for a different location for this new project folder.
! Do not save the RockWorks20x project in the RockWorks16 project folder. - Database Engine:
- Use Default Database Engine: Choose this option to use the default database engine (SQLite).
- Customize the Database Engine (Advanced): Select this option to display advanced settings that allow you to customize the database to be used. (More info)
- New Project Settings:
- Create New Project with Data or Settings from an Existing Project: This should be the default setting. This will enable RockWorks to bring in data from the existing project.
- Create New Project with Data or Settings from an Existing Project: This should be the default setting. This will enable RockWorks to bring in data from the existing project.
- Click the Next button, at the bottom of the window, to proceed to the next tab.
- Base the New Project on the Following Project: The default displayed here will be the name of the RockWorks16 project you're opening. This should remain selected.
- Use the database structure, types tables and borehole data: This should be the default selection, so that all data from the RockWorks16 project will be brought into the new RockWorks20x project. This option should remain selected.
- Copy Project Menu Settings: This should be checked by default so that the menu settings (such as gridding methods, contour line styles, etc.) will be brought into the new project. Leave this checked.
- Copy Project Support Tables: This should be checked by default so that the "Misc Support Tables" will be brought into the new project. Leave this checked.
- Click the Next button at the bottom of the window to proceed to the next tab.