Installing RockWorks - The First Time
Reinstalling RockWorks
RockWorks can be installed from a file you've downloaded from the RockWare website.
! You will need administrator level access to your computer to run the installation and licensing programs.
! If you have already installed the RockWorks 20xx trial version (demo), you don't need to install again. Jump directly to licensing.
Download the Installation Program from the RockWare Website
To download the RockWorks20xx * installation program from the RockWare website, follow these steps.
- Access the Product Updates page from the RockWare website:
https://www.rockware.com/support/rockworks-support/rockworks-downloads/rockworks-product-updates/
- Find the RockWorks20xx item, click the small "Download" link below it.
- When requested, save the downloaded file ("rockworks20_64_installation.exe") on your computer (such as the Desktop or Downloads folder).
Install RockWorks20xx
- When the download is complete, click the browser’s Run or Open button. Or, you can use Windows Explorer or My Computer to locate the downloaded file, and double-click on it to start up the RockWorks20xx installation program.
- If you have User Account Controls active on your computer and you are prompted whether to let this program make changes to your computer, click Yes.
- Screen 1, License Agreement: In the first screen of the installation wizard, read the contents of the displayed license agreement. Click the I Accept or the I Do Not Accept button as appropriate.
If you do not accept the license agreement, click the Cancel button and the installation will halt. Contact RockWare if you need additional information about our license agreement.
If you click the I accept the agreement button, then click the Next > button at the bottom of the window.
- Screen 2, Select Components: Here you have some choices:
- Standard installation - Take the defaults for eveything: Choose this option to complete a normal installation of the software.
Highly recommended.
 Tutorial Files - will be installed into your \Documents\RockWorks Data\Samples folder.
 Override system file locations - unchecked. The program system files will be installed into the \Program Data\RockWare folder.
- Custom installation - Tutorial files off. We don't recommend you install using these settings unless you already have the sample files installed.
Tutorial Files - will not be installed.
- Custom Installation - Override system files. We don't recommend you install using this setting unless you need for the system files to be installed into a folder other than the user's \Program Data\RockWare folder.
Override system file locations - You will have the opportunity to install the program's system files to a location of your choice.
To progress to the next screen at each installation step, click on the Next button. To go back to a previous window, click on the Back button. To cancel the installation entirely, click Cancel.
- Screen 3, Special System Files: If Override is on, here you can define a customized location for the program's external graphic libraries. For example, if you want everyone to share a server-based version of these libraries, you can select that location. Be sure all of the users will have read permissions to the drive and folder you select.
- Pattern File Location: Choose where you want the RockWorks Pattern library to be installed and referenced.
- Symbol File Location: Choose where you want the RockWorks Symbol library to be installed and referenced.
Click the Next > button to proceed.
- Screen 4, System Support Files: If Override is on, here you can define a customized location for these system files:
- Raster Symbol bitmaps: These are the Google Earth symbols which you can display in the RockWorks datasheet or the Borehole Manager Location table.
Default = C:\ProgramData\RockWare\RasterSymbols.
- Landgrid files: These comprise the RockWorks PLSS landgrid library, called the LandBase, which is used to spot boreholes, plot section maps, etc. Note that these are not installed with the program - they are huge - and must be downloaded separately; this setting tells the downloader where they need to be installed.
Default = C:\ProgramData\RockWare\Landgrid\
- Root Directory for all projects: This defines the default "parent" folder for your RockWorks20xx project folders.
Default = C:\Users\username\Documents\RockWorks Data\
Click the Next > button.
- Screen 5, Copy Tutorial Data: If Tutorial Files is on, here you can define how to handle the management of these data files if this is NOT A NEW installation:
- Overwrite any existing tutorial data: Choose this if the factory sample files are to be copied to the \Documents\RockWorks Data\Samples\ folder after the installation is complete and the program is launched. This assures you have all of the sample tutorial files that we include with the program.
! If you have made any changes to the existing sample files, they will be overwritten.
- Update only when tutorial data is newer: Choose this option if the installer's sample files are to be copied to the \Documents\RockWorks Data\Samples\ folder on startup only if the factory versions are newer.
! Again, if you have made any changes to the existing sample files, they might be overwritten.
- Do not copy tutorial data: Choose this option if the factory sample files are not to be copied to the \Documents\RockWorks Data\Samples\ folder after installation is complete and the program is launched.
Click the Next > button.
- Screen 6, Select Additional Tasks: Use these options to select other items to do during installation.
- Additional shortcuts
- Create a desktop shortcut: Check this to create a program shortcut on your computer's desktop.
- Create a Quick Launch shortcut: Check this to create a program shortcut on your Windows taskbar.
- Component Object Model (COM)
- Register RockWorks: Check this option (default = on) for RockWorks to be registered in your Windows system. If you uncheck this there may be problems with recognition of file name extensions.
Click the Next > button.
- Screen 7, Ready to Install: Here you will see a summary of the installation options you have selected, for your review.
Click the Install button to proceed with installation. If you wish to review any of the settings, click the < Back button one or more times to return to a previous screen.
- Screen 8, Installation Complete: After all of the program files have been installed, you will see the final installer screen notifying you that it is complete.
- Start RockWorks20: Check this box if the program is to launch when you click the Finish button, below.
Click the Finish button to complete the installation.
* Note that the program name is "RockWorks2020" in the year "2020" and increments to "RockWorks2021" the year 2021, and so on. Thus you will see the use of the name "RockWorks20xx" or just "RockWorks20" in this documentation.
Start Up RockWorks20xx
- If "Start RockWorks20" was checked (above) then RockWorks will start and you will see a startup screen. You can also start the program using Desktop or Taskbar shortcuts, or via the Windows programs options.
Since RockWorks is always installed as a fully-functional, time-limited demo, you'll initially see how many days and sessions you have remaining in the trial period.
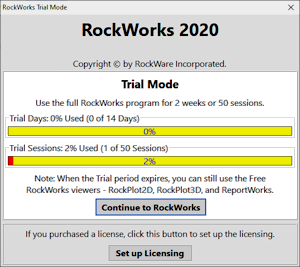
- To proceed into RockWorks in Trial mode, click the Continue to RockWorks button. The startup screen will close, and you can begin work in the program - data entry, modeling, and map/diagram generation using the Borehole Operations, ModOps programs, Utilities programs, and Graphics programs. In trial model you have full use of the software for 14 days or 50 sessions.
Or, if you have purchased the software and wish to license it at this time, click the Set up Licensing button. See Licensing RockWorks for details.
RockWare releases updates to the RockWorks program when new features are added, problems are fixed, etc. This generally occurs each month. These new revisions are posted to our website. Like the original program, the updates can be installed by downloading the latest installer from the RockWare website.
To re-install RockWorks, you should follow the same instructions as listed above for about installing. You can install right over the top of the existing copy of the program.
IMPORTANT:
! Re-installing should not require a new unlocking code.
! Do not un-install the program prior to re-installing because the licensing will be lost.
! You can set up automatic notification of updates in the Setup | Preferences window. (More info)

RockWare home page