RockWorks | Graphics | Animate | Google Earth Flyovers | Circular
This program:
- Reads a listing of data from the Datasheet Editor: XY locations, elevations, radii, tilt angles, and times.
- Creates a KML output file containing the flyover that circles the listed points, using the specified settings.
- Creates a KMZ (zip) output file, containing the KML file.
- Loads the KMZ file in Google Earth.
See also
Advanced Flyovers - Command-Driven
Feature Level: RockWorks Basic and higher
Menu Options
Step-by-Step Summary
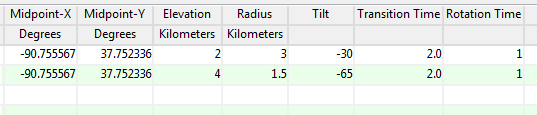
- Data Columns: These prompts tell RockWorks which columns in the current Datasheet contain the intput data.
Click on an existing name to select a different name from the drop-down list. See a sample data layout below.
- X (Easting): Column that contains the X coordinates for the center of the circular tours.
These can be Eastings in meters or feet, decimal longitudes, etc. See Defining your Datasheet Coordinates for more information.
- Y (Northing): Column that contains the Y coordinates for the circle centerpoints.
- Elevation: Column that contains the elevation coordinates and units at which the circular flyover will occur. This represents absolute elevation, not relative to the ground.
- Circle Radius: Column that contains the radius and units for this circular flight path.
- Tilt Angle: Column that contains the 0 to -90 angle of the flyover view.
- Transition Duration: Column that contains the duration in seconds between that flyover and the next. For example, for there to be 2 seconds between the current flight path and the next, you would enter "2".
- Rotation Duration: Column that contains the duration for that circular flight path.
! Note that this value is defined in seconds per 10-degrees of rotation. For example, for the 360 degree circle tour to occur in 36 seconds, you would enter "1".
- Tour Parameters
- Tour Title: Defines the flyover tour name.
- Start with Vertical Descent: Insert a check in this box if the animation is to start in outer space, and then zoom down to the start of the tour, as a virtual introduction to the flyover.
Note: As it descends, it gradually tilts to the same angle as that specified for the first circular fly-over. Unlike the standard Google Earth fly-in (i.e. clicking on a waypoint), the descent does not appear to accelerate exponentially with the descent. Instead, a geometric progression is used to slow the descent down as the camera moves closer to the project area. Then net result is the illusion of a uniform descent thereby providing the viewer with a better spatial orientation.
- Start with Rotation from Opposite Side of Earth: Check this item if the zoomed-out starting point should be on the opposite side of the Earth relative to the tour. The Earth then spins around such that the project area is directly below the "camera", then the descent begins.
- Initial Elevation: Enter the elevation in Kilometers from which the vertical descent will begin.
- P2 Elevation: Enter the elevation in Kilometers at which the vertical descent will end and it will start transition to P3.
- P3 Elevation: Enter the elevation in Kilometers at which the camera angle will tilt toward the center point.
- P3 Offset: Enter the offset from the center point at which the camera will be positioned.
- Group Name: Type in the name to assign to the flyover, which will be displayed in the Google Earth data tree.
- Output Options: Click on this tab to define the output file and display settings.
- Output File Name
- Automatic: Choose this option to have RockWorks assign the name automatically. It will use the name of the current program plus a numeric suffix, plus the ".KMZ" file name extension.
- Manual: Click this option to type in your own file name. The extension is ".KMZ".
- Display output within Google Earth: Check this box if you want to display the output at this time in Google Earth.
! Note that the actual program which will be used to display the KMZ file is determined by your Windows settings.
- Use Custom View: If unchecked, the starting viewpoint for the images will be determined automatically. If checked you can set a custom view.
- Longitude, Latitude: Type in the longitude and latitude coordinates where the viewpoint will be.
- Heading: Type in the 0 to 360 degree bearing from the viewpoint to the flyover start.
- Tilt: Type in the angle downward from the viewpoint to the flyover start.
- Range: Enter the distance in meters from the viewpoint to the flyover.
- Access the RockWorks Datasheet program tab.
- Create a new datasheet and enter or import your flyover script into the datasheet.
Or, open one of the sample files and replace that data with your own.
! Click the Example button at the top of the window to load a sample file that is installed with the program.
Longitude and latitude coordinates must be in decimal format. If you're using another coordinate system, be sure you've specified the Units and Projection Settings as appropriate. Be sure the Elevation and Radius columns' units are also defined.
- Select the RockWorks | Graphics | Animate | Google Earth Flyovers | Circular menu option.
- Enter the program settings as described above.
- Click the Continue button to proceed.
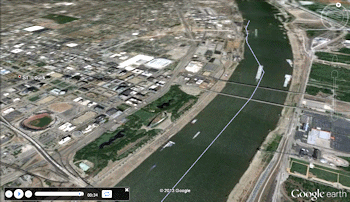
The program will create a KML file listing the circular flyover around the first point, using the radius, tilt, and rotation time settings. If multiple rows are listed, it will pause the defined transition and create the next circular flyover. It will create a KMZ (zip) file containing the KML file. The Google Earth KML and KMZ file names will be assigned as ou specified.
The resulting tour will be displayed in Google Earth, if requested.
 Back to Animate Menu Summary
"Google" is a trademark of Google Inc.

RockWare home page