Import Kansas Geological Survey Files into the Borehole Manager
Borehole Manager | File | Import | Kansas Geological Survey

This program is used to import Kansas Geological Survey well and tops files into the RockWorks borehole database. This data is not supplied with the RockWorks program; you can download them from the Kansas Geological Survey web site at: http://www.kgs.ku.edu/Magellan/Qualified/index.html. Well coordinates will be converted to the current project coordinate system.

Menu Options
Step-by-Step Summary


File Selection Tab

Borehole Options Tab

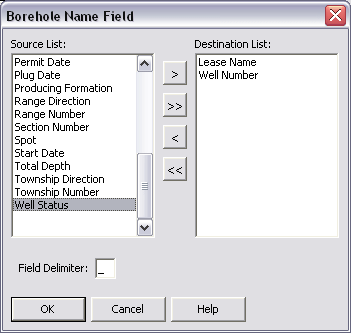
Location Fields Use this tab to select which KGS fields are to be mapped to the RockWorks Location fields. These are well location and information fields only.

  1. Open the project folder (if necessary) in which the well records are to be created.
  2. Access the Borehole Manager.
  3. Choose the File | Import | Kansas Geological Survey option.
  4. Enter the requested menu options, described above.
  5. Click OK to continue.

    The program will scan the input files and determine whether wells with the same names already exist. If no, the new well record will be created. If yes, the program will either overwrite the existing record, store the new record under a new name, warn you that the record exists, or skip the existing record, based on your selection under Overwrite Options.

    The specified Input Fields will be written to the selected Data Fields in the RockWorks database.

    Stratigraphic top depths, and formation names, will be recorded to the Stratigraphy data table.

    The formation names listed in the import file will be written to the database's Stratigraphy Types Table.

  6. Post import:
    1. Stratigraphy Types: Expand the Project Tables | Types Tables heading in the Project Manager pane along the left edge of the program window, and double-click on the Stratigraphy Types item. The importer will have recorded the listed formation names into the Type Table, and will do its best to list them in proper order but you'll need to review their order and assign desired patterns and colors. The easiest way to define stratigraphic order here is by editing the Order column (1, 2, 3, 4, etc.) - this is the column upon which the Table is sorted.
    2. Well locations: Check that the Collar Coordinates - Easting and Northing - were computed for all of the wells during import, from either the lon/lat or PLSS coordinates as you selected above.
    3. Elevations and TD: Be sure these required fields are present for all wells before you start mapping/modeling.
    4. Output Dimensions: Once all of the Location data is entered for all of the wells, be sure to establish your output dimensions prior to mapping/modeling.
  7. Once these have been entered, you can use the Stratigraphy menu tools to fill in missing stratigraphy, and to model and display the formation tops and bases as maps, 3D surfaces & models, profiles, sections, and fences. You can also visualize the source data on 2D and 3D logs using the Striplogs menu tools.

Back to Import Data

RockWare home page