RockPlot2D File | Export | KMZ (Google Earth) Map
or
RockWorks | Graphics | 2D Tools | Export | KMZ | Map -> Google Earth
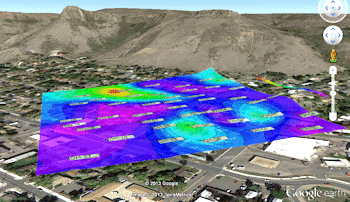
Use this program to save an existing map (saved as a RockPlot2D "Rw2D file") into a Google Earth KMZ (Keyhole Markup Language - Zipped) file. The result is your RockWorks map displayed in Google Earth.
Menu Options
Step-by-Step Summary
- Rw2D Input File: (Graphics menu only.) Click here to browse for the name of the RockPlot2D file containing the map to be exported to KMZ format. This file must have already been saved in the RockPlot2D window. See Saving RockPlot2D Images.
- Conversion Options: Click this tab to establish output settings.
- Vector: Click this option to export the map using vector components, such as lines, triangles, and symbols.
- Replace Vector Symbols with Raster Symbols: Check this if any vector map symbols are to be replaced by the graphic symbol you select here. This generally provides better organization and visibility in Google Earth. If left unchecked, the output will represent the map symbols with small lines.
- Icon Scaler: If you are option for raster symbols here, use this setting to adjust the size for the symbols.
- Raster: Click here if the entire RockPlot2D map is to be output as a raster image.
- Export Style:
- Drape (Clamped to Ground): Choose this option to lay the map on the ground surface in Google Earth.
- Float at Specific Elevation: Choose this option to float the map above the ground surface in Google Earth.
- Elevation (meters): Click to the right to type in the absolute elevation at which the map will float, in meters. (This does not represent elevation relative to the ground, but elevation relative to sea level.)
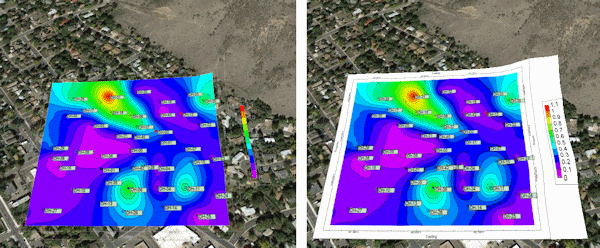
- Transparent Background: Check this option to have the background color in the image be set to fully transparent. In the example below, the map on the left was generated with Transparent Background turned on.
Note that you can also apply transparency to the map as a whole once it is plotted in Google Earth.
-
- Group Name: Click this tab to type in the name for the group or heading in Google Earth. For example, "Borehole Location Map" or "Structural Contours".
- Output Options: Click on this tab to define the output file and display settings.
- Output File Name
- Automatic: Choose this option to have RockWorks assign the name automatically. It will use the name of the current program plus a numeric suffix, plus the ".KMZ" file name extension.
- Manual: Click this option to type in your own file name. The extension is ".KMZ".
- Display output within Google Earth: Check this box if you want to display the output at this time in Google Earth.
! Note that the actual program which will be used to display the KMZ file is determined by your Windows settings.
- Use Custom View: If unchecked, the starting viewpoint for the map will be determined automatically. If checked you can set a custom view.
-
- Longitude, Latitude: Type in the longitude and latitude coordinates where the viewpoint will be.
- Heading: Type in the 0 to 360 degree bearing from the viewpoint to the map.
- Tilt: Type in the angle downward from the viewpoint to the map.
- Range: Enter the distance in meters from the viewpoint to the map.
- From RockPlot2D: If necessary, open the Rw2D file you wish to export (see Opening Plot Files) or save the current plot if it is untitled (see Saving RockPlot2D Images). Be sure to use the Layers pane to turn on/off the items you do/don't want to have displayed in the output.
- Select the File | Export | KMZ (Google Earth) Map command from the RockPlot2D menu.
-OR-
From the main program window, select the Graphics | 2D Tools | Export | KMZ | Map -> Google Earth menu option.
- Enter the requested menu item, as described above.
- Click the Process button to proceed.
The program will create a KML file containing the map image. It will create a KMZ (zip) file containing the KML file.
- If requested, RockWorks will launch your default KMZ viewing program (established in your Windows system, typically Google Earth) and load the output file.
 Back to Export menu
Back to Graphics Menu Summary

RockWare home page