When you create a new project in RockWorks, you are asked to define for the program the coordinate system and units that you'll be using to enter your data and create output models/maps/diagrams. These are displayed on the Collar Coordinates tab, and it is there that you'll enter the Easting and Northing (X and Y) for each borehole. The Collar Coordinates tab is where you enter all of the required location fields.
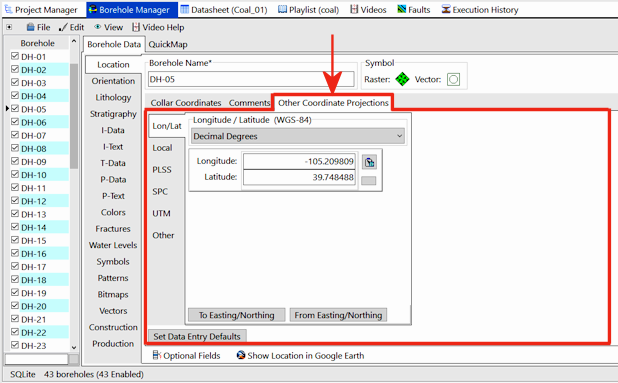
However, if you (1) have other coordinates you wish to store for the hole and/or (2) need to compute the project coordinates from these other coordinates, you can use the Other Coordinate Projections tab in the Location table to enter the borehole's coordinates in any other coordinate system.
For example, if you know the longitude and latitude coordinates for the borehole, you can enter (or import) these here for reference.
You can enter or import as many of the other coordinate systems as you like.
Other Coords tab options:
- Set Entry Defaults: Click on this button to define default settings for the optional coordinates you wish to enter into the database. For example, if you are hand-entering US PLSS coordinates, you can define the default Meridian, Range, and/or Township settings to be used. This makes hand-entry of data more efficient.
Tip: Western Ranges and southern Townships are actually stored in the database as negative values, for example -70 is the same as 70 West, and -3 is the same as 3 South, even though they are displayed in the interface as positive numbers. Because of this, if you define West as the default Range direction and type in "70", RockWorks will highlight the East button. If you define South as the default Township and type in "3", RockWorks will highlight the North button. You'll need to re-click the West or South button or (perhaps easier) type in your western Ranges and southern Townships as negatives - RockWorks will then display them as positive numbers with the correct direction selected.
- Coordinate conversion tools:
- Use the To Easting/Northing button if you want to compute the required Easting and Northing fields (on the Collar Coordinates tab) from the other coordinate projection currently displayed, for the current borehole.
! BE SURE ABOUT THIS - clicking this button tells RockWorks to read the displayed Other Coordinate Projections values (such as the longitude and latitude coordinates shown in the example above), convert them to the project coordinate system, and overwrite the current Collar Coordinates Easting and Northing values, for this borehole. This is not undo-able.
- Use the From Easting/Northing button if you wish to compute these other coordinates from the required Easting and Northing fields (on the Collar Coordinates tab), for the current borehole.
! BE SURE ABOUT THIS TOO - clicking this button tells RockWorks to read the Easting and Northing values listed in the Collar Coordinates tab for the current hole, convert them to the currently-displayed Other Coordinate Projections system, and overwrite the displayed values. This is not undo-able.
See the links below for bulk coordinate conversion tools.
 Back to Location Table

RockWare home page