![]()
How it's Used
How to Insert Edit Text into a Log Design
Menu Settings
How to Reposition the Text
How to Review the Settings
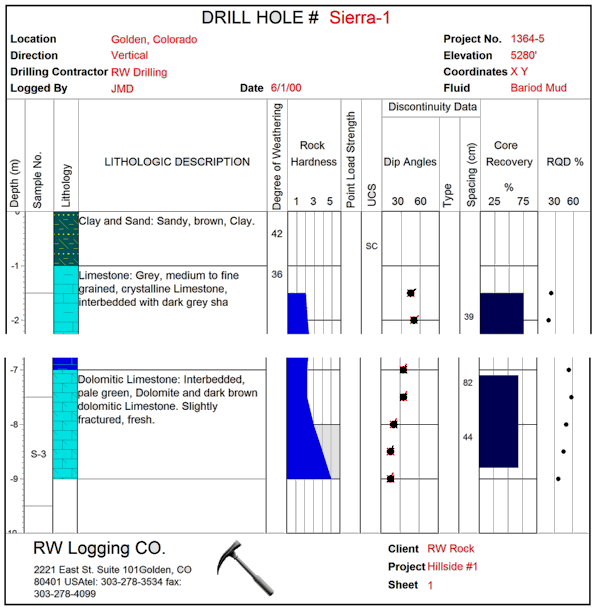
The Edit Text button is used to plot textual labels in the header or footer portion of the log. It is used for text such as dates, client company names, and other information that will change from log to log, project to project. The actual text that is to be plotted for an Edit Text item is declared in the log data file (unlike the Static Text entries with which the text for the label is declared in the log design file). See the red text in the example below
How it works: During compiling, if the LogPlot program finds Edit-Text entries in the data file, it will look for Edit Text items in the log's design that are flagged with the same names. If it finds a match, the label declared for the item in the data file will be plotted in the header or footer of the log at the Edit Text location.
Restrictions: You may include a virtually unlimited number of Edit Text items in the header or footer. The Edit Text labels can be up to 120 characters in length, including spaces. They can occupy a single line only - wrapping will not occur. If you need multi-line text, see Header/Footer Edit Notes.
Data and Design file example(s): The picture above is taken from the sample file "Documents\LogPlot 8\Samples\Enviro-geotech7.ldfx8" and illustrates how location, contractor, drill hole name, and other changing fields can be entered into the data file as Edit-Text, and displayed on the log header and footer (here, shown in red). Static text labels are shown in black.
Name: Enter the name for this Edit Text item. Each Edit Text item must have a unique name so that you can refer to each one individually in the data file.
If you have the same Edit Text items on Header #1 and Header #2, or in Footer #1 and Footer #2, they may share the same name, thus requiring only one entry in the LogPlot data file.
Group: The group is used to organize the Edit Text entries into different tabs in the data file. If you don't wish to assign groups simply leave it set to "Default". To create a new group, simply type in the name. To choose an existing group, select it from the drop-down list.
Position: These coordinates determine the placement of the handle of the Edit Text block, in the header or footer of the log. The X coordinate represents the horizontal (left to right) placement, and the Y coordinate the vertical placement in inches or centimeters relative to the top of the header or footer. The defaults reflect the location where the mouse button was clicked (step 2 above). You may change the text placement by editing these values, or by moving the text itself on the design screen using your mouse. See the alignment settings, below, for information about the position of the handle relative to the text label.
The units (inches or cms) are defined in the File | Page Setup window.
Default Text: Enter the text to be used as default for this Edit Text entry.
The default text serves two purposes:
- As a placeholder in the design window: In this example, "Enter Location Here" will be displayed for this Edit Text field in the log design screen. If the default text is typical of the length of the data you'll usually enter, it's helpful for knowing how much space the text will occupy when the log is compiled.
- As default text in the data template: If you use the Data | Create Data New File menu option to create a new data file for your log design, the program will suggest this text as the text to be plotted. You may change the default entry as necessary.
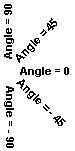
Angle: Enter the angle at which the Edit Text label is to be plotted. The text angle may be any integer between -90 and 90.
Font: Use this button to access the Font dialog box, where you may set the Edit Text label’s font type, color, and size.
Color: Use this button to select a color for the text. This can also be established using the Font button.
Horizontal Alignment: Click in a radio button to choose how the text is to be aligned horizontally relative to the insertion handle. In the graphic examples below, the Edit-Text labels are set to Top vertical alignment; they show the difference between left-, center-, and right-aligned text.
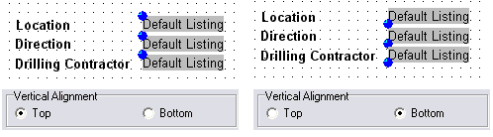
Vertical Alignment: Click in a radio button to choose how the text is to be aligned vertically relative to the insertion handle. In the examples below, the six Static Text labels are set to Left horizontal alignment, and show the difference between Top and Bottom vertical alignment.
Transparency: Click in a radio button to set the text as Transparent (with no background) or Opaque. If you select Opaque, click on the color box to choose a color for the background of the text.
The text label you specified will be displayed on the screen at the declared location.
See: Move or Resize Header/Footer Items for information about dragging, resizing, and aligning items.
If you need to access the Setup window you can:
![]() Back to Header/Footer Item Summary
Back to Header/Footer Item Summary
![]()