![]()
How it's Used
How to Insert an Edit Note into a Log Design
Menu Settings
How to Reposition the Text
How to Review the Settings
The Header/Footer Edit Notes item displays multi-line, wrapping text in the log header or footer. The text to be plotted is entered into the data file, for text that will change from log to log (such as drilling notes, well descriptions, etc.). You might think of Edit Notes as expanded Edit Text labels. If you want to enter non-changing notes, use the Static Notes item.
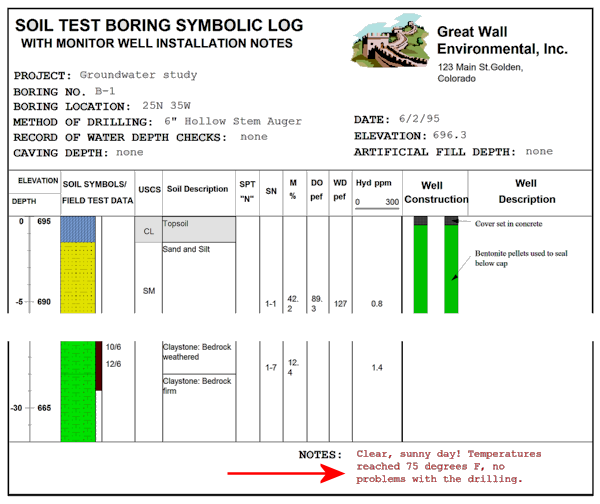
How it works: When LogPlot compiles your data into the log design, it will look in the data file for an Edit Note item with the same name as the Edit-Notes item in the design (e.g. "Comments" and "Comments"). If it finds a match, then the Notes in the data file will be plotted in the designated location. If it does not find a Notes entry in the data file, no text will be displayed (though the notes block itself will if outlined with a border or filled with a solid color).
Restrictions: There’s no limit to the number of Edit Notes entities you can include in your log design.
Name: Enter the name for this Edit Note item. Each Edit Note item must have a unique name so that you can refer to each one individually in the data file. For example, you might name an Edit Note item that will contain driller's notes, "Driller Notes."
Group: The group is used to organize the Edit Note entries into different datasheets in the data file, and this is used only when you create a blank data file automatically for your log design. If you don't wish to assign groups simply leave it set to the default setting. To create a new group, simply type in the name. To choose an existing group, select it from the drop-down list. See Groups for more information.
Position: These coordinates determine the placement of the edges of the note block in the header or footer of the log. The X coordinate represents the horizontal (left to right) placement, and the Y coordinate the vertical placement in decimal inches or centimeters relative to the top of the header or footer. The defaults reflect the location where the mouse button was clicked (step 4 above). You may change the text placement by editing these values, or by moving/resizing the block itself on the design screen (usually easier, for Notes). Units (inches or centimeters) are declared under the File | Page Setup option.
Margin: These settings define the top, bottom, left and right margins within the Notes block. They are defined in decimal inches or centimeters (the same units and the Position coordinates).
Text: Press the
button to enter into the displayed pop-up window the text to be used as default for this Edit Notes entry. You can resize the pop-up window if necessary by grabbing and dragging the window’s lower-left corner. There is no limit to the number of characters in the Notes field.
What is "default" text? The text you enter will be displayed for this Notes field in the log design screen - a handy placeholder. In addition, when you use the Data Editor's Data | Update Data Template from Log Design or the Log Designer's Data | Create New Data File menu options, the program will suggest this text as the text to be plotted. You may change the default entry as necessary.
Text Alignment: Click in the Left, Center, or Right radio button to choose the alignment within the defined block.
Font: Use this button to access the Font dialog box, where you may set the Note’s font type, size, and color.
Color: Use this button to change the color for the text. This can also be selected using the Font button.
Rotation: Use this drop-down list to define any rotation of the Notes text.
Border: If you want the Notes block to be outlined, insert a check in the Outline check-box and choose a line color.
Fill: If you want the Notes block to be filled with color, insert a check in the Fill check-box and choose a fill color.
! For the Notes block, it’s possible that the Position settings don’t allow enough space to see the text once you’ve clicked Apply; you’ll either need to modify the Position coordinates or close the Note Setup window to resize the block manually.
See: Move or Resize Header/Footer Items for information about dragging, resizing, and aligning items.
If you need to access the Setup window you can:
![]() Back to Header/Footer Item Summary
Back to Header/Footer Item Summary
![]()