Introduction
Example
How to enter Construction Data
Use: The LogPlot Construction datasheet is used to enter depth intervals and well material "keywords" for display as a Well Construction diagram on a log. In addition, the user declares the inner and outer diameter for the materials for correct representation of width. The construction "keywords" are associated with graphic patterns just like lithologic keywords, and are easily selected from the data tab. In addition you can specify an "offset" from well center, enabling you to display more than one separate boring in a single Well Construction diagram.
Corresponding log design component: Intervals and materials listed in this tab will be plotted on the log within the Well Column of the same name.
Corresponding RockWorks data table: Construction
Right-Click Options: When you right-click in any of the Construction datasheet's cells, you have the following options:
Cut, Copy, Paste Insert/Append/Delete Rows Manipulate Columns Fill Depth Column Edit Data Page Name Delete Data Page Move
Automatic:
If there is already a Well Construction column in the current log design to which you will be linking the data, you can use the Data | Update Data File from Log Design menu option to insert a new Construction datasheet in the current data file. The program will know how to name the tab based on the log design information.
Manual:
You can also use the Data | New Data Page | Construction menu option to manually insert a new Construction datasheet.
New Name: Type in the name to assign to the datasheet. LogPlot will use this name to match data to the item in the log design.
Click OK.
The program will add to the data file a Construction datasheet labeled with the selected name and with 7 blank columns: Depth to Top, Depth to Base, Outer Diameter, Inner Diameter, Material, Offset, and Description.
Name: The name displayed on the Construction tab is used to match the data to a particular Well Construction Column in the log design. This name is declared when you first create the data page (above) and can be edited using the Data | Edit Data Page Name command.
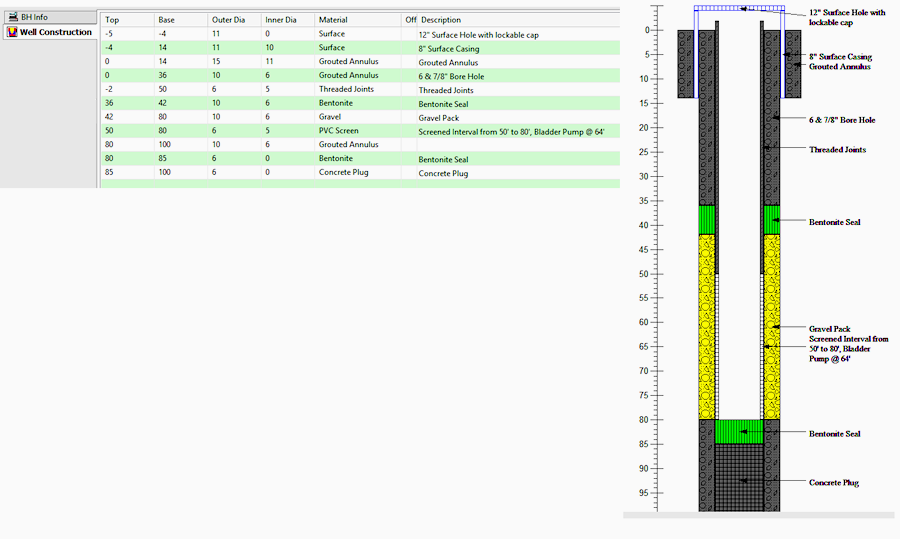
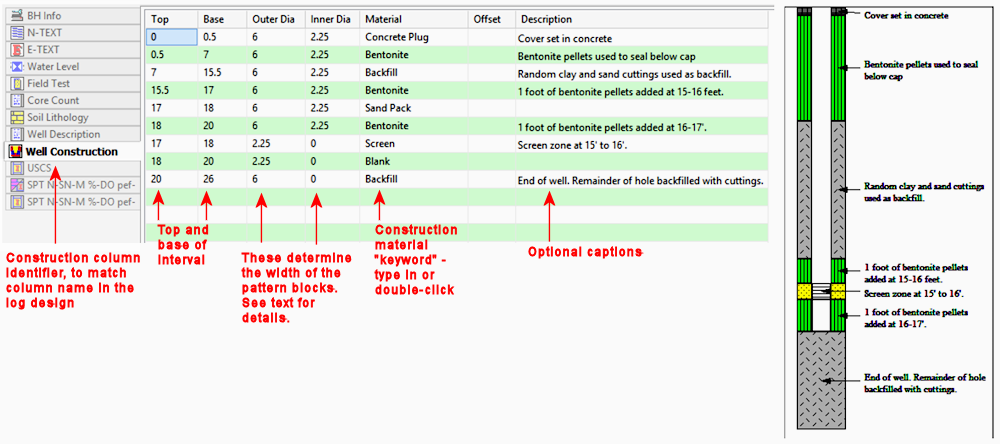
Top, Base: In these columns you list the depth at the top and base of the interval to be filled with construction material fill.
! For items that are above ground, such as a surface cap in a well construction diagram, you need to enter them as negative values.Outer Dia: The value entered in this column determines the outer width of the pattern blocks in the Construction Column. The Construction Column is set up in the Log Designer to represent a particular well diameter, usually in real world coordinates such as inches or centimeters. The Outer Diameter setting established here determines how much of the width of the graphic portion of the Construction Column will be filled with that pattern block.
Example: Let's say you created a Construction Column in the log designer and established its diameter at "8" (inches). If you then declared a pattern interval in the Construction datasheet to have an Outer Dia of "6," the pattern block would be plotted 3/4 of the way to the edge of the graphic portion of the column.
Inner Dia: The value entered in this column determines how far to the center of the Construction Column that the interval will be filled with the pattern block. In the example above, the first 6 items are listed with an inner diameter of 2.25, resulting in a hollow space. The Screen, by contrast, has an Inner Diameter of 0, such that it fills the center of the column.
Material: In this column you type in the "keyword" for the well construction interval. These construction keywords are listed in the same keyword library as the lithology keywords and are associated with particular patterns. Keywords may be comprised of one or more words.
Shortcut: Rather than typing in the keyword name, just double-click on the Material cell to bring up the Lithology Selector window. Here you can pick from the available keywords in the current keyword file and view the pattern that is associated with them. See the Lithology Selector Window for information.
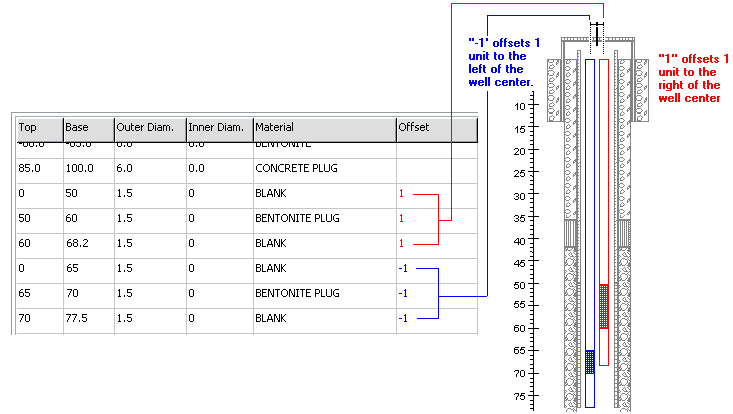
Offset: (Optional). This setting is used to declare the offset from the center of the well that this material block is to be plotted, enabling multiple borings within a single construction diagram. Negative values offset the block to the left of the center, positive values to the right. In the example below, the items noted in red are plotted to the right, and the items noted in blue to the left.
If no offset is declared, the program assumes the item to be centered in the well.
Caption: (Optional). This column is used to define any captions to be plotted to the right of the construction diagram. The well column can be set up in the log design to be comprised of part diagram and part labels, with settings for the label font size/color and lines/arrows.
![]() Back to LogPlot Datasheet Summary
Back to LogPlot Datasheet Summary
![]()