RockWorks | Utilities | Planes | 3-Points->Planes | Multiple
Given a list of xyz coordinates for three points along a series of planes, this program computes the dip direction (or strike) and dip angle for planes that pass through these points. The output is stored within two new datasheet columns.
Menu Options
Step-by-Step Summary
Menu Options
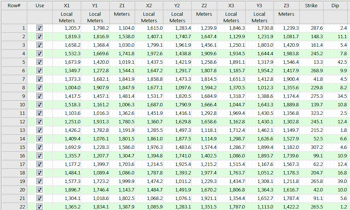
- Input Columns: The prompts along the left side of the window tell RockWorks which columns in the input datasheet contain what data.
Click on an existing name to select a different name from the drop-down list.
! Note that the coordinate system and units must be defined for the XY coordinates (e.g. lon/lat or UTM meters), and the units (feet or meters) for the elevations. See Defining your Datasheet Coordinates for more information.
- X1: Select the name of the column in the Datasheet that contains the X (Easting) coordinates for the first point along each plane.
- Y1: Select the column that contains the Y (Northing) coordinates for the first point.
- Z1: Select the column that contains the Z (Elevation) coordinate for the first point.
- X2: Select the name of the column in the Datasheet that contains the X coordinates for the second point along each plane.
- Y2: Select the column that contains the Y coordinates for the second point.
- Z2: Select the column that contains the Z coordinates for the second point.
- X3: Select the name of the column in the Datasheet that contains the X coordinates for the third point along each plane.
- Y3: Select the column that contains the Y coordinates for the third point.
- Z3: Datasheet column that contains the Z coordinates for the third point.
- Output Columns
- Direction: If the output style is set to dip direction (see below), this column will contain the dip direction of the plane. Otherwise, it will contain the strike (and the dip will be generated based on the right-hand rule).
- Dip: Dip of plane (in degrees) whereby zero = horizontal, 90 = vertical, downward.
- Output Style:
- Dip Direction: Choose this if you want the output direction to represent Dip Direction in a 0 to 360 degree format.
- Strike: Choose this option if you want the output direction to represent the strike of the plane. The dip will adhere to the right-hand rule.
Step-by-Step Summary
- Access the Utilities program tab.
- Create a new datasheet and enter/import your X1Y1Z1 X2Y2Z2 X3Y3Z3 data into the datasheet.
Or, open one of the sample files and replace that data with your own. (In the Samples folder, an example file = "\RockWorks17 Data\ Samples\Three_Point_Planes_01.rwDat".)
- Select the Utilities | Planes | 3-Points->Planes | Multiple option.
- Enter the menu options, described above.
- Click the Process button to continue.
The program will compute the orientation of each plane and record the strike and dip, or dip direction and dip angle, in the specified output columns.
Tip: Use this data to create a stereonet diagram. Be sure to specify the format of the input data (strike & dip, or dip & dip angle).
See also
 Back to Planes Menu Summary

RockWare home page