- Launch RockWorks14 or RockWorks2006.
- Open the project you wish to bring into RockWorks20 (or newer).
- When the drillhole data is loaded into the Borehole Manager, select the File | Export | ASCII menu option.
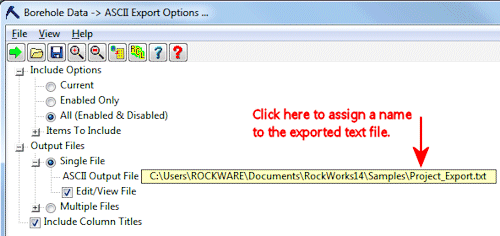
- In RockWorks14, enter the following:
In RockWorks2006, enter the following:
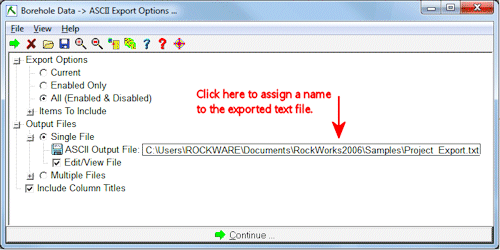
- Under "Items to Include" be sure that all of the data types are checked.
- Click Continue to export the data.
- Launch RockWorks20.
- Click on the Project Folder button at the top-left corner of the program window, and select Create New Project.
- On the Folder tab:
- Project Name: Type in the name for the new project folder to be created. We recommend creating the folder in the "RockWorks Data" folder which resides in your "Documents" folder.
Example: C\Users\RockWare\Documents\RockWorks Data\Airport 2013 - Choose Use Default Database Engine.
- Choose Base the New Project on Default Settings.
- Project Name: Type in the name for the new project folder to be created. We recommend creating the folder in the "RockWorks Data" folder which resides in your "Documents" folder.
- On the Coordinates tab: (Please refer to Coordinate Systems if you need more details than are listed here.)
- Horizontal Coordinates: Here you can tell RockWorks20 the map coordinate system you wish to define for this project. If you know the coordinate system in which your old project's borehole locations were defined, and you want to continue using that system, choose that. If you don't know, choose Local (Custom). (If you want to define a different map coordinate system for this new project, that's OK; RockWorks can convert the old coordinates when you import the data in the next step.)
- For Local (Custom) coordinates, you can geo-reference the project by typing in the known Latitude and Longitude at the project's "0,0" coordinate spot. If you don't know, leave these set to "0,0".
- For State Plane coordinates, you need to click on the button to define the State Plane zone.
- For UTM coordinates, you need to select the Datum and the UTM Zone.
- Horizontal Units: This defines the units for the map points for this new project. Choose Feet or Meters. (Again, you can choose the same units or different units than your previous project; RockWorks can convert them.)
- Vertical Units: This lets you define whether you want this project's depths and elevations to represent feet or meters.
- Output Coordinates: The coordinate system you've selected for data storage (above) will also be used in your output models and diagrams. If your horizontal and vertical units don't match (e.g. mixed feet and meters), then you need to select which units to use for your output. Since RockWorks does a lot of volume computations, cubic meter-feet don't make sense. You have to choose one or the other. Choose either Feet or Meters.
- Horizontal Coordinates: Here you can tell RockWorks20 the map coordinate system you wish to define for this project. If you know the coordinate system in which your old project's borehole locations were defined, and you want to continue using that system, choose that. If you don't know, choose Local (Custom). (If you want to define a different map coordinate system for this new project, that's OK; RockWorks can convert the old coordinates when you import the data in the next step.)
- Click the Finish button.
- Confirm the data coordinates and units, and the output units by clicking Yes. If you wish to make any changes, click No.
- RockWorks will build the project folder and the borehole database. Note that the coordinate system and units will be shown on the Borehole Manager's Location tables, and in the Coordinates pane at the top of the window.
- Once the new project is created, click on the Borehole Manager program tab.
- Click on the File menu, right above the borehole Name pane, and choose Import | CSV | Multiple Tables.
- On the File Selection Tab:
- Import Filename: Browse for the name of the file you created under Step 1, above.
- File Contains Column Titles: Check this box, if you did include column titles, as shown in the windows above. If you did not include column titles in the export file, uncheck this setting.
- On the Block Selection Tab:
- All of the RockWorks14/RockWorks2006 data blocks should be mapped automatically. But, it's good to double-check.
- On the Data Coordinates Tab: These settings will default to the project coordinates you just established. If you created the new project using a different coordinate system or units than the old project, be sure to specify the imported data setup here; RockWorks will convert the data as necessary.
- Imported Data Coordinate System: Choose the coordinate system represented in the imported data. The project coordinates are shown to the right, for your reference.
- For Local (Custom) coordinates, you can geo-reference the project by typing in the known Latitude and Longitude at the project's "0,0" coordinate spot. If you don't know, leave these set to "0,0".
- For State Plane coordinates, you need to click on the button to define the State Plane zone.
- For UTM coordinates, you need to select the Datum and the UTM Zone.
- Vertical Values: Here choose whether the depths and elevations of your old project data are defined in Feet or Meters.
- Imported Data Coordinate System: Choose the coordinate system represented in the imported data. The project coordinates are shown to the right, for your reference.
- On the Location Fields tab: You'll see your import fields displayed in the left column, and the database fields to the right of them. RockWorks should be able to map the expected fields automatically.
- Confirm that the automatic fields were mapped properly by the program.
- If there are columns in the input file which do not yet have a place to land in the new project database, click on the RW Database Field cell, and choose <New Field> to create a new field in the Location table.
- Borehole Overwrite Options: If you are importing data into a new database, you can simply choose Create a New Record.
- Click the Finish button to import the data.