RockWorks | Borehole Operations | Lithology | Lithology -> I-Data (Table)
Often, we wish to create numerical block models based on a parameter that can be associated with lithology. For example, let's say that we wish to model porosity but we don't have any downhole porosity samples. One trick is to assume that gravels have a porosity of 0.8, while shales have a porosity of 0.1, and so on. Entering these inferred values as downhole geochemistry and then modeling them is one method. But, that requires lots of work. A simpler method is to use the Lithology -> I-Data program.
While reading downhole lithology data, this program will compare the lithology names to a "lookup table" (see below) that associates a real number with each lithotype (e.g. Sandstone = 1.0, Limestone = 0.5). These numbers may represent porosities, hydraulic conductivities, strength, cohesion, or any other quantitative value that you wish to model. The program uses these numbers to populate a designated column within the I-Data table for all of the boreholes within the current project folder. Finally, these values may be used as the basis for creating solid models, fence diagrams, and contoured profiles and sections, and more.
See also
Transfer Lithology to I-Data if you simply wish to transfer the lithology G values to the I-Data table.
Feature Level: RockWorks Standard and higher
Menu Options
Step-by-Step Summary
- Lithology/Idata Table: Click to browse for the existing, tab-delimited text file that contains lithology terms and associated quantitative value (e.g. porosity, permeability, hydraulic conductivity, compaction, cohesion, etc.). Note: Fields within the lithology/idata table must be delimited by tab (ASCII code #9) characters. The lithology terms must match those defined in the current Lithology Type Table table. See more information below.
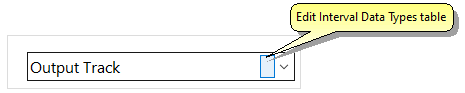
- I-Data Output Track: Click here to select the I-Data column in which to store quantitative data. Any existing data will be overwritten.
! If you need to add a new column to the I-Data table, just click the button to the right.
-
- Access the RockWorks Borehole Manager program tab.
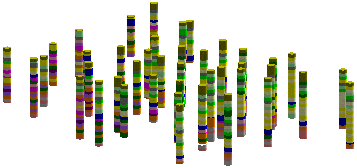
- If necessary, access the Project Folder where the borehole lithology data to be translated is stored. This example shows how lithologic information can be displayed in 3D logs; in this example white and yellow intervals represents porous, siliclastic units.
- Create a backup of your existing project database (never hurts), using the File | Backup Database option.
- Create a Lithology/I-Data look-up file that lists lithology keywords with the values to be used to represent them in the I-Data table. This table must list the keywords exactly as they are listed in the Lithology Types Table. (Tip: Use the Lithology Types Table's File | Export to an ASCII File tool to export the listing of material names, open that file into Windows Notepad, and then add the real number values. Be sure the columns are separate by <Tab> characters rather than spaces.) The values can represent porosity, conductivity, or virtually anything that you can associate with the lithology types.
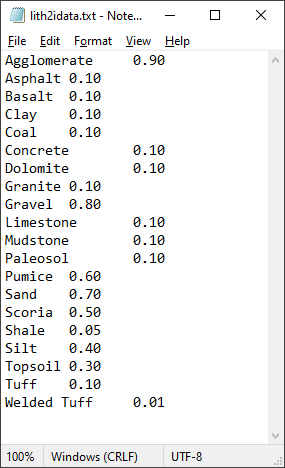
Lithology/I-Data look-up file loaded into Windows Notepad.
- If necessary, define an I-Data column in the project for the output data.
- Select the Borehole Operations | Lithology | Lithology -> I-Data (Table) menu option.
- Enter the requested program settings, described above.
- Click the Continue button to proceed.
For each borehole, the program will add the lithology depth intervals to the I-Data table, if they do not already exist, and will record the corresponding real number value for that lithotype in the user-specified column in the I-Data table.
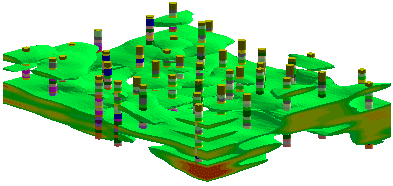
- You can now use the I-Data menu tools to create a solid model (or profile, section, fence, etc.) of these values. The example below shows a porosity model combined with lithology logs. Note how the porous zones correspond with siliclastic lithologies.
 Back to Lithology Menu Summary

RockWare home page