RockWorks | Graphics | 2D Tools | Montage
This program is used to rescale (if necessary) and combine multiple RockPlot2D files (*.Rw2D) into a single "montage," using coordinate information that you enter into the RockWorks datasheet. The new, combined image can be displayed in a new, untitled RockPlot2D window. The files to be combined must be RockWorks Rw2D files, and must reside in the project folder.
Note: You can also use the ReportWorks program for a more interactive method of combining images into a page layout.
Menu Options
Step-by-Step Summary
- Data Columns: Use these prompts to specify the columns in the current datasheet that contain the required input data.
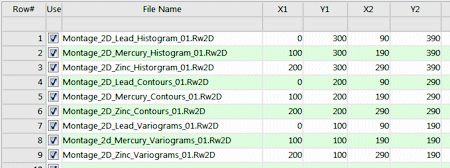
- File Name: Select from the drop-down list the column in the datasheet in which the Rw2D file names are listed.
Tip: use the File | Import | Create File List program to quickly create a list of specified file names.
- X-Min: Select the name of the datasheet column in which the minimum X (left- or westernmost) coordinates for each of the Rw2D files are listed.
- Y-Min: Select the datasheet column in which the minimum Y (bottom- or southernmost) coordinates for the Rw2D files are listed.
- X-Max: Select the column where the maximum X coordinates for the images are listed.
- Y-Max: Select the column where the maximum Y coordinates for the imagse are listed.
- Output Options
- Save Output File: Check this to assign a name for the output diagram in advance, rather than displaying it as Untitled.
- Automatic: Choose this option to have RockWorks assign the name automatically. It will use the name of the current program plus a numeric suffix, plus the ".Rw2D" file name extension.
- Manual: Choose this option to type in a name of your own for this file.
- Display Output: Check this option to have the resulting montage displayed in RockPlot2D once it is created.
Follow these steps to create a montage image of two or more Rw2D files.
- Be sure all of the images to be included in the montage have been saved on disk as Rw2D files, in the current project folder. This is necessary because RockPlot2D will rescale and combine the contents of these Rw2D files rather than reading the images as displayed on the screen. See Saving RockPlot2D Files for information.
- Visualize how you want the images to look in the montage; sketch this on a piece of paper if necessary.
- Type into the RockWorks datasheet the Rw2D file names along with their new corner coordinates.You do not need to define coordinate system or units here, since these can be simple diagram units.
- Select the Graphics | 2D Tools | Montage menu option.
- Enter the menu settings, as described above.
- Click the Process button at the bottom of the Montage window.
The program will locate the first "Rw2D" file listed in the montage table and rescale it to fit within theindicated X and Y axis range. The program will locate the second "Rw2D" file in the table and rescale it tothe indicated coordinates ranges, and then append the second file onto the end of the first. It will continuein this manner for as many files as are listed in the montage table.
If requested, the completed plot will be displayed in a RockPlot2D tab in the Options window.
- You can adjust any of the options along the left and click the Process button to regenerate the montage.
- View / save / manipulate / print / export the diagram in the RockPlot2D window.
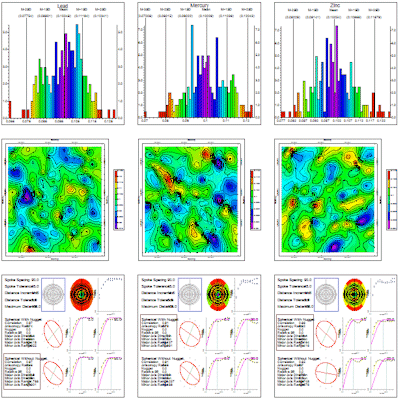
Here's how the files listed in the above sample would look in a completed montage plot:
 Back to Graphics Menu Summary

RockWare home page