RockWorks | Utilities | Earth | Pre-Defined Polygons
This program:
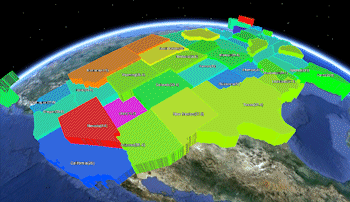
- Reads a listing of data from the datasheet: Country or U.S. state names, and measured values of some kind.
- Creates a KML output file which illustrates the relative values as extruded polygons in the shape of the state/country as selected.
- Creates a KMZ (zip) output file, containing the KML file.
- Loads the KMZ file in Google Earth.
Menu Options
Step-by-Step Summary
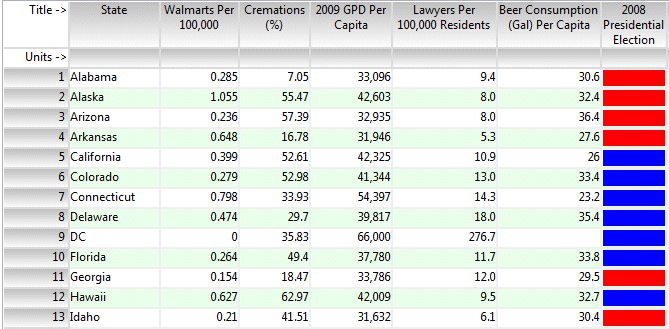
- Data Columns: These prompts define which columns in the current datasheet contain the input data. Click on the existing name to select a different name from the drop-down list. See a sample data layout below.
- Polygon Name: Select the column that contains the names of the states or countries.
- Options
- Polygon Types
- Countries: If the names in the Polygon Name column represent countries, choose this option.
- States: If the names in the Polygon Name column represent U.S. states, choose this option.
- Polygon Fill Colors
- Fixed: Choose this option for all of the extruded polygons to be the same color. Click on the color box to choose a new color for the polygons.
- Defined by Data Column: Choose this option if you have colors listed in the datasheet, to be used to color the polygons.
- Color Column: Select the column that contains the color listings.
- Proportional to Data within Designated Column: Choose this option to have the program color-code the polygons based on quantitative values listed in the datasheet. A cold-to-hot color scheme is used to represent low-to-high values read from the column.
- Data Column: Select the column that contains the data values to be used to color the polygons. Note that you can use different columns for colors and elevations, below.
- Polygon Perimeter: Use these settings to set up the edges of the extruded polygons.
- Color
- Same as Polygon Fill Color: Choose this for the fill and perimter colors to be the same.
- Other: Choose this option to set the perimeter to a different color. Click on the color box to the right to choose the perimeter color.
- Thickness: Defines the thickness, in pixels, for the perimeter. A setting of "1" creates a thin edge, "2" a thick edge.
- Elevation at Top of Polygon: Use these settings to define the extent to which the polygons will be extruded from the earth's surface.
- 2D - Flat: Choose this for the polygon to lie along the earth's surface.
- 3D - Fixed Elevation: Choose this for all polygons to be extruded to the same elevation.
- Elevation (meters): Click here to enter the elevation for the top of all polygons, in meters.
- 3D - Defined by Elevation Column: Choose this if you have the elevation for each polygon listed in the datasheet.
- Elevation Column: Select the name of the column containing the elevation values.
- 3D - Proportional to Data within Column: Choose this if the polygons are to be extruded low-to-high based on values listed in the datasheet.
- Data Column: Select the column that contains the data values to be used to define the extruded polygon elevations.
- Minimum Altitude (meters): Enter the altitude for the polygon(s) with the lowest Z-Value.
- Maximum Altitude (meters): Enter the altitude for the polygon(s) with the highest Z-Value. All polygons with intermediate Z-Values will be scaled proportionally between the Minimum and Maximum altitudes.
- Opacity: Type in the opacity for all of the polygons, from 0 (fully transparent) to 100 (fully opaque).
- Labels: Insert a check here to label the site in the Google Earth side panel and in the map.
- Column: Select the column in the current datasheet that contains the text to be used for the labels.
- Label Color: Click the color box to choose the color for the labels.
- Label Size: Defines the size of the labels. Default = 1.
Rule of thumb: 0.5 will create small labels, 2.0 large labels.
- Use Polygon Name as Prefix when Labeling Polygon: Check this item to include the Polygon Name (defined in the Data Columns tab) before the text listed in the label column. For example, if the polygon name is "Colorado" and the label text are Beer Consumption measurements, then the label would read "Colorado (33.4)".
- Group Name: Type in the name to assign to the polygon map, which will be displayed in the Google Earth data tree.
- Output Options: Click on this tab to define the output file and display settings.
- Output File Name
- Automatic: Choose this option to have RockWorks assign the name automatically. It will use the name of the current program plus a numeric suffix, plus the ".KMZ" file name extension.
- Manual: Click this option to type in your own file name. The extension is ".KMZ".
- Display output within Google Earth: Check this box if you want to display the output at this time in Google Earth.
! Note that the actual program which will be used to display the KMZ file is determined by your Windows settings.
- Use Custom View: If unchecked, the starting viewpoint for the map will be determined automatically. If checked you can set a custom view.
- Longitude, Latitude: Type in the longitude and latitude coordinates where the viewpoint will be.
- Heading: Type in the 0 to 360 degree bearing from the viewpoint to the map.
- Tilt: Type in the angle downward from the viewpoint to the map.
- Range: Enter the distance in meters from the viewpoint to the map.
- Access the RockWorks Datasheet program tab.
- Create a new datasheet and enter or import your location names and measured values into the datasheet. (More info.)
Or, open one of the sample files and replace that data with your own.
! Click the Example button to the left to load a sample file that is installed with the program.
Here is an example of how a data file might look.
- Select the RockWorks | Utilities | Earth | Predefined Polygons menu option.
- Enter the menu options as described above.
- Click the Process button to continue.
The program will create a KML file containing these extruded polygons. It will create a KMZ (zip) file containing the KML file. The Google Earth KML and KMZ file names will be assigned as you specified.
The resulting map will be displayed in Google Earth, if requested.
 Back to Earth Menu Summary
"Google" is a trademark of Google Inc.

RockWare home page