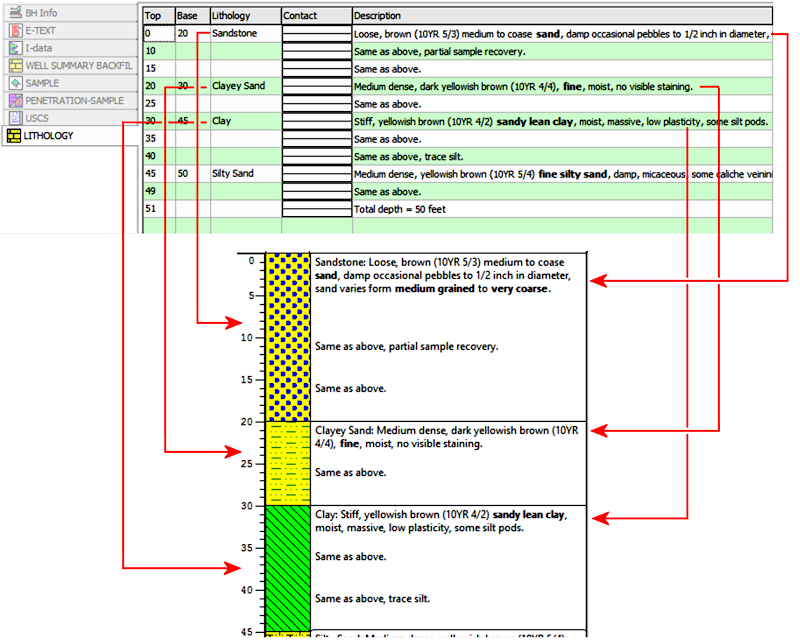
This illustrates how lithology data might look when plotted into a Lithology Pattern and Lithology Description column on a log:
Introduction
Example
How to enter Lithology Data
Use: The LogPlot Lithology datasheet is used to enter a set of lithologic descriptions for a Lithology Pattern column and/or Lithology Description column that have the same name. LogPlot compares the declared keyword to those listed in the keyword file. If a keyword match is made, the pattern declared for that keyword will be plotted in the Lithology Pattern column for that interval. Any short or extended description text can be plotted in the Lithology Description column.
Alternatives: If you wish to plot text that is not associated with lithologic information and has no keywords (such as comments, text measurements, etc.), then you should use either the Point Text datasheet or the Interval Text datasheet. Text that is to be plotted vertically in the body of the log is entered using the Vertical Text datasheet. If you want to plot interbedded pattern blocks, use the Interbed datasheet.
Corresponding log design component:
* Keywords listed in the Lithology column of the Lithology datasheet are linked to graphic patterns. These patterns will be plotted in the Lithology Pattern column of the same name, if any, in the log design. The keywords themselves can be plotted in the Lithology Description column, or they can be omitted, as declared in the Log Designer.
* Descriptions entered in the Description column of the Lithology datasheet will be plotted within the Lithology Description column of the same name, if any, in the log design. Descriptions may be short or extended, and are optional.
Corresponding RockWorks data table: Lithology
Right-Click Options: When you right-click in any of the Lithology datasheet's cells, you have these options:
Cut, Copy, Paste Insert/Append/Delete Rows Manipulate Columns Edit Data Page Name Delete Data Page Move
This illustrates how lithology data might look when plotted into a Lithology Pattern and Lithology Description column on a log:
Automatic:
If there is already a Lithology Pattern or Lithology Description column in the current log design to which you’ll be linking the data, you can use the Data | Update Data File from Log Design tool to insert a new Lithology datasheet in the current data file. The program will know how to name the datasheet (tab) based on the log design information.
Manual:
Select the Data | New Data Page | Lithology menu option to manually insert a Lithology datasheet into the current file.
New Name: Type in the name to assign to the datasheet. LogPlot will use this name to match data to the item(s) in the log design.
Click OK.
The program will add to the data file a Lithology datasheet labeled with the selected name.
Shortcut: Use the right-click options to rename the data page.
Name: The name displayed on the datasheet's tab is used to match the data to a particular Lithology Pattern and/or Lithology Description column in the log design. This name is declared when you first create the data page (above) and can be edited using the Data | Edit Data Page Name menu option.
Top, Base: In these columns list the depth at the top and the base of the lithologic interval being described on that row.
Shortcut: Right-click on any data column in the Lithology datasheet and select Columns | Fill Column.
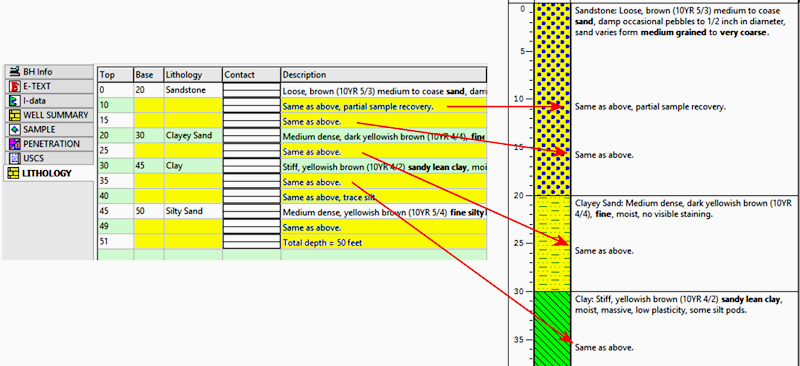
Comments: If you leave the Base depth blank, you can plot comments within a larger description interval.
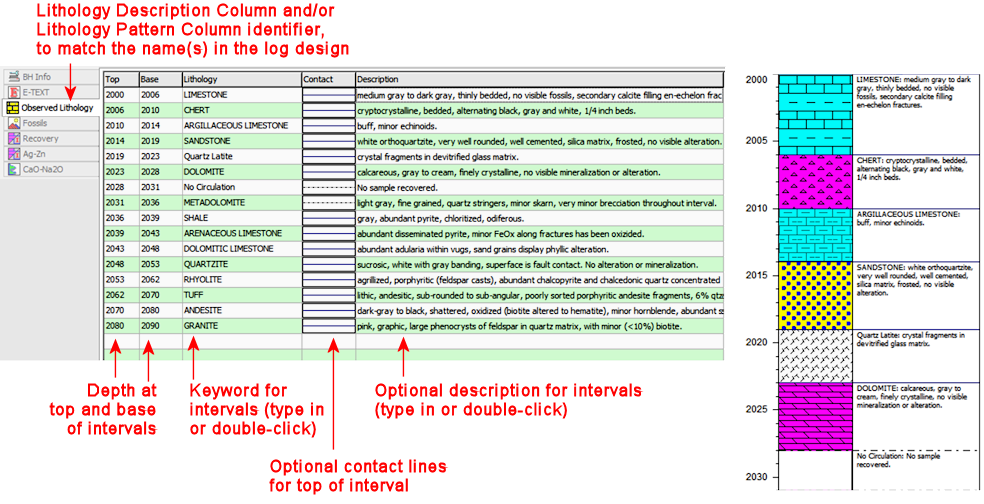
Lithology: In this column you type in the "keyword" for the interval. Keywords may be comprised of one or more words.
Shortcut: Rather than typing in the keyword name, just double-click on the keyword cell to bring up the Lithology Selector window. Here you can pick from the available keywords in the current keyword file and view the pattern that is associated with them.
Contact: Double-click in this column to specify a customized contact line for the top of the listed interval. This line will be plotted between pattern blocks and between description blocks if present and if description divider lines are enabled.
Description: In this column, you may type in any extended description that you wish to have plotted in the Description column of the log design.
Shortcut: Rather than typing the extended description into the Lithology datasheet cell, you can double-click on the description cell to bring up the Description Editor window.
! You can apply text formatting to specific words within the description. While the font, font size, and overall font style are defined in the log design, you can apply bold, italic, superscript, subscript, color, etc. formatting to specific words.
! This will only apply if there is no bold, italic, color, and other formatting established for the entire column in the log design.You can format your descriptive text with spaces and paragraphs. In the Description Editor window, simply add spaces or carriage returns (paragraph markers using the Enter key) to format your text.
See the Description Editor for more information.
Tip: If you need specific depth-placement of the non-contiguous text, you should use the Comments method, discussed above.
![]() Back to LogPlot Datasheet Summary
Back to LogPlot Datasheet Summary
![]()