You can move and resize log body items using several methods:
Manually
Alignment tools
Options window
Shift tools
See also: Lock the Design Screen
Reposition log body items by grabbing (left-click-and-hold) and dragging them on the design screen itself. The program also offers a reference grid and a "snapping" feature to make it easy to line things up. You may select items individually or in groups.
- Click on the pointer button in the Log Designer toolbar.
- Click on the item to be moved to select it. It will contain small, round "handles" on each corner (or each end, if a line). To select multiple items, hold down the Ctrl key and click on additional items.
- Keep the mouse button depressed and drag the item to its new location. If you need to move the item just a pixel or two, you can use your keyboard’s arrow keys to “nudge” the item left or right
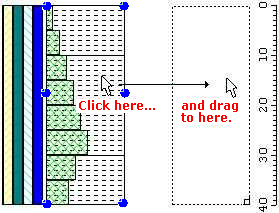
Or, to resize an item, click on the largest handle, located at the lower-right corner or at the end of the line. Keep the mouse button depressed and drag that corner or end point to the new location. Release the mouse button when it is resized as you wish.

Use the Edit menu's Align tools to assist you in getting your log body items arranged.
- Click on the pointer button in the Log Designer toolbar.
- Click on the first of the items to be aligned. This is the "reference" item, to which the other items you choose will be lined up with.
- Hold down the Ctrl key and click on the additional items to be lined up with the first.
- With all of the items selected, click on the Edit | Align option you wish to use. (Or, right-click and choose Align | . . . )
Align | Left: Multiple items will be set to the same left (X1) coordinate. This can be handy for columns which overlay each other, such as Curve columns.
Align | Right: Multiple items will be set to the same right (X2) coordinate.
Align | Horizontal Spacing: Items will be spaced evenly from left to right.
Align | Horizontal Snap: Item edges will be aligned, at the "snap margin" that is defined.
Align | Set Snap Margin: The snap margin defaults to 0, so that the column edges will snap to each other, but you can set a greater margin to force space between the columns.
! Alignment will occur based on the first item selected.
Each log body item has characteristics that can be set via its options window. There are "coordinate" fields that display the current horizontal coordinates for the item. You may change the placement of the item by editing these coordinates. You can also use the options window to change font type and sizes for text items, line styles, etc.
- Click on the pointer button
 in the Log Designer toolbar.
- Double-click on the log body column you wish to edit, to display its options window. (Or, right-click on the item, and select Edit Item.) (Or, double-click on the item in the Item List pane.)
- Edit the placement coordinates for the item.
- Click the Apply button to see the effect of the position change.
- Click Close to close the Settings window and return to the design screen.
It is typically easier to use the manual method since it involves working right on the design screen, and you can see what you are doing. And, with the reference grid and snapping features, it's easy to line things up.
However, you might find it valuable to use the options window coordinates if you need to align items at a resolution different than that of the snapping grid.
For example, if you have two log body columns that you want to line up right next to each other, you could set the horizontal (x) coordinate to the same value for their shared sides.

To shift selected items or all of the items in the log body by the same amount to the left or to the right, follow these steps:
- Click in the Log Body design pane to make it active.
- If you want to shift only certain items, select those items.
- Click on the Shift (Active Panel) item in the Edit menu. You'll see a pop-up menu.
- Choose Shift Selected to move only the items currently selected in the log body pane. Or, choose Shift All to move all of the items in the log body pane. You might use this shift-all tool to move items to the right to increase your left page margin, for example.
The program will display this options window:
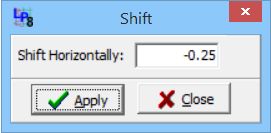
- Enter the X (horizontal) shift, in decimal inches or centimeters. Positive values will shift items to the right. Negative values will shift items to the left.
- Click the Apply button to move the log body items the indicated amount, or click the Close button to cancel the operation.
The horizontal range of the log design depends on the page size you have established (File | Print Setup).
The Shift Body Items command is not affected by any snapping settings you may have established.
 Back to Log Body Introduction

RockWare home page