RockWorks | Utilities | Faults | 3D Faults File -> 3D Diagram
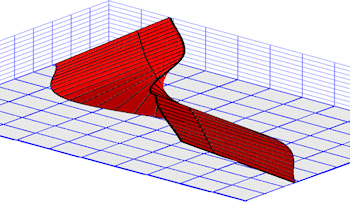
This program reads an existing 3D fault file (.RwFlt) and displays the fault(s) as a 3D ribbon diagram.
! This program does not apply faulting to a solid model, it just shows the fault locations. While you can create the Boolean Fault Model in the Utilities interface, you need to have RockWorks Advanced to be able to use it to fault a 3D solid model.
See also: Creating a 3D Fault File - Single Faults, Creating a 3D Fault File - Multiple Faults, Solid Model Faulting
Menu Options
Step-by-Step Summary
Menu Options
- 3D Fault File: Click to the right to browse for the existing .RwFlt file to be displayed. See the links above for more information about creating the single- or multiple-fault .RwFlt files.
- Diagram: Click the Options button to the right to establish diagram settings.
- Group Name: Type in the name for the item in RockPlot3D.
- Plot Triangle Perimeters: Check this box if the boundaries of each triangle comprising the ribbon are to be displayed. Use the Line Color box to choose the color and the Line Thickness setting to select the thickness in pixels.
- Fill Mesh Triangles: Check this box if the triangles comprising the ribbon are to be filled with a solid color (as shown in these examples). Click Fill Color to choose the color and Thickness to assign panel thickness (in project units).
- Reference Cage: Check this option to include axis annotation. (More.)
Step-by-Step Summary
- Access the RockWorks Utilities program tab.
- Select the Faults | 3D Fault File -> 3D Diagram menu option.
- Enter the requested menu settings, described above.
- Click the Process button to continue.
The program will read the selected 3D fault file and create a series of connected, oriented triangles representing the fault panels for display in a RockPlot3D tab.
- You can adjust any of the input options along the left side of the window and click the Process button again to regenerate the model and display.
! Each time you click the Process button, the existing 3D display will be replaced.
- View / save / manipulate / print the diagram in the RockPlot3D window.
 Back to Faults Menu Summary

RockWare home page


![]() Back to Faults Menu Summary
Back to Faults Menu Summary