RockWorks | Utilities | EarthApps | Flyover | Advanced: Command Driven
This program:
- Reads a listing of data from the Datasheet Editor: Google Earth commands, XY locations, headings, inclinations, and flight times.
- Creates a KML output file containing the flyover along the listed route, using the command specifications.
- Creates a KMZ (zip) output file, containing the KML file.
- Loads the KMZ file in Google Earth.
See also: Advanced Flyovers - Circular
Menu Options
Step-by-Step Summary
Menu Options
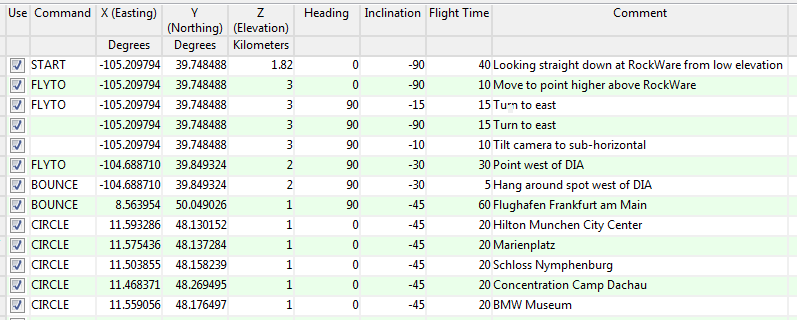
- Input Columns: The prompts along the left side of the window tell RockWorks which columns in the input datasheet contain what data.
Click on an existing name to select a different name from the drop-down list. See a sample data layout below.
- Command: Column that lists the flyover commands.
- X (Easting): Column that contains the X coordinates for the flyover action.
These can be Eastings in meters or feet, decimal longitudes, etc. See Defining your Datasheet Coordinates for more information.
- Y (Northing): Column that contains the Y coordinates for the flyover action.
- Z (Elevation): Column that contains the elevation coordinates and units for the flyover action.
- Heading: Column that contains the heading, in 0 - 360 azimuth, for the flyover action.
- Inclination: Column that contains the inclination for the flyover camera.
- Flight Time: Column that contains the flight time values for the flyover action.
- Tour Title: Defines the flyover tour name.
- Circle Duraction (Seconds): Type in the number of seconds that should transpire for each flyover circle in the script.
- Circle Radius (Meters): Enter the radius for all of the flyover circles in the script.
Step-by-Step Summary
- Access the Utilities program tab.
- Create a new datasheet and enter or import your flyover script into the datasheet. (More info.)
Or, open one of the sample files and replace that data with your own. (In this example, the sample file = "RockWorks17 Data\EarthApps Samples\Flyover_Advanced_Command_01.rwDat")
Longitude and latitude coordinates must be in decimal format. If you're using another coordinate system, be sure you've specified the Units and the Projection Settings as appropriate. Be sure the Elevation column's units are also defined.
- Select the RockWorks | Utilities | EarthApps | Flyover | Advanced: Command-Driven menu option.
- Enter the menu options as described above.
! Tip: If you're working with one of the sample .rwDat files, you can load its specific menu settings by (1) clicking on the Menu button at the top of the window, (2) clicking Load from RCL, and (3) browsing for the .rcl file with the same name as the .rwDat file you're working with.
- Click the Process button to continue.
The program will create a KML file listing the flyover path along the designated route. It will create a KMZ (zip) file containing the KML file. The Google Earth KML and KMZ file names will be assigned automatically.
- If RockWorks displays the KMZ name in a popup window for your reference, you can confirm:
- Automatically load file into Google Earth: Be sure this is checked if you want to display the output at this time.
- Show this message every time a KMZ File is Created: If checked, this window will be displayed each time a Google Earth output is created. Uncheck this if you prefer not to see this window in the future.
(Both of these settings are also available via the Preferences menu.)
- Click OK to continue or Cancel to cancel the operation.
The resulting flyover will be displayed in Google Earth, if requested.
 Back to Flyover Summary
"Google" is a trademark of Google Inc.

RockWare home page