 Estimated time: 1 minute.
In this section, you will add border annotations to the combined map in the previous step.
! You can add these same borders to maps as they are being created, using the Labeled Axes, Peripherals, and other settings in most 2D map windows (such as the Borehole Operations | Maps | Borehole Map program, and the Utilities | Maps | Point Symbols program). We recommend, though, that if you intend to combine different maps, it's best to create the separate maps without borders, combine the maps as layers or in RockPlot2D, and then add the border annotation after the maps are combined. That's what we are doing in this lesson.
! These map border annotations are also offered in the main RockWorks menu, via the Graphics | Embellish | Map menu.
! It is necessary that you have completed the previous lesson before continuing.
- With the combined point and contour map displayed on the screen, select the RockPlot2D Utilities | Annotate option.
- Insert a check in
 Labeled Axes and click on the tab to adjust the settings:
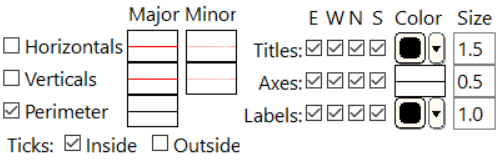
- Axis Titles: You can edit any titles as you wish.
- Dimensions: Set this to Automatic.
- Set the visible items and styles as shown here.
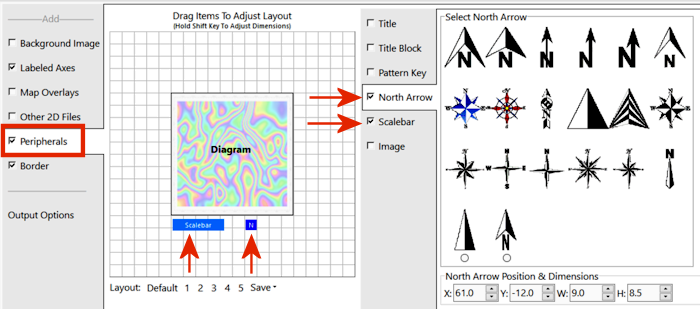
- Insert a check in Peripherals and click on the tab to adjust the settings:
- North Arrow: Check this on.
- Select a style from the gallery on the right.
- Adjust the position of the North Arrow in the preview pane by clicking and dragging with your mouse.
- Adjust the size of the North Arrow by holding down the Shift key as you click on a corner and drag.
- Scalebar: Check this on.
- Adjust the position of the Scalebar in the preview pane by clicking and dragging with your mouse.
- Adjust the size of the Scalebar by holding down the Shift key as you click on a corner and drag.
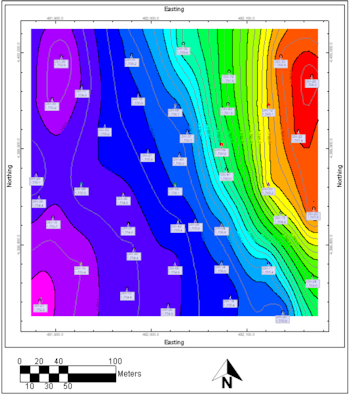
The Preview pane might look like this:
- Click Continue when you are done entering this information.
The program will add the requested annotation to the combined map, displayed in a new RockPlot window.
- Save the map:
- Click on the Save button
 or choose File | Save to save this image.
- Type in the name: map with border and click Save. RockPlot2D will append the ".Rw2D" file name extension automatically.
 Annotating 2D Plot Files

RockWare home page