
How it's Used
How to Draw a Header/Footer Line
How to Reposition the Line
How to Access the Line Settings
The Header/Footer Rectangle button is used to define a rectangle anywhere in the header or footer portion of the log. This is a fixed design item with no corresponding data file commands.
- Access the Log Designer window.
- Click in the header or footer design pane you wish to edit. (Use the Visible Sections check-boxes to show/hide the different design panes.)
- Select the Rectangle button
 from the Log Designer tool pane. The pointer will change shape to a "+" for drawing the rectangle.
- Place the "+" at the intended location for the upper-left corner of the rectangle, in the header or footer portion of the design screen.
- Hold the mouse button down and drag down and to the right until the "+" has reached the opposite corner point for the rectangle.
- Release the mouse button.
The rectangle will be displayed on the screen.
See: Move or Resize Header/Footer Items for information about dragging, resizing, and aligning items.
You can use the Header/Footer Rectangle Setup window to adjust the rectangle's position, the line style, thickness, and color, and its fill color, if any.
- Double-click on the rectangle to access its Setup window. (Tip: You can also right-click on the rectangle and choose Edit Item, or double-click on the rectangle in the Item View pane.)
- Adjust the rectangle's placement by editing the edge coordinates:
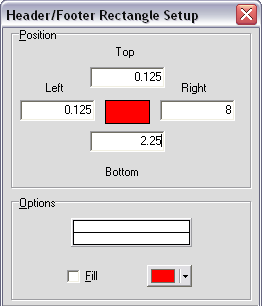
Left, Right: These coordinates determine the horizontal placement of the left and right edges of the rectangle in the header/footer of the log. You may change the rectangle's position by editing these values, or by simply moving or resizing the item on the design screen itself, as discussed above. The horizontal coordinates are expressed in decimal inches or centimeters relative to the left edge of the design screen.
Top, Bottom: These coordinates determine the vertical placement of the top and bottom edges of the rectangle in the header/footer of the log. You may change the rectangle's position by editing these values, or by simply moving or resizing the item on the design screen itself. The vertical coordinates are expressed in decimal inches or centimeters relative to the top edge of the design screen.
- Adjust the rectangle's appearance by clicking on the line sample and choosing style, thickness, and color. Click OK to close the line properties window.
- Fill: Insert a check in this box if you want the rectangle to be filled with color. Then click on the color box to the right to select the fill color.
- To accept the displayed information, click the Apply button. You will see the rectangle displayed on the screen according to your settings. You may continue to adjust the settings if necessary, remember to click Apply any time you want your changes applied.
- To close the Rectangle Setup window, click the Close button.
 Back to Header/Footer Item Summary

RockWare home page