The Borehole Manager’s Stratigraphy table is used to enter interpreted stratigraphic data only. These are interpreted formations, often groups of lithologies, which are distinctly layered in nature, are consistent between wells in their order from the surface downward, and never repeat within a borehole. See Lithology versus Stratigraphy for more details about the differences between "lithology" and "stratigraphy." You may leave this table blank if you have no stratigraphy data.
The Stratigraphy data tables link to the Stratigraphy Types Table where the formations are defined.
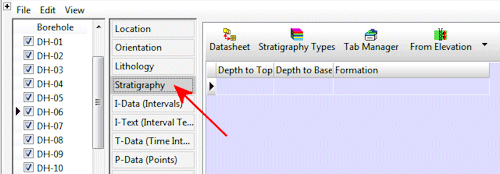
Accessing the Stratigraphy Table
- Access the Borehole Manager
- Create a new project as necessary.
- Create a new well if necessary, or click on the existing well to be edited.
- Click on the Stratigraphy button for the well.
Stratigraphy Fields
These instructions are for hand-entering the data; please see the links at the end of this topic for other options.
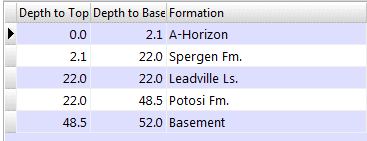
- Depth to Top: Enter the measured depth to the top of the first stratigraphic horizon for the well.
! The depth units must be the same as the Vertical units you defined for the project (and which are displayed on the Location table). For example, if the elevation and TD for the hole are shown there in feet, then the depth listings here must be in feet as well.
! The depth values must be positive.
- Depth to Base: Enter the measured depth to the base of the first stratigraphic horizon for the well.
! RockWorks generally requires that you enter the top and the base of each formation. However...
- If you don’t know the base of the lowest formation – perhaps the borehole ends mid-formation – you can leave this blank. See Missing Formations for more information.
- If you don't know the bases of any of your formations - you intend to create logs, straight sections, and structure/isopach maps only - you can leave them all blank. See Missing Formations for more information.
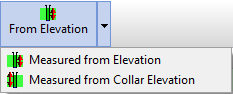
- From Elevation / From Collar Elevation: Use this button at the top of the table to define for this borehole which datum your depths were measured from.
- Choose Measured from Elevation if the depths were measured from the ground elevation (entered as the "Z (Elevation)" field in the Collar Coordinates tab). This is the default setting.
- Choose Measured from Collar Elevation if the depths were measured from the collar elevation (entered as the "Collar Elevation" field in the Collar Coordinates tab).
- Formation: Double-click in this cell and choose the unit name from the Stratigraphy Types Table. Or, you can single-click in this cell, click the small down arrow, and choose the formation name from the drop-down list.
- If the formation name is not listed, you'll need to add it to the current Stratigraphy Types Table. See the Stratigraphy Types Table section for more information.
- Repeat this process for additional stratigraphic layers.
! Stratigraphic layers must be listed in the same order from borehole to borehole. Units can be missing, but they cannot change order.
Example:
- Optional Fields: There are additional fields in the Stratigraphy table which may not be displayed, but which can be used to enter additional stratigraphic information.
- Structural measurements: These can be defined for any formations, and can be used by the Dip Gridding method to bias the surface modeling based on the dip-direction and dip-angle of the contact points.
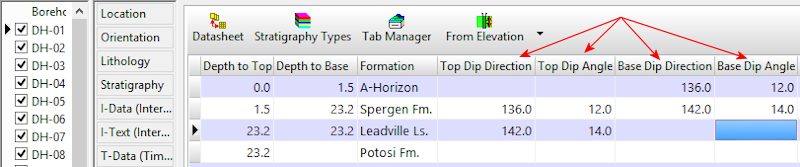
- Top Dip Direction: Enter the dip direction (0 to 360) for the unit's upper contact.
- Top Dip Angle: Enter the dip angle (0 to 90) for the upper contact.
- Base Dip Direction: Enter the dip direction for the unit's lower contact.
- Base Dip Angle: Enter the dip angle for the unit's lower contact.
- Comment: Enter any text comment information for the formation. There is no limit to the text you enter into this "memo" field.
If these fields are not visible, follow these steps to enable their display: Select the Borehole Manager | View | Tab Manager menu option. Click on the Stratigraphy item. Click on the Edit Fields button. Insert a check in those fields which you want to be displayed.
See also
 Back to Data Introduction

RockWare home page