Borehole Manager | File | Import | Kansas Geological Survey
This program is used to import Kansas Geological Survey well and tops files into the RockWorks borehole database. This data is not supplied with the RockWorks program; you can download them from the Kansas Geological Survey web site at: http://www.kgs.ku.edu/Magellan/Qualified/index.html. Well coordinates will be converted to the current project coordinate system.
Menu Options
Step-by-Step Summary
Menu Options
File Selection Tab
- Import File Name: Click on the
 button to the right of the name prompt to browse for the KGS-format well data file. This file may have the file name extension ".txt" and may begin with the characters "ogwell...".
- Stratigraphy File Name: Click on the button to the right of the name prompt to browse for the KGS-format tops data file. This file may have the file name extension ".txt" and may begin with the characters "tops..." This file contains stratigraphic tops information for those wells in the Ogwell file for which this data was available.
Borehole Options Tab
- Borehole File Name Uses: Click on this button to define how the well names are to be extracted/built from the data. The well names will be shown in the Borehole Manager window, used as labels in maps and logs, etc. The current setting will be shown on the main window to the right of the button; the default is the Kansas Geological Survey well ID.
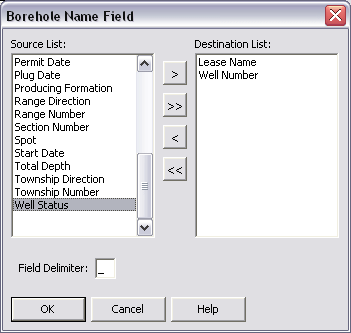
- To change the well name, click on the button, and you'll see a Borehole Name Field window.
- The Source List shows the different well fields that you can use for naming the wells in RockWorks. The Destination List shows the fields currently selected to be used for the names. Use the > and < buttons to move a selected field to the right or left. Use the >> and << buttons to move all fields to the right or left.
- What to use? Here are some examples:
- Kansas Geological Survey well ID: 1001260604
- API number: 15135004400001 or 15-135-00440-0001 (without and with dashes)
- Lease Name and Well Number: Holmes_1
This setup is shown below; note the field names in the Destination List (to the right) and the delimiter "_" shown at the bottom.
- Easting/Northing Values: Use this setting to decide which of the KGS well location coordinate systems - Longitude/Latitude or Public Land Survey System - will be used to compute the Easting and Northing coordinates for the well (Collar Coordinates tab) in your project coordinate system. Typically the Longitude/Latitude would be the more accurate of the two.
! Note that both the Longitude/Latitude and the PLSS coordinates will be imported into the Other Coords tab in the Borehole Manager's Location table, so you'll have them for reference.
- Clean Stratigraphy Options: These settings will affect how the stratigraphic units in the Tops file will be imported.
-
- Match Tops and Bottoms: Choose this option if you want RockWorks to fill in or adjust stratigraphic tops and/or bases, based on the unit immediately above or below.
- Import As Is: Choose this option if you want the stratigraphic tops and bases to be imported as-is from the source file.
- Set the Symbol from Well Status: Check this box if you want RockWorks to choose the well symbol for each well based on the status for each which is listed in the import file. It will match that status to the Well Status definition table in RockWorks. Note that you can update the symbol after import, as noted at the end of this topic.
- Borehole Overwrite Options: Specify what should happen if the KGS file references the same well names as already exist in the current project folder.
-
- Skip Existing Record: If a well ID exists in the RockWorks database, the importer will skip all KGS records with the same well ID.
For example, if there is already a well named "Smith-01" in the project, the program should not import any new data flagged for a "Smith-01" well, and the original well will be left intact.
- Create New Record: If a well ID exists in the RockWorks database, the importer will create a new well record (with a new name, appending "_1") for all KGS records you've mapped for import that have the same well ID.
For example, if there is already a well named "Smith-01" in the project, and you're importing data for a well named "Smith-01," the program will create a new record named "Smith-01_1" and import the data into that new record, leaving the original well record unchanged.
- Replace Existing Record: If a well ID exists in the RockWorks database, the importer will delete all existing data for that well and replace it with the KGS records you've mapped for import with the same well ID.
For example, if there is already a well named "Smith-01" in the project, the importer will delete all data for that well from the database, and then import the KGS data for Smith-01. The original well record will be completely replaced.
! Be sure about this. All existing data for existing wells will be lost.
! You can activate Warn on Existing Record (the check-box below these options) to have the program display a confirmation dialog box for each existing well, so that you can choose to replace, update, skip, or create a new record, on a well-by-well basis.
- Update Existing Record: If a well ID exists in the RockWorks database, the importer will not delete that well's data before import. Instead it will add new data types to the well. Any existing data types in the well will be replaced.
Example: There is already a well named "Smith-01" in the project, with basic well location information. This run-through you map several additional header fields to custom fields you've created in the Location tabs, and these new data fields are appended to the Smith-01 well record.
! However, note that the basic location information for that well will be replaced with the new.
Location Fields Use this tab to select which KGS fields are to be mapped to the RockWorks Location fields. These are well location and information fields only.
- Select: Use these check-boxes to select the fields to be brought into the RockWorks database. You can use the All or None buttons near the bottom of the window to easily select all/no fields. Of course, you can click in individual check-boxes with your mouse to insert/remove the check-marks.
- Input Field: This column lists the fields in the KGS file. This is not editable.
- Data Field: This column lists the fields in the RockWorks database. For each of the selected Input Fields, you can define the RockWorks database field where it should be mapped, by:
- Clicking in the Data Field cell to display a down-arrow button
- Clicking the down-arrow button to see all Location fields that are currently available.
- Selecting the <new> option in the field listing to create a new Location data field for the wells.
- BE SURE that you define these fields, at minimum:
- Input Field Data Field
Longitude Longitude
Latitude Latitude
Elevation Elevation
Total Depth Total Depth
- Other recommended fields:
- Input Field Data Field
API Number API
Well Status Symbol
Step-by-Step Summary
- Access the Borehole Manager.
- Open the project folder (if necessary) in which the well records are to be created.
- Choose the File | Import | Kansas Geological Survey option.
- Enter the requested menu options, described above.
- Click OK to continue.
The program will scan the input files and determine whether wells with the same names already exist. If no, the new well record will be created. If yes, the program will either overwrite the existing record, store the new record under a new name, warn you that the record exists, or skip the existing record, based on your selection under Overwrite Options.
The specified Input Fields will be written to the selected Data Fields in the RockWorks database.
Stratigraphic top depths, and formation names, will be recorded to the Stratigraphy data table.
The formation names listed in the import file will be written to the database's Stratigraphy Types Table.
- Post import:
- Stratigraphy Types: Expand the Project Tables | Types Tables heading in the Project Manager pane along the left edge of the program window, and double-click on the Stratigraphy Types item. The importer will have recorded the listed formation names into the Type Table, and will do its best to list them in proper order but you'll need to review their order and assign desired patterns and colors. The easiest way to define stratigraphic order here is by editing the Order column (1, 2, 3, 4, etc.) - this is the column upon which the Table is sorted.
- Well locations: Check that the Collar Coordinates - Easting and Northing - were computed for all of the wells during import, from either the lon/lat or PLSS coordinates as you selected above.
- Elevations and TD: Be sure these required fields are present for all wells before you start mapping/modeling.
- Output Dimensions: Once all of the Location data is entered for all of the wells, be sure to establish your output dimensions prior to mapping/modeling.
- Once these have been entered, you can use the Stratigraphy menu tools to fill in missing stratigraphy, and to model and display the formation tops and bases as maps, 3D surfaces & models, profiles, sections, and fences. You can also visualize the source data on 2D and 3D logs using the Striplogs menu tools.
See also
 Back to Importing Data

RockWare home page