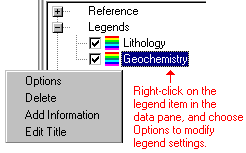
- Legend Type: This is displayed for Type Table Legends - you can choose from Lithology, Stratigraphy, Aquifer, or Well Construction Types. During construction of the 3D image, RockWorks reads the project's Type tables, extracts the material and formation names checked as "Show in Legend", and stores the material and formation names in the RockPlot3D view, under the Tables heading in the data pane. The Type Table Legends can pull information directly from here.
- Lithology: Choose this option if you want the legend to display the material types defined in the project's Lithology Types Table.
- Stratigraphy: Choose this option if you want the legend to display the formation names defined in the project's Stratigraphy Types Table.
- Aquifer: Choose this option if you want the legend to display the aquifer names from the project's Aquifer Types Table.
- Well Construction: Choose this option if you want the legend to display the material types defined in the project's Well Construction Types Table.
- Color Scheme: Click on the Min-Max button to define the display's color scheme - automatic, table-based, etc. This should correspond to the color scheme of the RockPlot3D item to which the legend is associated. (More.)
- For example, if the RockPlot3D window displays an I-Data solid model that’s colored using a Cold-to-hot color scheme, you would select that scheme for its legend as well (in which low G values are displayed in purples and blues, and high values in oranges and reds). Or, if your P-Data fence is displayed using a Hot-to-cold scheme, you would choose that scheme for its legend. See Range, below, for entering the value range.
- Range: If you have selected a Min -> Max or Min -> Mid -> Max color scheme, you need to enter the range of values to be shown on the legend itself.
- Maximum: Enter the value to be shown at the top of the legend.
- Minimum: Enter the value to be shown at the base of the legend.
- Color Interval: Enter here the value interval for incremental colors in the legend.
- Text Interval: Enter the value interval for the legend labels. See also the Text settings below regarding label options.
-
Tip: If you do not know the range of data to be shown on the legend, you can access the surface, isosurface, or solid model settings and use the Info button in those windows to view the data range.
- Location + Size:
- Use the drop-down box to the right to select whether the legend should be on the left or right side of the view pane. RockPlot3D maintains a boundary zone around the current image, in which the legend "floats" independently of the image.
- Use the Horizontal Offset item to adjust the horizontal positioning of the legend in the boundary area. An entry of "0" (default) will center the legend in the boundary zone (left or right). A setting of "0.1" will bump the legend slightly to the right. A setting of "-0.1" will move the legend slightly to the left. You should adjust the position in increments of 0.1 or the legend may get bumped off the screen.
- Use the Vertical Offset item to adjust the vertical positioning of the legend. An entry of "0" (default) will center the legend in the boundary zone (left or right). A setting of "0.1" will bump the legend slightly upward. A setting of "-0.1" will move the legend slightly downward. You should adjust the position in increments of 0.1 or the legend may get bumped off the screen.
- Scaler: The default setting is "1". If you decrease this value, the legend will appear smaller, and if you increase this value, the legend will appear larger. Note that this may affect the appearance of the font characters.
- Outline Legend: Insert a check in this box to enclose the legend in a solid line border.
- Text: These settings will define the text titles and labels for the legend.
- Title: Enter the title, if any, to be displayed at the top of the legend, and as a label for the legend in the data tree.
- Prefix: Use this prompt to type in any characters that are to be displayed before the numbers in the labels.
- Suffix: Use this prompt to type in any characters to be displayed after the numbers in the labels, such as units.
- Scientific Notation: Check this box to display the legend labels using scientific notation.
- Decimals: Use this setting to define the number of decimal places to appear in the labels.
- Font: Click on this large button to select the font style, size, and color for the legend text.
- Automatic Text Color: Check this box if you want RockPlot3D to change the legend text based on the background color of the scene. For example, if the text is set to display in black, and you change the scene's background color to dark gray, this option will change the legend text to white, automatically, for better visibility.
Using the Apply button tells the program to invoke the changes you have made. You cannot discard changes once they have been applied.