![]()
The Index Legend Attributes window is used to define or to modify the location, layer, and appearance for a line style, symbol, color or pattern index legend in a map or diagram. This window is displayed when you edit an existing index legend in or insert a new index legend into a RockPlot2D window.
! The program will pull the content for the legend from the selected index table in the project database when the legend is first inserted. After insertion, the table link is not maintained, and the text and graphics (lines, symbols, colors, patterns) are simply stored in the Rw2D file. This means that if you later edit the Index Table, any existing graphic legends will not be updated automatically; you'll need to re-insert the legend.
Appearance Options
- Plot Title: Insert a check here to include an upper row with a title. You can type the title text into the prompt box, such as "Symbol Index."
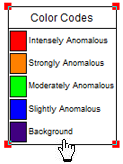
- Index Style: Here you can define what kind of index table you'll be inserting - choose from Color, Line, Pattern, or Symbol.
- For each Index style, you can click on the small button to the right to choose the name of the Color Index Table, Line Index Table, Pattern Index Table, or Symbol Index Table whose contents are to be displayed in the legend.
! Once the contents of the selected table are loaded into the graphic legend, all connection to the table is lost and no automatic updates will occur should you modify the table.- Plot Border: Check this box to plot the outer border for the legend. Click on the line box to choose the style, thickness, and color for the border lines.
- Plot Rectangles: Check this to display the graphic line style, symbol, color, or pattern design in a rectangular box. Click on the Line box to choose the line style, color, and thickness for the bounding rectangle.
- Fill Background: Check this item to fill the background in the legend, and click the color box to choose the fill color.
- Font: Click here to choose the font style for the legend.
Dimensions Options
- Use these settings to define the dimensions of different items in the Legend, as a percent of the size of the legend.
- What's nice about this approach is that as you resize the legend, by grabbing the lower-right handle and dragging, the individual compents (title, labels, patterns) will resize accordingly.
Position Options
- Layer: Use this setting to select the layer to which the pattern legend is to be associated. See Working with Layers for more information.
- Corner Points: The position of the legend can be defined by editing these coordinates or by interactively moving/resizing the legend.
- West: This coordinate defines the left or western edge for the legend.
- North: This coordinate defines the upper or north edge for the legend.
- East: This coordinate defines the right or east edge of the legend.
- South: This coordinate defines the lower or south edge of the legend.
General Options
- Visible: Insert a check in this box for the pattern legend to be visible in the drawing or map. Remove the check-mark to hide the legend.
![]() Back to Editing Tools
Back to Editing Tools
![]()
