Borehole Manager | View | Filter
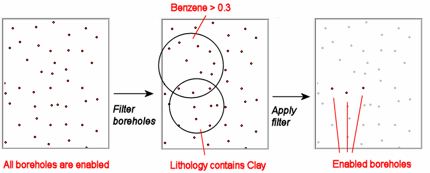
Use the Filter tool to query all boreholes in the current project using one or more filters - such as a rectangular map area, specific stratigraphic formations, or specific Location table fields - and disable those boreholes that don't meet all of the criteria. This is a basic "AND" type of filter: each of the boreholes for which every criterion is true will be enabled and the remaining boreholes will be disabled.
Here is a cartoon that shows how the entire database is filtered based on two parameters, and only those wells where the criteria overlap result as enabled.
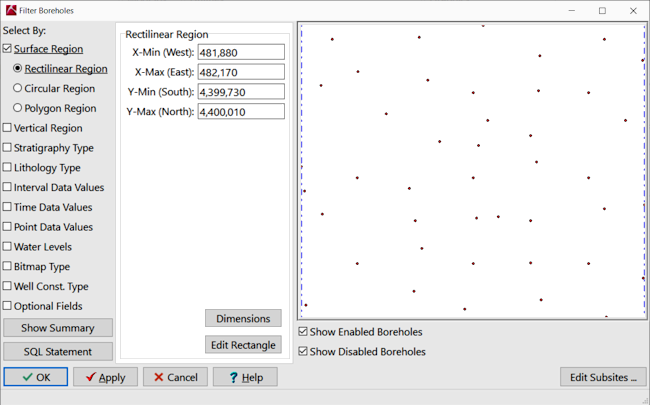
There is a preview window to the right where project boreholes are displayed in red, if currently enabled. Disabled boreholes can be invisible or shown in gray. Clicking the Apply button will leave the dialog box open but update the database using the selected filters and update the preview window.
Menu Options
Step-by-Step Summary
- Select By: Choose which data type you wish to filter for by clicking in its check-box. Each option will offer different search criteria. Multiple filters can be selected; only those boreholes for which all criteria are true will remain enabled.
You can click the Apply button at any time to implement the current filter(s) and see which boreholes are enabled in the reference map to the right.
- Surface Region: This option allows you to filter based on borehole locations.
- Rectilinear Region: This option allows you to enter a specific Easting and Northing range for the boreholes. The initial defaults will be the full X,Y range of the project.
- Circular Region: This option allows you to enter an Easting and Northing point, and a radius in your map units.
- Polygon Region: This option permits you to select boreholes that lie within a polygon. Click on the button to select the project's Polygon Table to be used.
- Vertical Region: Filters based on elevation or depth ranges:
- Elevation: Enter a minimum and maximum surface elevation to be included in the filter. The defaults displayed will be the full elevation range of the project.
- Total Depth: Enter a minimum and maximum total depth to be included in the filter. The defaults displayed will be the full TD range of the project.
- Stratigraphy Type: Filters based on a specific stratigraphic formation being listed for a borehole. You can choose the formation name from the drop-down list.
- Lithology Type: Filters based on a specific lithology material being listed for a borehole. You can choose the material type using the drop-down list.
- Interval Data Values: Filters based one column of I-Data values:
- I-Data Name: Choose the I-Data type on which to filter, using the drop-down list.
- From, to: Enter the minimum and maximum values for that data type to be included in the filter. You can leave either blank for an open-ended filter. To filter for a specific value, enter that value for both the From and To fields.
- Time Data Value: Filters based on one column of T-Data.
- T-Data Name: Choose the T-Data type on which to filter, using the drop-down list.
- From, to: Enter the minimum and maximum values for that data type to be included in the filter. You can leave either blank for an open-ended filter. To filter for a specific value, enter that value for both the From and To fields.
- From, to: In the lower set of prompts, enter the minimum and maximum dates for the measurements to be included in the filter. You can leave either blank for an open-ended filter. To filter for a specific date, enter that for both the From and To fields.
- Point Data Values: Filters based on one column of P-Data.
- P-Data Name: Choose the P-Data type on which to filter, using the drop-down list.
- From, to: Enter the minimum and maximum values for that data type to be included in the filter. You can leave either blank for an open-ended filter. To filter for a specific value, enter that value for both the From and To fields.
- Water Levels: Filters based on dates entered into the Water Levels table.
- Aquifer Type: Choose which aquifer you wish to filter from this drop-down list.
- From: Check this box if you want to apply a minimum filter on the date field then click the down-arrow to select a date to be an earliest-date. Leave this check-box blank if the early-date search should be open-ended.
- To: Check this box if you want to apply a maximum filter on the date field then click the down-arrow to select a date to be a latest-date. Leave this check-box blank if the ending-date search should be open-ended.
- Bitmap Type: Filters based on whether a raster image of the selected type is present in the hole.
- Bitmap Type: Choose from the drop-down list the bitmap type on which to filter.
- Well Const. Type: Filters based on a specific well construction material being listed for a borehole. You can choose the material type using the drop-down list.
- Optional Fields: Filters based on matches in optional location table fields. You can list multiple criteria.
- Field: Click on the down-arrow and choose from the list the name of the optional field on which the filter is to be applied.
- Operator: Choose the desired filter operation. Choose "LIKE" to enter wildcards in the Value field.
- Value: Type in the filter value for the selected field. For example, for a field "County" and an operator "equal to" you could type in "Jackson" to search for all boreholes with Jackson county in the Location table. For a field "County" and an operator "LIKE" you could type in "Jack%" to search for all boreholes with a county name starting with "Jack" (Jackson, Jackman) in the Location table.
- Add: Click this button to add the selected Optional Field filter to the list.
- Remove: Click on a listed filter, then click the Remove button to remove it from the list.
- Clear All: Click on this button to remove all Optional Field filters from the list.
- Show Summary: Click this button to see a summary of the current filter criteria, such as:
Boreholes will be Enabled for the following criteria:
Easting values inside the range from 481800 to 482170
Northing values inside the range from 4399730 to 43400000
Lithology contains Sand
- SQL Statement: Click this button to see a listing of the SQL statements for the current filter criteria.
! If you are using the Advanced version of RockWorks, you can edit or add your own SQL commands to this window. NOTE that the principle of Caveat Emptor strongly applies to editing or creating your own SQL statements. In other words, back up your database BEFORE running your own SQL commands, unless you consider yourself to be an infallible SQL wizard.
- OK: The OK button will apply the filter and exit back to the Borehole Manager.
- Apply: Clicking the Apply button will apply the filter without closing the dialog allowing the user to see the effect of the filter in the diagram on the right.
- Cancel: The Cancel button exits the dialog without applying the filter, however if the Apply button has already been pressed, whatever filter was set will remain in effect.
- Access the Borehole Manager.
- Open the project folder you want to work with.
- Select the View | Filter Boreholes menu option. You'll see all of the currently-enabled boreholes in the preview map to the right. You'll see disabled holes also, if that option is checked.
- Select the first filter you wish to use.
- You can click Apply to see the holes for which this setting is true, or you can continue to select additional filters.
- Select any additional filters you wish to use.
- You can click Apply each time to see which holes meet the increasing criteria. Or you can just Apply the filters once all are set.
Only those holes which meet all of the criteria will be enabled. Any holes which do not will be disabled.
- Click OK to close this window and return to the Borehole Manager, with these holes enabled.
Or, click Cancel to cancel any filters since the last Apply was done.
 Back to Database Overview

RockWare home page