The RockWorks QuickMap tab is situated just to the right of the Borehole Data tab. It is designed for quick display of your borehole locations as a quality check - bad coordinates or undefined output dimensions can be easily recognized.
As you click on the name of a borehole in the list to the left, it will be shown in the map with a red rectangular outline.
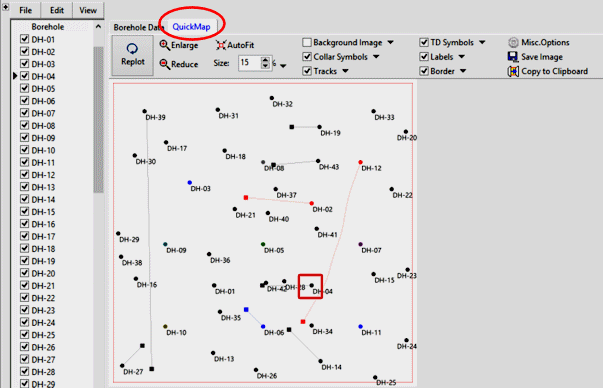
Use QuickMap to get a quick display of your borehole locations.
QuickMap Layers - The following layers are offered; use the small down-arrow buttons to access the settings for each.
- Background Image: Display a raster image behind the symbols and labels.
- Background Image: Use this prompt to browse for the name of the image to display in the QuickMap view.
- Image Location: These settings define how the image is to be geo-referenced.
- Output Dimensions: Choose this option if the current Output Dimensions represent the border coordinates for the image you've selected.
- World File: Choose this option if there is an accompanying World File which defines the image extents. Expand this heading to select the world file.
- Manually Select: If this box is checked you can browse for the name of the World File to be used.
- World File: Browse for the World file to be used for georeferencing the selected image.
- If the box is not checked, the program will search automatically for a World file with the same file name as the Image File, above, and with either world file name extensions: *.bmpw or *.bpw (italicized letters are replaced by the extension characters of the Image File, as in *.pngw or *.pgw, etc.)
- Manually Specify: Click in this radio button if you want to type in the X and Y coordinates for each bitmap corner.
! RockWorks assumes that these coordinates match the coordinate system and units defined in the Output Dimensions.
- Western Border: Enter the X (Easting) coordinate represented along the western edge of the image (X-Min).
- Southern Border: Enter the Y (Northing) coordinate represented along the southern edge of the image (Y-Min).
- Eastern Border: Enter the X (Easting) coordinate represented along the eastern edge of the image (X-Max).
- Northern Border: Enter the Y (Northing) coordinate represented along the northern edge of the image (Y-Max).
- Collar Symbols: Display a symbol at the borehole locations. Collar locations are represented with filled circles, using the colors you've selected for the map symbol in the Location table.
- Collar Symbol Radius: The size of the symbols is defined in pixels; increase the setting for larger collar symbols and decrease the setting for smaller ones.
- Tracks: For non-vertical holes, this displays a line from the collar location to the total depth location.
- Track Thickness: The thickness of the collar-to-TD line is defined in pixels; increase the setting for thicker lines and decrease the setting for thinner ones.
- TD Symbols: For non-vertical holes, display a filled-square symbol at the total depth location.
- TD (Total Depth) Symbol Radius: The size of the symbols is defined in pixels; increase the setting for larger TD symbols and decrease the setting for smaller ones.
- Labels: Display borehole names.
- Label Size: This is defined in pixels - increase the setting for large labels and decrease the setting for smaller ones.
- Maximum Label Length: Set the maximum number of beginning characters of the borehole names to be displayed.
- Border: Display the project boundary as defined by the Output Dimensions.
- Border Color: Choose a color for the project boundary rectangle.
- Border Thickness: This is defined in pixels - increase the number for thicker lines and decrease it for thinner ones.
Other Options
- Replot: Click this button to refresh the QuickMap display.
- Enlarge: Click this button to do a stepped zoom into the QuickMap display. When you are zoomed in, you can use the scroll bars along the side and bottom of the display to navigate.
- Reduce: Click this button to do a stepped zoom out of the QuickMap display.
- AutoFit: Click this button to scale the entire QuickMap to fit within the available space.
- Misc Options: Use this drop-down list to change...
- Margin: This defines the space outside the Border to display. If you have long borehole names and the labels are displayed, you may need to increase this to see the complete labels for holes along the project edge.
- Background Color for the QuickMap pane.
- Save Image: Use this to save a raster image of the QuickMap.
- Save As: Type in the name to assign to the BMP, PNG, JPG, or TIFF file.
- Copy to Clipboard: Use this button to copy the QuickMap to the clipboard for pasting into a document.

RockWare home page