![]()
How it's Used
How to Insert a Horizontal Line into a Log Design
Menu Settings
How to Review the Settings
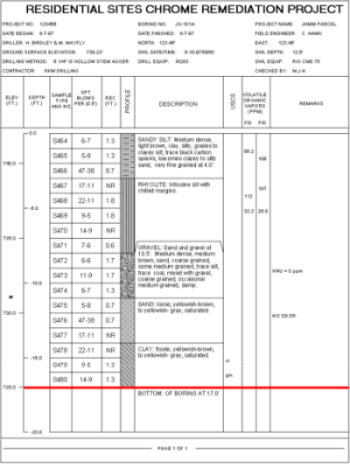
How it's used: The Horizontal Line tool is used to plot a horizontal line of user-defined length and style at regular depth intervals AND/OR at specific user-declared depths in the body of the log. This could be used to plot a line at the total depth level in the log.
How it works: If you request regularly-spaced horizontal lines here in the log design, there's nothing more you need to do; the program will plot the lines at the specified intervals down the log. If you wish to declare specific depths for the line(s), you can do so with a Horizontal Line datasheet in the data file. You may request both.

Name: Enter a Name to identify the line. This will only be used if you define specific depths for the line in the data file; in this case the name in the Horizontal Line datasheet would need to match this name. The name match is not case-sensitive.
Position: Use the Left and Right boxes to define the horizontal positioning for the line. If, for example, you want the line plotted from the far left side of the log to the far right side, you would enter coordinates that correspond to the left-most and the right-most log items. The horizontal coordinates are expressed in decimal inches or centimeters relative to the left edge of the design screen. You may change the line's position by editing these values, or by widening/narrowing the line itself on the work screen (see Moving and Resizing Log Body Components. (The depth of the line will be defined in the data file or using Automatic Intervals, below.)
Line: Click on this box to choose the line style, thickness, and color for the horizontal line.
Automatic Intervals: Insert a check here if you want the horizontal line to be plotted at regular intervals down the log.If activated, you can enter the depth intervals in the prompt box. If not activated, you'll need to specify the depth(s) at which the line is to be plotted via the data file. You can request both automatic intervals AND enter customized depths.
You will not be able to drag the line up or down in the design screen; its representation should be used to determine horizontal placement only.
If you need to access the Options window you can:
![]() Back to Log Body Item Summary
Back to Log Body Item Summary
![]()