RockWorks includes the ability to define coordinate systems and units in the Borehole Manager, and in the EarthApps and Utilities datasheets. The intent here is to make it possible to output your maps to Google Earth or other geo-referenced software programs.
! If you don't know/don't care what system your spatial coordinates represent, choose Local Coordinates.
The following coordinate systems are available, though not all are available for all interfaces and processes.
- Local Coordinates: Use this if your XY (map) coordinates are undefined, or if they are X and Y coordinates in a local grid (e.g. not using global system). RockWorks will assume a Cartesian coordinate system whereby X coordinates increase in value to the east, and Y coordinates increase to the north.
- Units: You need to specify whether the Local coordinates represent Feet or Meters.
- Local Coordinate System Origin: This is used to geo-reference your local coordinates.
- If you want to geo-reference your local coordinates, you can do so by entering the longitude and latitude coordinates in decimal degrees that exist at the local coordinate "origin" of 0,0.
Tip: If you don't know this origin coordinate, you can have RockWorks calculate it for you: Use the Utilities | Coords | Compute Origin Lon/Lat for Local Coordinate System program, where you enter a local coordinate XY and its known lon/lat, and RockWorks will calculate the origin lon/lat for you.
! Important Note: Georeferencing local coordinates only works in small-scale, truly local coordinate areas where the Origin is in the proximity of the project data. RockWorks does not take into account any curvature of the earth in this local->global conversion, so if your "local" coordinates are large numbers and the Origin is thousands of kilometers away, the georeferencing won't work.
- If you don't need to geo-reference your local coordinate system, just leave the Local Origin set to a Longitude of 0.00000 and a Latitude of 0.00000. And don't be surprised if you try to export to Google Earth and find your points in the middle of the Atlantic.
- Longitude / Latitude: Use this if your coordinates represent longitude and latitude degrees.
- Decimal Degrees: For most map-generating programs, you need to be sure these are entered as decimal degrees (e.g. longitude -105.209676 and latitude 39.748544); western longitudes and southern latitudes must be entered as negative values.
- Degrees & Decimal Minutes: The Utilities | Coords | Coordinate Converter program, and the Borehole Manager's Other Coords tab also support Degrees and Decimal Minutes (e.g. longitude -105° 12.581' and latitude 39° 44.913'). As above, western longitudes and southern latitudes must be entered as negative values.
- Degrees, Minutes, & Seconds: The Utilities | Coords | Coordinate Converter program, and the Borehole Manager's Other Coords tab also support Degrees, Minutes, & Seconds (e.g. longitude -105° 12' 34.83" and latitude 39° 44' 54.76"). As above, western longitudes and southern latitudes must be entered as negative values.
- Public Land Survey: The Utilities coordinate converter programs, and the Borehole Manager's Other Coords tab support Public Land Survey coordinates, which represent Range, Township, and Section survey locations.
- Meridian: In the US Public Land Survey System, a Principal Meridian is a north-south line that divides Ranges into east and west. You must define the Principal Meridian for each survey listing so that the program knows the "grouping" to which each Range and Township declaration belongs; this allows your data to span multiple meridians. However, when creating a Land Grid Section map, you may plot Range/Township/Section lines for only a single Principal Meridian at a time.
- Range: Enter the Range number followed by the letter "E" or "e" or "W" or "w", with or without spaces separating the number and letter. The number must precede the letter.
- Township: Enter the Township number followed by the letter "N" or "n" or "S" or "s", with or without spaces separating the number and letter. The number must precede the letter.
- Section: Enter the Section number, from 1 to 36.
- Location: Locations can be entered in either of the following formats:
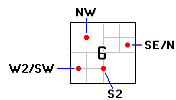
- Quarter/quarter format: Example: NW or SW or SE/SE or W2/SE or SESE or W2 SE or SE-SE or W2,SE or similar, as shown in the illustration below. Use upper- or lower-case characters. You may use spaces or slash (/) characters or commas within the description. You may also concatenate the descriptions (SESE)
- Offset format: Example: 250FSL,510FEL or 250fwl , 510fnl or similar. Footage descriptions must have a comma separating listings, not spaces alone. Footage descriptions may not include "/" or "-" characters. The footage label must immediately follow the number.
- State Plane Coordinates: Use this if your map coordinates are based on the US State-Plane system.
- Units: You need to specify whether the State Plane coordinates represent Feet or Meters.
- State Plane Coordinate Zone: The State Plane systems are zone-specific, so you need to define the zone to which the coordinates apply. Click on the Zone button to see a reference map; choose the zone from the scrolling list to the right of the map.
- UTM Coordinates: Use this if your map coordinates are based on a Universal Transverse Mercator system.
- Units: You need to specify whether the UTM coordinates represent Feet or Meters.
- Datum: Click on the large button to view the available projections. The most common projection for the U.S. is:
- WGS-84 (NAD-83): Used by GPS (Global Positioning System) units and more recent USGS maps.
See the Select Datum topic for more information.
- Zone: Click on this button to display an interactive map where you can click on the UTM Zone for the data.
- Custom: Use this to define a custom coordinate system or to select a preset UTM Datum and Ellipsoid that are not listed in the standard datums above. See the Custom Projection topic for more information.
See also

RockWare home page