There are some programs within RockWorks which do not utilize "tree-style" menus, thus you cannot quickly generate an RCL listing of DEFINE and EXECUTE commands. This topic discusses the commands used to import data from an Excel spreadsheet, either multiple worksheets or a single worksheet, into the RockWorks database via RCL.
![]() Back to RCL Imports
Back to RCL Imports
Importing Excel Data from Multiple Worksheets into Multiple Database Tables

Introduction
This set of RCL commands replicates the File | Import | Excel | Multiple Tables menu option in the Borehole Manager. This tool can read data from multiple worksheets in a single XLS file and map these worksheets to different tables in the borehole database. For example, the information in the "Location" worksheet in the Excel file can be mapped to the database's "Location" table, and the data in the "Stratigraphy" worksheet to the "Stratigraphy" table.
Defining the Import File Name and Setup
When you import from Excel using the program menus, the first step is to define the name of the Excel file to be imported. (See Importing Excel Data - Step 1 for the menu-based discussion.) Here are the corresponding RCL DEFINE commands:
DEFINE: BM_EXCHANGE XLS_FILE_NAME RockWorks data import.xls
DEFINE: BM_EXCHANGE INCLUDE_COLUMN_TITLES TrueThe second command listed here tells RockWorks whether the worksheets contain column headings (True = there are headings, and False = there are no headings) so that it knows if the data listings start on row 1 or row 2.
Mapping the Location Fields
When you import from Excel using the program menus, the next step is to map the Location fields. (See Importing Excel Data - Step 2 for the menu-based discussion.) Here is the corresponding RCL DEFINE command:
DEFINE: BM_EXCHANGE LOC_FIELDS_MAP Name, , Easting, Northing, Elevation, TotalDepth, SymbolTypeId, Color, GEIcon, Enabled, CollarOffset, SiteName, DrillerName
After the LOC_FIELDS_MAP variable you simply list the database fields to which the columns in the Location worksheet are to be mapped, in the order in which the worksheet columns are listed, separated with commas. Any user-defined fields (such as SiteName and DrillerName in the example above) must be created first in the database prior to the import.
Defining what to do with Duplicate Records
The next step in the import is to define how duplicate records are to be handled. (See Importing Excel Data - Step 2 for the menu-based discussion.) Here is the corresponding RCL DEFINE command:
DEFINE: BM_EXCHANGE REPLACE_MODE 2
Here are the REPLACE_MODE settings:
1 = Create New Record
2 = Replace Record
3 = Update Record
Multiplying Depths
Another option in the import is to specify whether depths are to be multiplied by a constant or not. (See Importing Excel Data - Step 2 for the menu-based discussion.) Here are the corresponding RCL DEFINE commands:
DEFINE: BM_EXCHANGE MULTIPLE_DEPTHS False
DEFINE: BM_EXCHANGE DEPTH_MULTIPLIER 1.0
Map the Worksheets
Now comes the heavy lifting. In the menu-based import process, the Import Block Mapper window is used to map the names of the Excel worksheets to the RockWorks database tables. (See Importing Excel Data - Step 3 for the menu-based discussion.) Here are the RCL DEFINE commands:
DEFINE: BM_EXCHANGE INCLUDE_PROJECT_DIMENSIONS True
DEFINE: BM_EXCHANGE INCLUDE_AQUIFER_UNITS True
DEFINE: BM_EXCHANGE INCLUDE_LITHOLOGY_TABLE True
DEFINE: BM_EXCHANGE INCLUDE_STRAT_UNITS True
DEFINE: BM_EXCHANGE INCLUDE_WELLCONST_UNITS True
DEFINE: BM_EXCHANGE INCLUDE_IDAT_TITLES True
DEFINE: BM_EXCHANGE INCLUDE_ITXT_TITLES True
DEFINE: BM_EXCHANGE INCLUDE_TDAT_TITLES True
DEFINE: BM_EXCHANGE INCLUDE_PDAT_TITLES True
DEFINE: BM_EXCHANGE INCLUDE_PTXT_TITLES True
DEFINE: BM_EXCHANGE INCLUDE_LOCATIONS True
DEFINE: BM_EXCHANGE INCLUDE_ORIENTATIONS True
DEFINE: BM_EXCHANGE INCLUDE_LITHOLOGY True
DEFINE: BM_EXCHANGE INCLUDE_STRATIGRAPHY True
DEFINE: BM_EXCHANGE INCLUDE_IDAT False
DEFINE: BM_EXCHANGE INCLUDE_ITXT True
DEFINE: BM_EXCHANGE INCLUDE_TDAT True
DEFINE: BM_EXCHANGE INCLUDE_PDAT False
DEFINE: BM_EXCHANGE INCLUDE_PTXT True
DEFINE: BM_EXCHANGE INCLUDE_AQUIFERS True
DEFINE: BM_EXCHANGE INCLUDE_BITMAPS True
DEFINE: BM_EXCHANGE INCLUDE_COLORS True
DEFINE: BM_EXCHANGE INCLUDE_FRACTURES True
DEFINE: BM_EXCHANGE INCLUDE_PATTERNS True
DEFINE: BM_EXCHANGE INCLUDE_SYMBOLS True
DEFINE: BM_EXCHANGE INCLUDE_VECTORS True
DEFINE: BM_EXCHANGE INCLUDE_WELLCONSTRUCTION True
DEFINE: BM_EXCHANGE INCLUDE_COMMENTS True
DEFINE: BM_EXCHANGE INCLUDE_MISC_TABLES False
DEFINE: BM_EXCHANGE INCLUDE_XYZ False
Worksheet Names
By setting any of the INCLUDE listings above to "True" then RockWorks will understand that it is supposed to locate the worksheet in the Excel file and import that data to the borehole database. The import assumes that the worksheets in the XLS file have the "standard" names, listed below. (FYI, Worksheet names are displayed on the tab for that sheet, at the bottom of the Excel window, as shown here:)
! If your worksheets have different names, you can either rename them as listed below OR you can define their names via a Synonym Table, also discussed below.
The standard names for the worksheets are:
Types Tables
- Aquifer Types: "Aquifer Type" or "Aquifer Units"
- Lithology Types: "Lith Type" or "Lith Units"
- Stratigraphy Types: "Strat Type" or "Strat Units"
- Well Construction Types: "Well Const Type" or "WellConst Units"
- T-Data Types: "TmInterval Type" or "T-Data Titles"
- I-Data Types: "Interval Type" or "I-Data Titles"
- I-Text Types: "IText Type" or "I-Text Titles"
- P-Data Types: "Point Type" or "P-Data Titles"
- P-Text Types: "PText Type" or "P-Text Titles"
Data Tables
- Location: "Location"
- Orientation: "Orientation"
- Lithology: "Lithology"
- Stratigraphy: "Stratigraphy"
- I-Data: "Interval" or "I-Data"
- I-Text: "IText" or "I-Text"
- T-Data: "TmInterval" or "T-Data"
- P-Data: "Point" or "P-Data"
- P-Text: "PText" or "P-Text"
- Colors: "RockColor"
- Fractures: "Fracture" or "Fractures"
- Water Levels: "Aquifer" or "Aquifers"
- Symbols: "Symbol" or "Symbols"
- Patterns: "Pattern" or "Patterns"
- Bitmaps: "Bitmap" or "Bitmaps"
- Vectors: "Vector" or "Vectors"
- Well Construction: "Well Construction"
- Project Dimensions: "Dimensions"
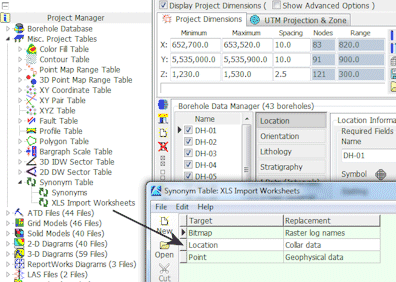
If your worksheets to be imported have different names, then you can create a new Synonym Table in the project database, list the expected worksheets in the "Target" column, and list your actual worksheet names in the "Replacement" column. Please refer to the Synonym Table topic for more information.
Perform the Import
Once you've established all of the import settings for the XLS file, using the DEFINE commands listed above, you can execute the import using the following EXECUTE command:
EXECUTE: XLS_2_BM
Importing Excel Data from a Single Worksheet into an I-Data, I-Text, P-Data, P-Text, or T-Data Table
Introduction
This set of RCL commands replicates the File | Import | Excel | Single Tables menu options in the Borehole Manager. This tool can read data from a single worksheet in a single XLS file and map the columns in the worksheet to different tracks in the I-Data, I-Text, T-Data, P-Data, or P-Text database table. The import can be for single boreholes or multiple boreholes.
Defining the Import File Name and Setup
When you import from Excel using the program menus, the first step is to define the name of the Excel file to be imported. Here are the corresponding RCL DEFINE commands:
DEFINE: BM_EXCHANGE XLS_FILE_NAME geochem_data.xls
DEFINE: BM_EXCHANGE WRK_FILE_NAME Assays
DEFINE: BM_EXCHANGE INCLUDE_COLUMN_TITLES TrueThe second command is required only if the data to be imported is not stored on the first worksheet in the XLS or XLSX file.
The third command tells RockWorks if the designated worksheet contains column titles in the first row. If set to True, then the program will assume that the data listing starts on row 2 in the worksheet.
If your worksheet does not include a column where the borehole name is defined, you can import the data for a single borehole using this command. This should be omitted if RockWorks will be gleaning the borehole ID from the spreadsheet.
DEFINE: GENERAL BOREHOLE_NAME DH01
Multiplying Depths
Another option in the import is to specify whether depths are to be multiplied by a constant or not. Here are the corresponding RCL DEFINE commands:
DEFINE: BM_EXCHANGE MULTIPLE_DEPTHS False
DEFINE: BM_EXCHANGE DEPTH_MULTIPLIER 1.0
Negative Data Values
Use these settings to define what to do with columns that contain negative values. They can be imported as-is, discarded altogether, or replaced with a user-specified value. For example, if the import data uses a number like "-999" to denote no-data, and if you don't have other (valid) negative values, then you might choose to discard them.
DEFINE: GENERAL NEGATIVE_BEHAVIOR 0
DEFINE: GENERAL NEGATIVE_REPLACEMENT 1.0Here are the NEGATIVE_BEHAVIOR settings:
0 = Include negatives
1 = Discard negatives
2 = Replace negativesThe second variable denotes the value to be used to replace the negative values. It is necessary only if NEGATIVE_BEHAVIOR is set to "2". Beware: If you are importing data into the I-Data, T-Data, or P-Data tables, these are restricted to numeric entries only, so don't choose a non-numeric replacement value.
Defining the Default Date
If you are importing data into the T-Data table, it's required that there be a default date specified, if none are present in the input data.
DEFINE: BM_EXCHANGE DEFAULT_TDATA_DATE 5/6/2011
The date format needs to be compatible to the format used by your computer (based on the Windows Regional Settings). It is only used if no date is specified for the T-Data import.
Mapping the Worksheet Columns
When you import from Excel using the program menus, the next step is to map the worksheet column names to the fields in the database. Here is the corresponding RCL DEFINE command.
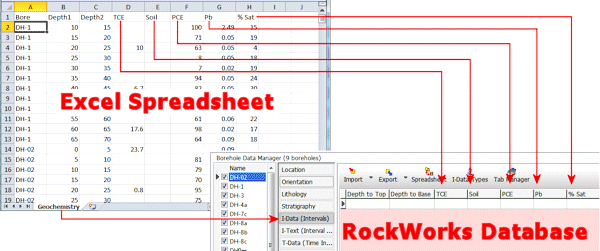
DEFINE: BM_EXCHANGE ASSAY_FIELDS_MAP Bore, Depth1, Depth2, TCE, Soil, PCE, , ,% Sat
After the ASSAY_FIELDS_MAP variable (don't worry about the word "ASSAY" - this pertains to all of the data types) you simply list the database fields to which the columns in the worksheet are to be mapped, in the order in which the worksheet columns are listed, separated with commas.
! Note that you are NOT listing the Excel column names here, but the "receiving" fields in the database.‘Bore’ or ‘Name’ is the borehole name; if this is left out then the value for GENERAL, BOREHOLE_NAME (discussed above) will be used and all the data will go to that borehole.
I-Data, I-Text, and T-Data must have "Depth1" and "Depth2" defined.
P-Data and P-Text must have "Depth" defined.
T-Data must have a "Date" field defined.
If you want any of the columns skipped, denote them with spaces in the list. In the example above, the Pb and Mg columns in the worksheet shown below, would NOT be imported.
If the Type Name does not exist yet in the Types table, it will be added. Type names cannot contain a comma in the name.
Perform the Import
Once you've established all of the import settings for the XLS file, using the DEFINE commands listed above, you can execute the import using the following EXECUTE commands. NOTE that the comments should NOT be included - they are shown here to explain which EXECUTE command is which.
EXECUTE: XLS_2_IDATA {for importing to the I-Data table}
EXECUTE: XLS_2_ITEXT {for importing to the I-Text table}
EXECUTE: XLS_2_PDATA {for importing to the P-Data table}
EXECUTE: XLS_2_PTEXT {for importing to the P-Text table}
EXECUTE: XLS_2_TDATA {for importing to the T-Data table}
![]() Back to RCL Imports
Back to RCL Imports
![]()