Borehole Manager | File | Import | CSV | CSV File -> P-Data
Borehole Manager | File | Import | Excel | Single Table | Excel -> P-Data
These Borehole Manager tools are used to read row and column data from a single worksheet in Excel file or from a single CSV file, and import the rows and columns into the P-Data table for a single borehole, or for multiple boreholes if the borehole IDs are listed in the spreadsheet. This is primarily designed for users who have measurements for multiple point-data components, by depths, that can't be easily brought into the RockWorks database using the multiple-worksheet Excel import tool. The import works with XLSX, XLS, CSV, and TXT files, provided that Microsoft Excel is installed on the user's machine.
! The Borehole Manager P-Data table is restricted to numeric values only. If you need to import alphabetic or alphanumeric data into RockWorks, use the P-Text import program.
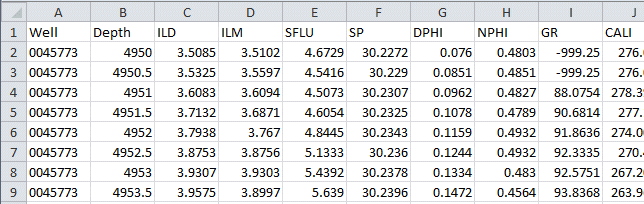
Here is an example of the kind of Excel data that can be brought into RockWorks using this tool; this subset lists measurement depths in the first column, and different geophysical measurements in columns 2 - 9. The columns can be in any order.
! This import tool allows you to import one or many columns from the spreadsheet.
! It also allows you to append new P-data columns to existing drillholes. For example, if the drillhole already lists ILD and ILM columns, you can add new SP and GR columns to the hole, with the result being all 4 P-Data columns for the drillhole.
! This tool does not allow you to append new data to an existing column - if the specific column already exists, and you import it again, the original data will be replaced. For example, if the hole already lists ILD and ILM columns and you import ILD and ILM data again, the original data will be overwritten.
Menu Options
Step-by-Step Summary
Menu Options
- Filename: Click on the small open-file button to browse for the name of the Excel file (XLSX or XLS) or CSV (CSV or TXT) that contains the data to be imported.
- Worksheet: If you are importing from XLSX or XLS, select the name of the worksheet in the Excel file that contains the row and column data. When you select this, the program should display data information in the Tracks section of the window. (If you are importing from CSV or TXT this step is not necessary.)
- Change Delimiter: If you are importing from CSV, you can use this button to define a different column delimiter for the input file.
- Data Contain Column Titles: This setting, on the right side of the Import window, allows you to define if the worksheet contains an uppermost row that contains the name of each data column, as in the "DEPT", "ILD", "ILM" and other items in the example above. If checked, these names will appear in the Tracks listing to the left. If unchecked, the column names will be set to the more generic "Column 1", "Column 2", etc.
- Borehole Name, Import for one Borehole: Here you can specify whether the import spreadsheet contains data for a single borehole or for multiple holes.
- Check this box to select the name of the existing borehole to which the P-Data is to be recorded.
! The program will assume that there is only data for this hole in the import spreadsheet. If there is data for more than one hole, and the IDs are listed, you should leave this box unchecked as discussed next.
- Leave this box unchecked if the data will be imported to multiple holes.
! This requires that there be a column in the spreadsheet that lists the borehole name.
! The borehole names in the spreadsheet must match the borehole name fields in the RockWorks project database.
- Input Column Name: This list, along the left, should contain all of the columns in your spreadsheet, either in a "Column 1", "Column 2" format (the Data Contain Column Titles option is not checked) or listing your actual column titles (the Data Contain Column Titles option is checked).
- Available Fields: In this area you will see the names of the P-Data tracks you have already defined for your project, in the P-Data Types table.
! If your defined fields are not listed here, click the Types Table button to define your columns at this time. (See P-Data Types Tables for more information.)
Your job here is to map the columns: For each selected spreadsheet Input Column Name, choose the P-Data track in the current database where the column is to be imported. You can either click and drag the Available Fields to the column names using your mouse, or you can click on the respective items and use the Add button to do the mapping.
Tips & Reminders:
- If you have specified that data for multiple boreholes is being imported (and the Import for One Borehole option is not checked), be sure that you map the spreadsheet column containing the Borehole ID to the "Track Name" named Borehole.
- Be sure to map the columns containing the depth values to the database Depth column. This is required.
- Depth Multiplier: Use this setting to convert depth units as necessary. For example, if your database elevations and depths are in meters, but the import units are in feet, you can check this box and type in: 0.3048 so that the units will match.
- Negative Data Values: Use these settings to define what to do with columns that contain negative values. They can be imported as-is, discarded altogether, or replaced with a user-specified value.
Other tips
- Be sure the borehole(s) to which the data is to be imported already exists in the project database. You can't post P-Data to a borehole if it doesn't yet exist.
- Be sure that the data in the Excel sheet is sorted by borehole, if multiple boreholes are represented.
- Any non-numeric data will be skipped during import.
Step-by-Step Summary
- Access the Borehole Manager.
- If necessary, browse to the project folder in which you want to work.
- Be sure that the borehole(s) to which you wish to import the spreadsheet data already exist in the project.
- Be sure that the spreadsheet you want to import complies with the row and column format, and the sort order described above.
- Select the File | Import | CSV | CSV File -> P-Data menu option to import from CSV.
Select the File | Import | Excel | Single Table | Excel -> P-Data menu option to import from XLS or XLSX.
- Select the name of the XLS or CSV file to be imported. The program will scan the file and load the names of the columns in the Input Column Name listing.
- If you are importing from XLS you can use the Worksheet field to choose a different worksheet from the file.
- If the input data does not contain column titles, uncheck the Data Contain Column Titles checkbox.
- Next, specify whether you are importing for a single borehole or for multiple holes using the Import for One Borehole checkbox (as described above).
- If you need to define the column names for your borehole project (or add to existing names) click the Type Table button and make the necessary changes to the P-Data Types table.
- Map the project's column names to the spreadsheet columns, as described above. Be sure to map the borehole name column to the Borehole ID field. You only need to map those columns you wish to import.
- Click the OK button to proceed.
The program will read the specified XLSX, XLS, CSV, or TXT file. It will extract the data from the requested data columns and map them to the indicated database fields. Any existing P-Data for the requested columns will be overwritten; any new P-Data columns will be added to the database.
 Back to Importing Data

RockWare home page