RockWorks | Utilities | Grafix |
3D-Utilities | Storage Tanks | Horizontal
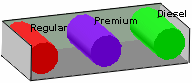
This program reads location, elevation, radius and color data from the Utilities datasheet and draws horizontal 3-dimensional cylindrical tanks at those locations for display in RockPlot3D. Use this to display underground or surface tanks with your 3D images.
Menu Options
Step-by-Step Summary
Menu Options
- Input Columns: The prompts along the left side of the window tell RockWorks which columns in the input datasheet contain what data.
Click on an existing name to select a different name from the drop-down list.
- ID: Select the column that lists the names of the tanks, if any. These can be used to label the tanks in the data tree and image within RockPlot3D.
- X1, Y1: Select the 2 columns in the datasheet that list the Easting and Northing coordinates for one end of the tanks.
X2, Y2: Select the 2 columns in the datasheet that list the Easting and Northing coordinates for the other end of the tanks.
Elevation: Select the column in the datasheet that list the elevations for the tank bases.
- Radius: Select the column in which the tank radii are listed.
- Label Offset: Choose the column where the label offset distances are listed.
- Color: Select the column in which the tank colors are listed.
Be sure that the XY coordinate system and the elevation, radius, and offset length units are defined in the datasheet.
- Group Name: Click here, in the right pane of the window, to enter a name for the tank group in RockPlot3D. For example, if the objects represent storage tanks, you could name this "Storage Tanks".
- Plot ID Labels: Insert a check in this box to include ID labels with the tanks in the display. Expand this item to set the font size and color.
- Reference Cage: Insert a check here to include reference labels or lines in the output 3D image. More
Step-by-Step Summary
- Access the RockWorks Utilities program tab
- Create a new datasheet and enter or import your location coordinates into the datasheet.
Or, open one of the sample files and replace that data with your own. (Sample file = "\RockWorks17 Data\Samples\Horizontal_Storage_Tanks_01.rwDat".) See Horizontal Tanks Data format for details.
- Select the Grafix | 3D-Utilities | Tanks | Horizontal menu option.
- Enter the requested menu settings, described above.
- Click the Process button to continue.
The program will read the indicated tank coordinates and create a 3D diagram that displays their placement using the indicated size and color. The completed diagram will be displayed in a RockPlot3D tab in the Options window.
- You can adjust any of the options along the left and click the Process button to regenerate the 3D image.
! Each time you click the Process button, the existing display will be replaced.
- View / save / manipulate / print / export the image in the RockPlot3D window.
Tip: Use RockPlot3D's File | Append to append an already-saved 3D image for the project onto the view of the horizontal tanks.
 Back to Grafix Menu Summary

RockWare home page