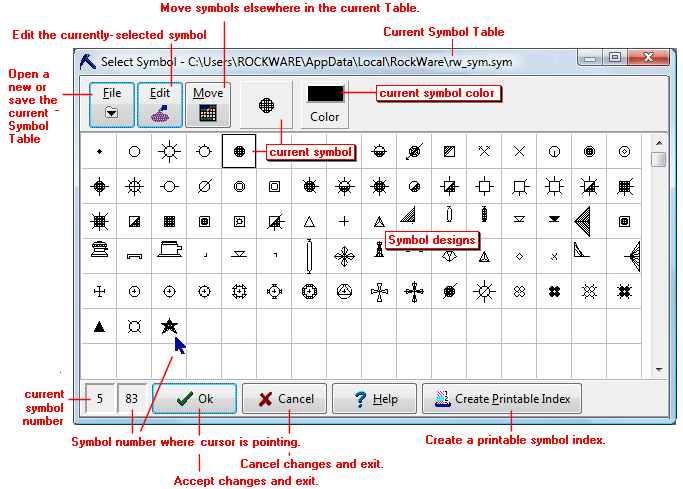
The Select Symbol window displays all of the symbol designs in the current Symbol Table. The factory default Table is "rw_sym.sym" (in the RockWorks system folder).
This window is used to view symbols, select symbol colors, open other Symbol Tables, and access the Symbol Editor.
- To view symbol samples that are not currently visible drag the scroll bars up or down as necessary.
- To view the index number for a symbol simply move the pointer to that symbol in the Select Symbol window, and see the symbol's index number shown in the lower-left corner of the window. The symbol library accommodates 1000 symbols.
- To select a symbol to be active simply click on the symbol sample. It will be displayed in the preview box at the top of the Select Symbol window.
- To open a different Symbol Table:
- Click on the File menu at the top of the Select Symbol window, and choose Open.
- In the displayed dialog box, select the name of the Symbol Table you wish to view. (This table will become the default Symbol Table.)
- Click on the Open button to open the Symbol Table you requested.
- Its symbol designs will be displayed in the Select Symbol window, and its name shown in the title bar at the top of the window.
- To save the current Symbol Table under a new name:
- Click on the File menu at the top of the Select Symbol window, and choose Save As.
- In the displayed dialog box, type in the name to assign to the Symbol Table and click Save. You can save to a different folder if desired.
- The new file name for this Table will be displayed in the title bar at the top of the Select Symbol window.
- To move symbols within the current table:
- Click on the Move button at the top of the Select Symbol window.
- Enter the requested information:
- Move from, Start at Symbol Number: Type in or use the up- or down-arrows to choose the first symbol number of the contiguous block of symbols to be moved.
- Stop at Symbol Number: Type in or use the arrows to choose the last symbol number of the block to be moved. If you only want to move one symbol, the Start and Stop number may be the same.
- Move to, Start at Symbol Number: Choose the symbol number where the block is to be moved.
- Click OK. The program will move the designated block of symbols to the new location.
! Any existing symbols at those locations will be overwritten.
- To save the changes made to the current Symbol Table, click on the File / Save command.
Example: Let's say the RockWare factory Symbol Table contains many symbols you don't use. You save the table under a new file name (such as "my_symbols.sym") using the File | Save As command. You then decide you only use symbols 43-46 and would like them to be placed at the beginning of the listing. You click on the Move button, enter 43 and 46 for the Move from symbols and enter "1" for the Move to number. The existing symbols in places 1 - 4 will then be overwritten by symbols 43-46. Spaces 43-46 will be left blank.
- To import symbols from another Symbol Table:
- Click on the Import button at the top of the Select Symbol window.
- Enter the requested information:
- Move from, Input file (other symbol table): Click on this large button to select the name of another RockWare Symbol Table from which you wish to import some symbol designs.
- Start at Symbol Number: Type in or use the up- or down-arrows to choose the first symbol number of the contiguous block of symbols in the above-named Table to be imported.
- Stop at Symbol Number: Type in or use the arrows to choose the last symbol number of the block to be imported. If you only want to import one symbol, the Start and Stop number may be the same.
- Move to, Start at Symbol Number: Choose the symbol number where the block is to be placed in the current Symbol Table.
- Click OK.
- The program will import the designated block of symbols from the other file to the designated location in the current Symbol Table.
! Any existing symbols at those locations will be overwritten. The symbols in the other file will remain intact.
- To save the changes to the current Symbol Table, click on the File / Save command.
- Example: Let's say you have modified a Symbol Table for work with a particular set of projects, and have saved this library as "my_symbols.sym". Then you discover that you need to add some of the symbols contained in the RockWare factory Symbol Table, specifically symbols 1 - 10. Your current symbol table's first available space is number 20. Simply click on the Import button, enter "rw_sym.sym" as the Move from file name, enter 1 and 10 for the Move from symbols and enter "20" for the Move to number. The blank spaces starting at #20 will now be filled with the factory symbols #1 - #10.
- To create a printable index to the current Table:
- With the desired Symbol Table displayed in the Select Symbol window, click on the Create Printable Index button.
- Symbols per row: Enter the number of symbols to plot in each row of the index.
- Skip Empty Symbols (recommended): Check this to omit any blank symbol spaces from the index.
- Printer Setup: Click this button to select the printer to which the index is to be sent. The list will be pulled from the printers installed on your computer.
- Click the Print button.
- The program will output the index to the selected printer.
- To access the Symbol Editor:
- In the Select Symbol window, click on the symbol design you wish to edit, or choose an empty design box to create a new symbol.
- Click on the Edit button.
- The program will display the selected symbol in the Symbol Editor.

RockWare home page