RockPlot3D | File | Export | KMZ (Google Earth)

Use this program to save the current 3D diagram as a Google Earth KMZ file. You can request automatic-loading of the output into Google Earth. You can adjust vertical placement, vertical exaggeration, and lighting.
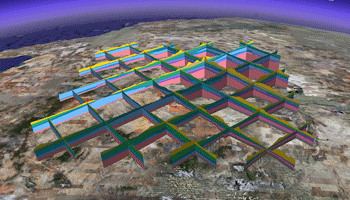
- The Google Earth 3D Export program is limited to objects that can be converted to triangles. As a consequence, lines, polylines, and other non-triangle-convertible objects will not appear within Google Earth.
- If your current 3D scene contains no coordinate system information, as might result from opening older-version scenes or from importing data from external sources, you'll need to assign this via the View | Dimensions menu option before exporting.
- 3D logs can be outrageously slow to stream into Google Earth.
Menu Options
Step-by-Step Summary
- File Name: Click the small button to the right to enter a name for the KMZ file which will be created.
- Open in Google Earth: Checking this option will cause the program to automatically launch Google Earth and load/display the designated output file, after you click the OK button at the bottom of the window.
- Vertical Position: Google Earth does not offer display of data below the ground surface. As a consequence, all subsurface data must be shifted vertically upwards such that it resides above the ground surface.
- Automatically offset diagram above ground surface: Check this option if you want RockWorks to do this shift automatically.
- Based on Project Dimensions: Select this option if the offset is to be calculated based on the full project extents.
- Based on Scene Dimensions: Select this option if the offset is to be calculated based on the extents of the current scene. (The current scene may be smaller than the entire project.)
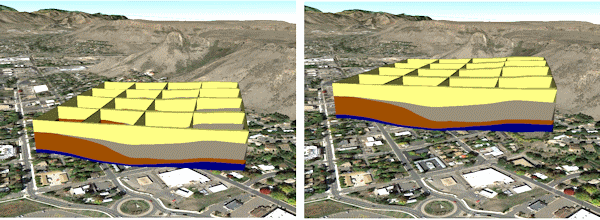
- Offset (meters): If you are working in an area of steep slopes, you may find it beneficial to add an additional shift adjustment. Use this setting to manually type in the offset, in meters, relative to the ground.
If set to zero, the bottom of the diagram will be placed along the ground surface. This is the easiest method for obtaining a quick display. See the left image, below.
If set to a value > zero, the bottom of the diagram will be placed above ground surface. See the right image, below.
If set to a value < zero, the bottom of the diagram will be placed below ground surface and will not be visible.
-
- Vertical Exaggeration: This will affect the horizontal:vertical scaling ratio of the image; the default will be the current vertical exaggeration of the scene as displayed in RockPlot3D.
Using a setting of "1", the height of the object will display at the same scale as the width and depth. At a setting of 2.0, the object will be stretched to twice its original height. At a setting of 0.5 the object will be compressed to half of its original height.
- Lighting
- Include Shading: If unchecked, the diagram will not have any artificial shading and appear flat. Conversely, setting the shading to true will give the diagram a sense of three-dimensional realism. It's a good idea to leave this checked – there's a slight speed penalty associated with shaded objects, but it's worth it from an aesthetic standpoint.
- If necessary, open the RockPlot3D Scene (Rw3D file) you wish to export. (See Opening a RockPlot3D View.)
- Use the RockPlot3D check-boxes to turn on/off the items in the scene which are/are not to be displayed in Google Earth. (Only visible items will be exported.)
- Click the Google Earth button in the upper toolbar, or select the File | Export | Google Earth menu command.
- Enter the requested menu options, described above.
- Click OK to proceed.
The program will build a KMZ file representing the 3D components of your RockPlot3D view.
- It will first apply any scaling multipliers you defined.
- It will then add any designated shift value to the elevations.
- If you requested that the KMZ file be loaded into Google Earth, it will do so at this time.
 Back to Exporting Images

RockWare home page