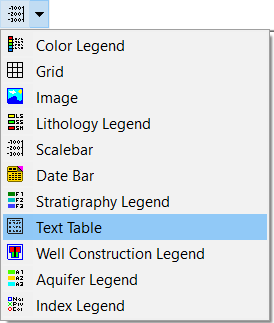
RockPlot2D | Draw | Insert | Text Table
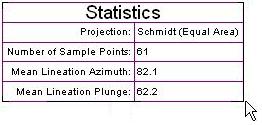
Use the Text Table menu command or toolbar button to insert a row and column table into an existing RockPlot2D image.
- Select the Draw | Insert | Text Table menu item, or click on the Draw | Text Table button at the top of the screen
 .
.
The Text Table button is available in the Draw | Insert drop-down menu.
The program will be in "Draw TextTable" mode, as noted at the bottom of the screen.
- Position the pointer in the graphic window where one corner if the text table is to be located, and click and hold down the left mouse button.
- Drag the cursor diagonally, to draw a rectangular space where the table will be placed.
- When you release the mouse button, the program will display the Text Table Atttibutes window.
- Click on the Text tab to type in the text to be displayed in the table. Click on the Appearance tab to type in a title.
- Establish any other text characteristics that you wish, and click OK to place the text table.
- To turn off the Insert Text Table mode, click the Draw TextTable X button at the bottom of the window, or press the Shift+Escape keys, or click the arrow button
 .
.
- To edit the table's characteristics (caption, labels, etc.),
- Click the Edit button at the top of the window
- Double-click on the Text Table, or right-click on it and choose Properties.
- Adjust the settings. See Text Table Attributes for information.
 Back to Drawing Tools

RockWare home page