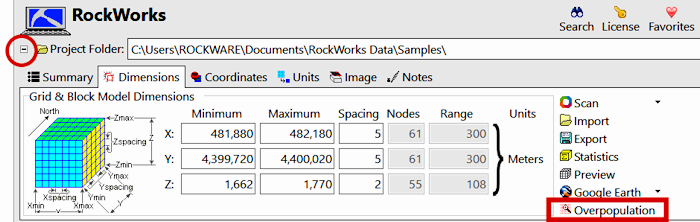
Use the Identify Overpopulated Cells button in the Project Settings | Dimensions pane to generate a report that lists cell nodes (midpoints) that contain more than one borehole. The intent of the program is to assist the user in identifying clusters of boreholes which will affect modeling. With this knowledge you can consider making the cells smaller (smaller spacing values), disabling boreholes, or consolidating the clustered boreholes into a single "composite" borehole.
To access this pane, click on the small button to the left of the project folder name. This toggles between "+" (expanding) and "-" (hiding) the Project Settings tabs.
These options are used to define how you want the population report to be generated.
- RwDat (RockWorks): Click in this button if you want the report generated in a RockWorks datasheet (.RwDat) format.
- Save Output File: Check this box to save the RwDat file on disk when the Process button is clicked.
- Automatic: Click here for the name of the file to be assigned automatically. ("CELLPOPULATIONxx.RwDat")
- Manual: Choose this option to type in a name for the .RwDat file.
- File Name: Click the Browse button to the right to type in the name for the RwDat file.
- Display Output: Check this box to display the RockWare datasheet file.
- New Tab: Click this button to view the RockWorks datasheet file in a new tab in this window.
- Utilities Datasheet: Click this option to view the RockWorks datasheet file in the Utilities datasheet.
- CSV (Excel): Click in this button if you want the report generated in a CSV file format for use in Excel.
- Output File Name
- Automatic: Choose this option for the name of the file to be assigned automatically.
- Manual: Choose this to type in a name for the .csv file.
- File Name: Click the Browse button to the right to type in the name for the .csv file.
- Display: Check this box if you want the .csv file to be loaded automatically into Excel after it is generated.
- TXT (Notepad): Click in this button if you want the report generated in a text (.txt) format.
- Save Output File: Check this box to save the text file on disk when the Process button is clicked.
- Automatic: Click here for the name of the file to be assigned automatically.
- Manual: Click here if you want to type in a name for the .txt file.
- File Name: Click the Browse button to the right to type in the name for the text file.
- Text Output Options
- Column Delimiter: Click here to select the character (tab, space, etc.) to be used to separate columns of values in the text file.
- Include Column Titles and Units: Check this box if any header lines which specify column names and column units should be included in the text file.
- Remove Thousands Separators: Check this box if numbers such as "12,345,678" are to be recorded in the output file as "12345678" (without the commas).
- Enclose Fields with Quotation Marks: Check this if columns are to be enclosed in quotation marks.
- Display Output: Check this box to display the text file.
- New Tab: Click here to view the text file in a new tab in this window.
- New Dialog: Click here to view the text file in a new window.
- Default Program: Click this button to view the text file in the default text editing program on your computer.
- RTF (Word): Click in this button if you want the report generated in an RTF file format for use in Word.
- Output File Name
- Automatic: Choose this option for the name of the file to be assigned automatically.
- Manual: Choose this option to type in a name for the .rtf file.
- File Name: Click the Browse button to the right to type in the name for the .rtf file.
- Display: Check this box if you want the .rtf file to be loaded automatically into Word after it is generated.
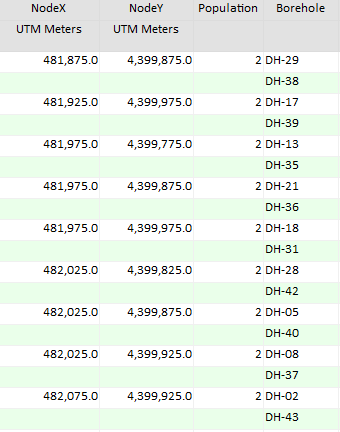
Here's an example of what a report might look like:
 Back to Project Dimensions

RockWare home page