On the next screen you define the borehole where the data is to be imported, and some filtering options.
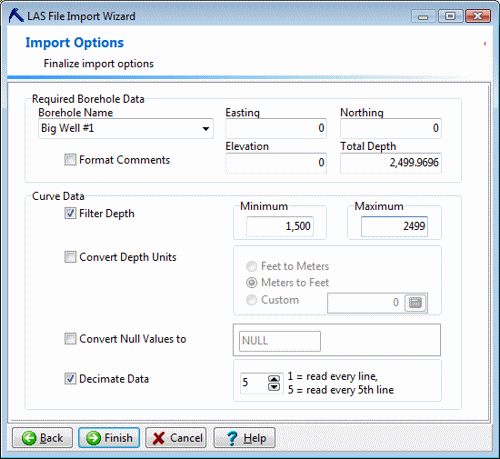
- Borehole Name: Choose the borehole record where the LAS curves are to be imported. The default name will be the well information item mapped to the "Name" field, back in Step 1.
- To create a new well, you can use the default name or type in a preferred name to assign the new record.
- To post the data to an existing borehole, click on the small arrow button and select the borehole name from the drop-down list. This list will display the names of the existing wells in the current project database.
- Other Location Fields: Enter the Easting, Northing, and Elevation information for the well. These fields are required.
- Any defaults displayed here will have come from your work in Step 1 of this import process. For example, you may have requested the LAS "STOP" field be mapped as the Total Depth. If fields are blank, you'll need to fill something in.
- IMPORTANT: If you are appending the LAS data to a well that already exists in the project, and if you want to maintain the established well location information, you should right-click in each field, and choose Read from Database.
! If you don't do this, you may lose your existing well location information.
- If you are creating a new well, the LAS file doesn't have any location information, and you don't know what to enter at this time, you can enter 0. You'll need to be sure to enter well location information after the LAS import is complete.
- You can type in any of the well location information, if you know it.
- Format Comments: If the LAS file contains a Parameter/Other description block, you can choose whether to format the information (check the box) or pass it untouched (un-check the box). This information is imported into the Location table's Comments field. This option will be dimmed if no description information is present.
- Filter Depth: Insert a check here if you wish to import a subset of the entire depth range represented in the LAS file. If activated you can type in the top and bottom depth to be imported. This filter will apply to all of the curves.
- Convert Depth Units: Insert a check in the Convert box if you want the depth units to be translated from Feet to Meters or Meters to Feet to accommodate your project depth units. You can also enter a customized conversion factor. Click in the appropriate radio button, and, if Custom, type in the value by which the LAS depth units are to be multiplied.
- Convert Null Values: Null values (such as "-999.25") are usually ignored, but you can insert a check here if any null values should be replaced by a specified number, character, etc. They can be replaced by a numeric value (such as 0) or by a blank (just leave the prompt box blank). When RockWorks plots the curves in logs, numeric null-replacements will be plotted at their true value, and blanks will be skipped.
- Decimate Data: Insert a check here if you want to resample the curve data, by depth. This can be helpful if the LAS curves are recorded, for example, at 0.1 foot intervals but you've determined that 1-foot intervals are adequate for your P-Data in RockWorks. If you set this to "2" then every other measurement will be brought in. If you set this to "5" then every 5th measurement will be imported.
! Note that there are also more advanced resampling tools in the P-Data menu (P-Data / Analyze / Resample) should you wish to bring all of the LAS measurements into the database and resample at a later time.
- When you're ready to import the data, click the Finish button. (If you need to check any previous settings, you can click the Back button at any time.)
The program will read the LAS file, import the requested header fields into the Location table (adding optional fields as necessary), import the requested curves into the P-Data table (adding column names as necessary), and any requested survey information into the Orientation table. You'll be returned to the Borehole Manager display.
 Back to Import LAS Files

RockWare home page